Storyworks Junior: #OnlineLearning Tool Extraordinaire

I grew up getting “Highlights” in the mail. All I remember doing was circling the stuff where two seemingly identical pictures varied. I never read anything from any of the magazines. Storyworks Junior is very different! 

Screen Shot 2020-05-07 at 8.14.50 AM.png
You can make your own games out of text. #STEAM Tweet shows Polite Pirates connecting to text

First of all, there isn’t any coloring or games. But, that does’t mean they aren’t fun. On the contrary, the articles and literature within each bimonthly magazine is more intellectually engaging than anything else I’ve witnessed. A traditional paper magazine arrives in my teacher mailbox every other month with a four page educator outline of the periodical. The outline gives overviews of the magazine’s stories, skills, and online tools that are available. 

Storyworks Junior is not that old. It began four years ago, as an offshoot of the Storyworks magazine for 4th, 5th, and older grades. This “Junior” version covers the same type of material as the original, but is tailored for ages 7 – 10 (third grade and advanced second graders). 

The magazine is perfect for the young minds that I teach because it has just the right amount of information. Each issue starts off with a literary appetizer that looks like the kid version of something you’d find in Time. Some favorites are about “The Best Pet,” “Why Do Animals Have Tails,” and more recently “The Fattest Bear In Alaska.” These two page articles have minimal text, contain funny ideas, and provide interesting pictures to get you thinking. It takes five minutes to read these pages, but a creative educator could spend a week right here! 

Every issue has a feature story that is nonfiction. These usually come from the editor, Lauren Tarshis, author of the “I Survived” series. This report was supposed to be about an online resource, and so far I haven’t even mentioned the powerful online component Screen Shot 2020-05-07 at 7.49.42 AMof this incredible magazine! Well, buckle up, because here is where Storyworks Junior shines. I used to think that you have to read a book, before watching its cinematic rendition. If you witness the movie, the ending of the story will be ruined! Storyworks Junior, along with some accompanying research has changed this mentality for me. The featured story for each magazine has a video that you show before the students read it. This video is accessed through the StoryworksJr.com website. It not only has the story read to you by the actual author, but there are images and video that help kids visualize the text. One of my favorites was the story about the revolutionary war. The video had tasteful battle recreation scenes that made the story’s setting come to life, without being too scary for little kids. How do you do that with words? 

Screen Shot 2020-05-07 at 8.12.44 AM.png“Does the video give away the ending of the story?” you may wonder. While it does answer the burning question of whether the main character survived, more than that, it gives students a mental literary road map for when they read the story on their own. They know what to expect. The video shows some of the text as it is being read, in between dramatizations of the story. Also, it provides vocabulary words with definitions in the middle of the screen when they are mentioned in the text. 

If you stop to think about it, nothing is lost because the title gives away the answer, anyway: “I Survived.” You read and watch to find out what kind of hardships the kid survived.

Screen Shot 2020-05-07 at 7.54.59 AM.png
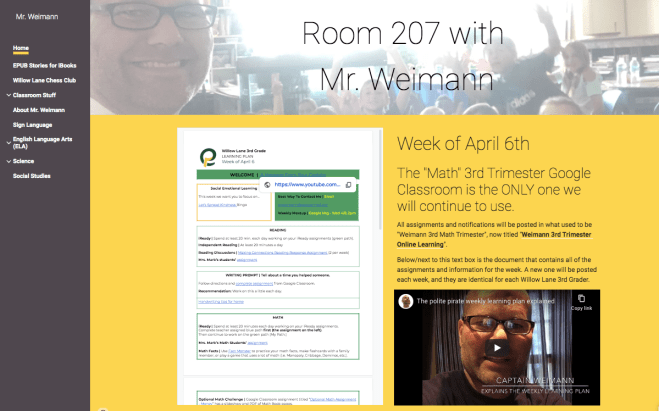
The video isn’t the only online tool that Storyworks Junior provides. Every feature story comes in a variety of differentiated versions for beginners, intermediate, and advanced readers. And, don’t forget about those English as a Second Language readers! There is a text for them, too. These texts, along with vocabulary slideshows, worksheet packets, and quizzes, all made by Scholastic, can be shared via the Google classroom. Before Coronavirus imprisoned everyone at home, I used to print some of these packets for kids to fill in while reading/listening to the story. Then I’d let the kids use their work to take the quizzes that I nearly always altered a little. You can easily do this because the quizzes are Google forms.

Screen Shot 2020-05-07 at 8.17.43 AM.png
You can seamlessly assign StoryworksJr resources through Google classroom or provide PDF versions for printing.

Screen Shot 2020-05-07 at 7.36.18 AM.pngLet me backup a little. One thing that I love about assigning the Storyworks Junior magazine work online is that students can listen to the text. Scholastic knows the power of audio, so they have made every version of the story available in “Text to Speech” mode.

But, if you turn “Speech” on in the “Accessibility” section of the settings on your iPad, every single text from a screen can be read to students. When I type my own questions and information into quizzes in Google Forms, I can have students listen to the questions, explanations, and instructions. My aim with online learning is for kids to be able to do their work independently. I don’t want parents to be bogged down with reading or explaining things to their children. Between text to speech and in turn students using “Speech to Text” to type, I rest assured that my Polite Pirates have the tools in their hands to communicate their thinking to me.

There are many educators connecting and chatting online about Storyworks Junior articles and teaching tools. You could join the Facebook group or tag them on Twitter. Use #StoryworksJr to share information. 


Communication During Online Learning

Anyone finding it tricky to communicate effectively with students and families during this 100% online learning experience?

A friend of mine uses Seesaw to share information with parents and students. This teacher is able to send blasts to her class with realtime, to-the-second info about things like Google meeting times and links, as well as clarification on Google classroom assignments. These same kiddos and parents have direct access to their teacher to ask questions and request explanations at any time of the day. This could be overwhelming at both ends of the communique, which leads me to wonder…

What is the ideal style of communication between Teacher and Class during Online Learning?

Seesaw isn’t the only app that fosters direct communication between parents and teachers. The Bloomz app is another powerful tool for connecting educators with homes. These social-media-style apps require logins, so they are safe for sharing personal information. This allows teachers to feel safe posting pictures of students, including names, and providing school information that would otherwise be too revealing on an open social media platform like Facebook or Twitter. Can the app be too social, though?

When group messages are posted, and parents “Thanks” and “Thumbs up” the message, each response goes to everyone. If you have “notifications turned on” on your phone or device, it dings over and over… Then families end up turning off the notifications and end up missing valuable information.

Classdojo is an app that I have used in the classroom. This one allows teachers to not only share information with homes, but educators can provide instant feedback concerning classroom behavior. With the proper settings and notifications, parents can be notified as to how their kid is doing throughout the day in a realtime way. Pictures, videos, and messages can also be communicated. Personally, I found that I was tied to the app, constantly looking for student icons to add information to, rather than actually addressing my students.

Additionally, when I used Classdojo, but this could be applied to any of these and other apps, families became accustomed to and dependent on the reporting. Teachers can become captives to communication!

Screen Shot 2020-04-16 at 8.16.25 AM
I’ve embedded a “Learning Plan” full of activities for the week into my classroom website. I try to “Link” as many items as possible to lessen the amount of “Searching.”

And, what about those families who are seemingly unreachable? Teachers collect all kinds of information at the beginning of the year; email addresses, phone numbers, best way(s) to communicate, etc. I’ve emailed, made phone calls, and texted. I want to respect people’s privacy, and not force my teaching onto their family life, but also make the educational experience reachable. I view my attempts at contact as throwing a pedagogical rope. If a family wants or needs some time to itself, they need not grab the string. It is there for them, though.

Screen Shot 2020-04-16 at 8.16.51 AM
I supplied videos and Google slideshows through the classroom website, as well.
Screen Shot 2020-04-14 at 8.37.04 AM
I love that this family got this assignment the way they knew how!

I have chosen to use a Google classroom to provide my online teaching. Because my school district uses Google and all of my students have Google accounts and are versed in Google apps, it was a no brainer. There are other platforms, but I imagine they behave similarly: Educators can post assignments, leave feedback, make announcements, and share links through an app that looks and behaves much like a social media platform. There is a “stream” of activity that teacher and students can scroll through to find things. Items are listed chronologically. Like the other apps, Google classroom provides the opportunity for families to be “notified” when there is app activity; when teachers post things to the classroom.

We return to my original question: What is the best communication between educators and families?

Too much could turn off families, causing them to literally “turn off” notifications. Not enough, and families will not be trained to depend on or look to the platform for updated information/assignments.

Composing this blog from an educator’s perspective, I am finding it difficult to locate my students’ work. In the physical classroom, I’d model and explain instructions to my whole-group of Polite Pirates (students) before posting a Google slideshow to the online classroom for them to engage with. Everyone heard the same message, and I was even available in person to aid students who needed guidance. Now that we are completely online, I am finding myself making movies to reiterate expectations. Luckily, I was able to train my class in the usage of the Google classroom before we were locked out of the school building!

Screen Shot 2020-04-16 at 6.52.24 AM
The flag next to the slide indicates there is a comment attached to it. The yellow box shows what the comment is attached to.

Here is a frustrating situation: I post an “Optional” assignment in the Google classroom. It is a Google slideshow that students can interact with; A copy was produced for each student. Because it is optional, students don’t have to do it. Do I have to check them all? I ought to honor the work of anyone willing to put in this extra effort! I have devised a system that could help me, and empower student work to be found for feedback. Simply tell me that you did the optional work in a comment with in the Google classroom. Additionally, in a slideshow made up of many slides, leave a comment on the slide that you worked on. In this way, students will be “flagging” their work. These comments are hands in the air saying, “Look over here; I did some work I want you to look at.”

I like the idea of “Less is More,” shared by iTeach:iMother on March 24th, 2020.

I am going to share this idea with my parents and pirates today. We’ll see how it works. What are some tips and tricks that you have used to streamline communication during this online learning experience? How can the connection between educator and pupil homes be made tight, clear, unhindered, unobtrusive, and most helpful? I’d love to hear from parents, teachers, administrators, app developers, and more! Comment below, and let’s make this out-of-school schooling as productive and beneficial as possible!

Not All Online Learning Is Created Equal

IMG_6437
Scarlet is a pro when it comes to imaginative play. 

Along with every other kid in the world, my 8 year old daughter Scarlet is experiencing at home, online learning during the “Stay at Home” novel Coronavirus Pandemic. She is receiving daily assignments of online activities. As I’ve been witnessing hers and preparing my own, I am evaluating what makes the most effective distance learning tools.

Recently, Scarlet was asked to log into a math website and complete a task geared toward teaching coin-counting. This cartoon animation had her making 25 cents with nickels and dimes. 

I try to let Scarlet do her online learning with as little distraction as possible, but this got to be too much for me! She was dragging coins to a spot on the screen until she accumulated 25 cents, and then it would celebrate her accomplishment with a silly jingle. I felt like my daughter was turning into a chimpanzee. 

IMG_6461I closed the device she was using and drew a grid. “I’m going to teach you a homonym; a multiple-meaning word,” I told her. “This is a table; not the kind you eat on. You use this to make sense of numbers.” 

We made a few tables with varying totals and different coins available. She made many different combinations of coins to show the same amount.

IMG_2567
Manipulatives help kids visualize math. 

While filling in a row of varying coins totaling a dollar, Scarlet made a slight mistake. The table already had one half dollar and one quarter. She wrote “5” in the nickels column which made me happy, but then she wrote “2” in the dimes space. I knew what had happened. She equated the value of one nickel with the number to be written in the field. No biggie. As it turned out, we happened to have toy coins that I had dug out of the closet. I presented the actual coinage on the carpet. Scarlet almost didn’t let me get out all five nickels, having realized her mistake. 

IMG_6466
If/Then problem solving; Cause & Effect relationships

Eventually, I made some puzzles where I would fill in certain coin fields and have Scarlet solve the missing number. “If you are making one dollar out of pennies, nickels, and dimes, and you have 8 dimes & 3 nickels, how many pennies will you have?” Not only did Scarlet solve the problem easily, but when I asked her to describe what she had done in her head, she walked me through her thinking


Thinking.


This is what was missing from the chimpanzee-producing online practice. The software allowed Scarlet to drop coins onto a spot on the screen and either rewarded her with a jingle or delivered a negative noise. It was up to Scarlet to figure out what worked best for getting the jingle to happen: Pull the lever to get the banana. 

IMG_3130
Follow Up Blog: “How Coding Can Be Taught Through Solving An Empty Field In A Math Table”

I’ve witnessed software programs that stop a kid after a few wrong answers and reteach a concept before allowing the student to continue an activity. Another way to check for thinking is having students type or video-record their reasoning for an answer. Then the educator can interact with the thinking, praising accurate steps, guiding ideas, and correcting missteps. 

The closer to simulating the tailored responses of a human teacher an online program can produce, the more thinking it will stimulate in the student. How can you make a program applicable to the most practitioners, while simultaneously being tailored to the most personalized outcomes/answers?

Pedagogical Easter Eggs

Screen Shot 2020-01-24 at 6.25.20 AM.png
Search “Easter Egg” on Youtube.

If you search “Easter Eggs” in youtube, you might get some videos of kids running around a field, but more likely your server will be flooded with videos of people sharing stuff that is seemingly hidden in movies. When I was a kid, I remember people going crazy about seeing ghosts mysteriously appear in a few frames of a movie. Supposedly, you weren’t intended to see this, which made it all the more creepy!

Easter eggs are different, in that they are apparently purposefully hidden by directors, illustrators, etc so that cult-like movie-watchers will find them. Could this just be an excuse for watching a well-liked film an otherwise abnormal number of times? Perhaps. And, maybe the producers of these films are aiming to foster this kind of multi-watching phenomena. 

Interestingly, the term may have come from one of the most cult-producing movies of all time: “The Rocky Horror Picture Show”. According to Urban Dictionary, the guests/prisoners of an alien home participate in a completely random Easter Egg hunt. When the characters fail to find many of the hidden eggs, they appear later on throughout the movie. Viewers enjoy looking for the literal Easter Eggs, which spurred the use of the term for hidden items in films. 

IMG_5411.JPG
It was a “BowtieTuesday” when I taught this lesson.

Easter Eggs in Teaching

The reason all of this came to mind is that I was teaching a lesson that had Easter Eggs in it, and I thought this was a neat pedagogy to explore. What if teachers purposefully hid learning experiences inside lessons, so that students would have to go back and find them? 

My school district is working hard to introduce computer science in elementary school. We used a grant to buy some SpheroEdu kits. A team of teachers was formed. Instructors were brought in to train us in the world of coding. We brainstormed and planned how we might share this information with our district’s students. Each of the teachers on this “tech team” tried out the lessons in our own classrooms, and now we are sharing them with all of the 4th and 5th grade students of the district.

I just taught lesson 1; This is the one that had the Easter Egg. The tech team built a slideshow in the Pages app that could function as an independent or whole-group teaching tool. The “pages” (slides) walk students through some instructions on how to use Pages, what is expected, and how to complete the lesson. We chose to use the Pages app, because it forces students to learn a tool on their iPad that they may not be familiar with. Also, it has an easy to use drawing tool. 

IMG_2777.JPG
Students practice using Sequencing Commands

The lesson requires students to move some images, arranging them on a grid. Paired kids, sitting back to back, take turns using “Sequencing Commands” (the object of the lesson) to get their partners to draw a path on an empty grid. Once done, the two partners compare their screens. Would the path land on the squares that images are resting on? They are to take screenshots of their work and a picture of their partner’s grid. This way, they can put the two images side by side to evaluate accuracy. Part of their reflection is to analyze what could have helped them use fewer commands. Also, is there a better route for collecting the images?

Easter Egg Time

As it turned out, moving the images was not exactly easy. It works well to first tap the image, and then touching the very middle of it, you drag it onto the grid. If you don’t get the middle, you’ll enlarge it. “Undo” is our best friend!Screen Shot 2020-01-25 at 7.20.34 AM.png

If kids click on the text that is near the images, it becomes “active” and covers the images. When this occurs, there is no way to get to the images to move them! Oh no!!! 

Here is your Easter Egg for the lesson: Students must “Unlock” the text box. Then they can “Arrange” the order of objects, placing the text box behind the images. Now, the image may be accessed again. Screen Shot 2020-01-25 at 7.25.38 AM.png

Questions for student reflection:

  1. Why would you want to “Lock” an object or text box? 
  2. Why is it important to know how to “Arrange” the order of items on a page? 

Impressive Learning

This Easter Egg was only found because a student let go of an image too soon. He was getting ready to drag an image up to the grid, but stopped right over the text box. Oops! When he couldn’t figure out how to get to the image, he brought his iPad to me, and we worked on gaining access, again. I then showed the classroom STEM teacher whom I was partnering with on the lesson. I wanted him to know how to remedy this kind of problem if it came up again. 

Something that struck me in that moment was the idea of teachers thinking that they have to have all of the wrinkles ironed out before doing a lesson. Guess what. More often than not, you will create a new wrinkle when you carefully iron out a potential problem. Perhaps locking that text box was thought to help students grab the images and not the text box. But, it ended up covering the image and preventing us from getting to it!

I thought of a way to remedy this for future lessons: make the text part of an image, along with the grid, that is the background for the slide. Then images cannot go behind it. But, then again…

Nooooooooo! Don’t fix it at all! Leave it as is, and even show earlier finishers of the lesson this problem. Here is an Easter Egg in the lesson. See if you can figure out how to solve the problem. Then these kiddos could help anyone who comes across this problem in the future. 

I leave you with this: How can you build Easter Eggs into your lessons? How could you purposefully plan problems that students may not find, but that could give them something to chew on, enriching the learning experience? 

Happy Easter… All year round!Screen Shot 2020-01-25 at 6.21.57 AM.png

Mission Impossible: The Engineering Process with SpheroEDU

IMG_8638
Is your “mission” to get kids excited about learning, or is it testing?

“I have a math test to give you, but I thought we could program some Spheros instead,” I said Friday morning to applause from the Polite Pirates of Room 207. Students’ cheers gave way to music… Mission Impossible Theme Music! 

“Your mission, should you choose to accept it… And, you’re going to want to accept it… is to rescue people from certain peril,” I proposed. With everyone on the carpet, I explained that before a rescue, engineers would set up models that they could use to plan out their efforts to minimize loss of equipment and life. Their mission was to program Spheros to make it through a model of obstacles, getting to someone or group of people who needed help. The Sphero couldn’t stray from the path or touch the walls because it would be damaged and not be able to complete its mission. 

Screen Shot 2019-11-09 at 7.19.04 AM
I walked them through what they would experience.

The students were riveted to my instruction as I taught the “Engineering Process” that they would need to use while figuring out the most effective code for completing their rescue. This was the real reason for the lesson, but simultaneously they would get so much more out of learning/practicing coding, problem-solving, and working together in a team. 

I went over each scenario, pointing out the “criteria” and the “constraints”, two vocabulary words from the “Engineering Process” model from Foss Science. Students whispered with neighbors about which they were more interested in trying. I told them that if they mastered one, they may move onto another “Mission”. 

Students then returned to their seats to get out their math spiral notebooks for taking notes about how they used the “Engineering Process” while solving their missions. They opened the Google slideshow that had all of the missions, as well as an image with the Engineering Process in it. I had “made a copy for each student” through Google classroom. 

I pulled popsicle sticks with student numbers on them to pair kids. As numbers were drawn, pairs came to the carpet to redeem their Sphero robot. Then they chose whatever mission fancied them most. With two pairs per mission, the class was a buzz of engineering within moments.

IMG_8633
“The Medic was difficult, but a lot of fun,” one student told me as I circulated the room.

 No one got to complete more than one mission, and most did not completely finish every parameter I had set for them, but every single student was 100% engaged in a learning activity full of purpose. 

IMG_8622
The problem-Solving was explosive!

I want to back up to the beginning of the day, before I tell you how this memorable lesson came to a close. Students entered my room to find me painting posters. They asked what I was doing. Because I didn’t know exactly what to call it, I didn’t give them a straight answer. That drove them crazy. They asked to help. “Sure,” I answered, getting out more paint brushes, cups and paints. All I had to do was outline things, and kids would fill in. When I told them that the white was snow or that the red was fire, it fueled their curiosity all the more! Dave Burgess calls this “Preheating the Grill” (Teach Like a Pirate, 2012). My students were so hooked on this upcoming lesson, they hardly wanted to go to gym! Have you ever heard of such a thing? 

While students were at their special, I made some finishing touches and turned a fan on to help the paint dry quickly. Then I came up with names, stories, and varying parameters for each mission. I took pictures of the maps, typed up the scenarios, and threw together a slideshow to share with the class.  

Back to the lesson. Throughout the “Engineering Process”, while students were working on coding Spheros, I stopped everyone a couple of times to instruct them to take screenshots of their code. That way they could have snapshots of different levels of success. It would help them describe their problem-solving, later. Finally, I put together a Flipgrid for students to make selfie-videos describing how they used the “Engineering Process” to solve (or come close to solving) their mission. If they finished, they could watch their peers’ videos and comment. 

IMG_4422
I didn’t even realize that this was National STEM day! (November 8th, 2019)

We DID take the math test, but in the afternoon. They did fine. I’m sure they will remember that forever;) 

Monsters Inc SpheroEDU Lesson

If you are a teacher and you are alive, you have heard about the importance of teaching computer science to students. “Code, code, code!” is shouted from the pedagogical rooftops.

Don’t hate me, but I haven’t been excited about this concept. I tried Scratch many years ago, but between wrestling with the failing tech in my school’s computer lab and less than perfect early-in-teaching-career classroom management of 8 year olds, I was unimpressed with the outcome of learning. I scratched my Scratch plans. 

Over the years, I’ve grown increasingly comfortable with integrating creative use of technology in my lessons and classroom. We make movies, video games, and are Google gurus! But, still no coding. 

Until…

Sphero rolled into my pedagogical practice. My school district is training teachers to roll out a computer science program, and I was chosen with several others to pilate some lessons. Among other things, we will be using SpheroEDU to share the coding experience with the students of East Penn. Spheros are exactly that; balls. They have mechanical parts inside of them that follow the commands that you input in an app on a device. They can roll, turn different colors, and make sounds. (Although the sounds come from the device, not the actual robot.)

When my teacher friends and I were initially introduced to the Sphero robots we were instructed to try to get it to do some tasks. We used a variety of coding methods and tried out several styles of lesson genres. It was fun, but I wasn’t completely hooked, yet. 

A recent get together of this team was assembled to begin creating lessons that would introduce and begin teaching coding to the 4th & 5th graders of East Penn. We were to come up with 3 lessons. A brainstorming session was followed by some discussion and voting. In the talk a theme emerged where we would introduce a narrative of insect study to the students. They were all going to experience the joys and difficulties of entomologists. The students would get their robots to study insects and eradicate invasive bugs: Debug. (One of our lessons is to clean up code of problems.) Notice how the targeted study focuses on a positive term for the animals: Insects, while the animals that are a problem (Spotted Lantern Flies have become a nuisance around Pennsylvania) are labeled negatively. Also, an obvious dual purpose of the storyline is to reinforce the necessity of clean coding, devoid of bugs. IMG_2721

This idea of purpose-driven instruction helped me see the coding lesson in a new light. Rather than tell my students to get the robot to make a square or go from an arbitrary point A to a pointless point B, I would be helping kids learn how to tackle real world problems. 

With new inspiration and vigor, I returned  to my third grade classroom where a case-full of unused Spheros sat in the corner. Let’s get to work, I thought, as I tore poster paper, uncapped markers, opened up bags of cups, and pulled out piles of pipecleaners. It was the day before Halloween, and an idea hit me: Monsters Inc. I would make grids with a door in one square and a kid sleeping in another. Students would dress up cups to look like monsters. These cups would float on top of a programed Sphero robot. They would need to get from the door to the bed and back to the door again. Also, the Sphero would need to create a scary sound. (This was attempted after figuring out the code for travel.)

Prior to the lesson, I got out all of the supplies. I made one more poster than I needed for 9 groups of 3 to have their own. Each poster had the door and bed in a different location. I did this incase an outstanding group had solved every coding combination for the map they were initially given. They could try a new one. (Another way of creating challenge would be to place items on the map, like wardrobes or piles of clothing, that the robot  would have to avoid.) 

To begin the lesson I placed one poster on the board to show students. I explained that they would be “playing” Monsters Inc. They were going to get monsters to go from the door to the sleeping child. Most students were familiar with the concept from the popular movie. I explained that the monster world was powered by an electricity that ran on the screams of kids. In the movie, monsters were trained and worked hard at sneaking into bedrooms and scaring children. I reminded everyone that it was important that the monster get back to the door, so that it could get back to the monster world. Otherwise it would be trapped in the human-parallel universe! “Aaaaahhh!”

IMG_6015
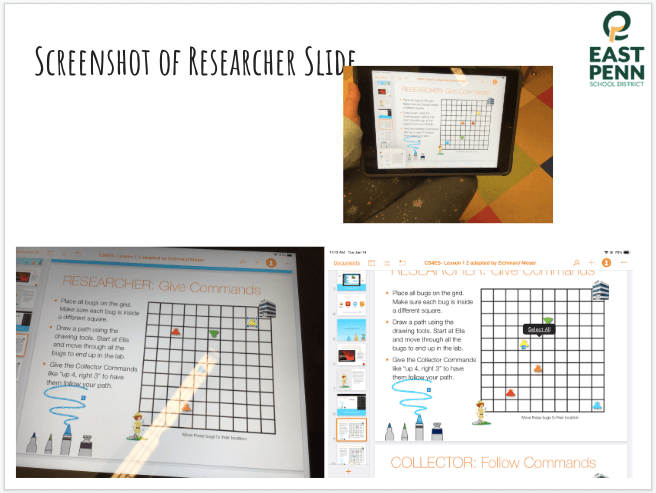
Before leaving the carpet, I showed the students how the block-coding in the Sphero app worked. I drew the “Roll” command on the board with labels explaining/reminding what each bubble was for: Direction, speed, and duration (time).

While student groups decorated their cup/monsters with pipe cleaners, I had one kid at a time get a robot. Teams were separated around the room. The only parameter was for student groups to try to keep the robot on the paper. Needless to say, there were varying levels of success. One group figured out how to introduce changing the light of the Sphero. I didn’t bother telling them that the sleeping child (drawn on the paper) might not see the light change under the monster cup;) I was happy for the intrigue-guided discovery! 

I only had to get everyone’s attention once or twice. One time I wanted to mention only changing one variable at a time when adjusting the rolling command: Rather than changing both speed and duration, just alter one or the other. After giving the change a try, make another adjustment. Keep going until the movement is just right. After I witnessed one group make the discovery that you should “Aim” the robot before placing the cup over it, I shared that with everyone, adding that they must “practice-run” the Sphero with the cup, because the drag of the “monster” might affect its movement.

The whole experience was a smashing success. Everyone wanted to keep working on it, but recess time dragged us all outside. We put everything away, until the next day. 

The morning of Halloween, I had students get the Spheros out again. This time, I wanted to know exactly what they were coming up with. Students did not have to use a “monster”. (Because having a Sphero roll up to you, while you are sleeping and growl, was scary enough;) I put together a slideshow that I pushed out through Google classroom, much like I did recently with the Plural Noun BloxelsEDU maze video game lesson. Students were to take screenshots of their successful codes that got the Sphero from the door to the bed and back to the door. The screenshots were then imported into the slideshow for me to view. 

The room erupted in coding. 

Students nearly lost their minds when, halfway through the experience, I showed them that they could get the Sphero to say anything you typed into a speech command. From that time forward, “Hey, kid, aren’t you scared!” was heard, among other ridiculous phrases, uttered in a robotic, honestly less-than-scary voice, all over the room. It was both hilarious and exciting.

Again, recess, and then a costume parade, ruined our robotic fun:) 

The takeaway lesson for me was the creation of a narrative, giving coding a storyline, helped me present the tasks in a way that gave meaning and purpose. The plot of Monsters Inc provided the jolt of electricity that animated the previously lifeless lesson. What have you used to give life to your lessons?

via GIPHY

Assessment With Purpose

Ooooh
How many assessments have this reaction?

What was the most successful lesson you ever taught? Why was it so good? How do you measure its success?

I’ve recently been reading a classic on motivation: “Drive: The surprising truth about what motivates us” by Daniel Pink (2009). In part three Pink gets into the DNA of motivation; purpose. You can focus on intrinsic and dress up extrinsic all you want, but if your activity lacks a deep purpose, it will fall flat.

Last week I was interested in wrapping up a small unit on plural nouns. How could I close it out? There is the old-school paper method, where I plop a worksheet in front of them with a list of singular nouns the students must make plural. I could make a Google form full of questions. That would only substitute the paper. What was something I could have students do that would be more purposeful.

BloxelsEDU is an app that is free to download and use. You have to purchase an account

IMG_2367
Introductory Instructions

to build games. But, with one account, I can make many games that can be published to an online “Arcade” for my students to use. I have been taking a course through PD Campus, created and taught by Ken Ehrmann, where I have learned how to use this creative tool to engage my students in meaningful critical thinking.

To assess proficiency in making nouns plural in a super fun way, I decided to make a video game. I was interested in building into the game an element of reteaching. Additionally, the video game could show students some new elements of gaming design. (We have been working on crafting our own personal video games in class; I got accounts for all of my students through my PD Campus course–I highly recommend this professional development/grad-level class.)

IMG_8471
This student just got to the end of the maze!

The game would be a maze. The students’ purpose was to get to the end. What do you get when you get to the end of a maze? A feeling of accomplishment; I don’t have to tell you that this feeling is way better than completing and turning in a worksheet or filling in a Google form!

Here’s how I made it. I created a template frame within BloxelsEDU game builder platform that provided a few options of changing directions, so that students would be presented with having to make decisions on what way to continue traveling. I made sure that there were openings on the sides, top, and bottom that lined up with opposite sides, etc. Then I copied and pasted the template, over and over, making a huge waffle of terrain for video game characters to hop and run through. Next, I used coin blocks to select the direction that I would have the character travel. I replaced terrain blocks with yellow coin blocks in one direction choice at each stop throughout some of my maze waffle. From time to time I stopped and played the game, because some of the decision rewards came dangerously close to others. I wanted to be sure that the weaving back and forth would work and not cause a player to backtrack. 

After deciding on a place to end the maze, I went back and put red hazard blocks and purple, moving enemy blocks in the paths that would NOT be the correct decision. In other words, a student would be presented with a question that had 3 choices, one of which would immediately reward them with coins, and two that would harm the character, taking away hearts. At this point in the game development I could still view all of the different colors. 

over here
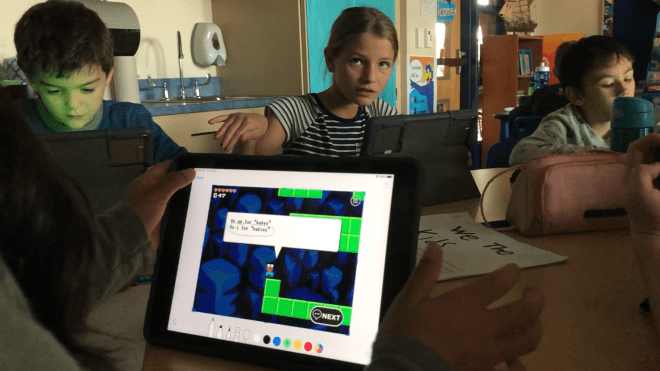
Before disguising the blocks, I first created all of the questions and answers that would guide students through the maze. I varied the nouns and the way they were presented. Some questions had fill in the blanks, while others presented a singular noun, but asked what the plural version would be. After planting all of the questions and directions, I played the game, to make sure that the player would not have any hangups. This showed me places where I ought to spread out the path of the maze. There were places where it folded too close to itself. I didn’t want players to accidentally skip questions by stumbling into the correct channel through a mishap. 

Once the path was complete, it was time to dress up the game. I made a fake green block in the “Art Builder” of BloxelsEDU. This block was brought into my Plural Noun Maze to disguise all of the yellow coins, red hazzards, and purple enemies. I also hid some life-giving hearts with the fake green blocks. Another block that I made in Art Builder was a “transparent” block. I saved a square of nothing; containing no color at all. This I used to disguise the word blocks. I didn’t want students to see future word blocks while they were playing the game. They would assume the correct path of the maze. Additionally, I hid some hearts, enemies, and hazards with the transparent block. Come to find out, when I made them invisible, it took their power away. A player can walk right through a transparent hazard, and an invisible enemy really is a ghost. A player would never know it was there! Lastly, I wanted the end of the maze to be on a floating, invisible terrain, but when I turned the green blocks invisible, they may as well truly disappear. The player cannot stand on the transparent terrain. Oh well. 

Now that my maze was complete, it was ready to administer. Before having students play it however, I devised an ingenious plan for monitoring their work. Students would read each question, then take a screenshot of the answers. While the screenshot was still

IMG_2370
The screenshot would show me students’ choice of noun spelling.

available, they would “mark it” up by circling what they thought was the correct spelling of the plural noun. Then they would save the screenshot and travel in the appropriate direction. They would then find out whether they were right or wrong by immediately receiving coins or encountering hazards. I put these instructions in a visible word block at the beginning of the game, along with one that warned students that the maze’s directions were hidden inside invisible blocks. 

Students enjoyed playing the game. They couldn’t help but show me their progress. Many felt the need to point out hidden things that they found, as if I didn’t know they had been placed in the maze! Ha ha.

Finally, when everyone was done, I posted a generic, simple Google slideshow to our Google classroom, making a copy for each student. They populated their individual slideshows with all of their screenshots of the game. I was able to go into Google classroom and access each student’s slideshow to see exactly what they had circled as their answers for spelling plural nouns. I gave kids scores of 1-4 depending on how successful they were on their initial guess. It was funny, because I could see in the screen shot areas where students had accidentally or otherwise already found the coins in the correct direction! The screenshots also betrayed loss of hearts, indicating that students had checked to see where hazards may be. But, I was totally okay with this. The whole idea of the game was for it to be self-correcting. If they figured out what direction they ought to go before looking at the answers and circled the corresponding answer, more power to them. You got it right, one way or another! That’s life!

The lesson, the maze, the assessment… it was all totally awesome, but there is more. Because I shared the game to my BloxelsEDU classroom, in addition to publishing it to the “Arcade”, my students now had access to the game as something that they could alter. They opened it up as a “Remix” and were able to see all of the different tricks to the trade that I had developed. They could learn how to make their own games/mazes, but also simply change mine and put in different questions, totally change the path of the maze… The BloxelEDU world was the limit! And, now you can too! Enjoy.

Pink, D. H. (2009). Drive: The surprising truth about what motivates us. New York, NY: Riverhead Books.

New @BloxelsEDU game: #Arcade no. 26523370 #ThePolitePirates #PluralNouns

It Isn’t “Follow The Leader”

I wasn’t sure what to title this blog. There are many ideas swimming around in my head that I want to share. The title I settled on may seem negative, but I chose it to dispel an idea that could hold people back; This misconception might limit people’s experience on Twitter. And so, I hope to help anyone struggling with the question of “who to follow” by offering a couple ideas.

When “following” someone, I am adding them to the influencers of my Twitter feed. Either I’ve seen something that they produced or due to their profile information, I’m interested in seeing more from this person. Immediately after clicking “Follow”, the person’s info will flood enter my feed. I struck out “flood” because it sounded negative; the new info does not push out other things. It just gets added. You do see it right away, if the person has tweeted recently, which is kinda fun.

Due to the information in the previous paragraph, I sometimes WON’T follow profiles that haven’t tweeted at all or who haven’t tweeted in the past couple years. Often authors will create a Twitter account that just sits there. There are some who tweet all of the time, and some even “Like” and “Reply” to you. @JerryPallotta is one of my favorites. He writes the #WhoWouldWin series that I use to teach my third graders nonfiction research skills.

That being said, I will definitely follow people who are using Twitter the way I like to use Twitter, even if they don’t have large numbers in the way of Tweets, Followers, or Following. Hey, I started at 0, 0, and 0 at one time, also. The people who jump in headfirst and immediately begin replying, connecting, sharing, and engaging with me and my PLN are golden on Twitter. These are my kind of people, and I can’t follow them fast enough!

There are a few exceptions. First of all, you will have your own list of parameters for people you follow. For instance, I enjoy the back and forth on Twitter. Therefore, I target following other educators who will talk TO me. Perhaps you would rather use Twitter as a type of news source. People who chatter away (me) may not be perfect for you; Follow me anyway;) (ha ha) Secondly, following isn’t exactly an artform. People who are highly engaged might have succinct algorithms for following. I find that most do not. I’ll tweet to people who are engaged in conversations with my PLN for weeks before that person follows me, sometimes. Other people and even companies will follow me for seemingly little reason. Thirdly, I have a personal philosophy of following certain people, regardless of Twitter behavior, just because. These people include anyone and everyone from my home school district, Eastpenn. I love that Dylan Peters put together a list that helps me find these people. (Make sure that your information is added to the list if you join later in the game!) Another group of parameter-pushing people I follow are tags my PLN suggests. If someone whom I am in close contact with, as in I communicate with them regularly, lists a bunch of people’s handles and says, “Follow these folks”, I do it, no questions asked. You might not have this rule, but I trust my PLN to give me good suggestions.

For example, I just took a break from writing this to check Twitter. Julia Dweck, my good friend, colleague from Willow Lane Elementary, and Twitterer Extraordinaire had tweeted a picture of students holding a project. She was tweeting #Task5 of the #EPSDTwitterChallenge, so Julia included several handles of Tweeple she follows who she suggests others follow as well. Most of them I already followed, but I was pleased to find that there were a couple whom I could add to my feed. I don’t even hover over or look at profiles of people that my close friends suggest I follow. This makes it easy and fast.

I want to end this blog with its title: “It Isn’t Follow The Leader Perhaps to some the word “Follow” leads to negative feelings; As in, “I don’t want to be a follower of anyone.” Also, when you type follow into the GIF search box, you get pictures of little ducklings “following” their mommy. Who wants to be associated with that? I encourage you to NOT think of it that way. There is no leader on Twitter. When you follow people, you DO lend your support to them, but more importantly, you allow yourself the opportunity to learn from them. Not following people is robbing yourself the ability to grow.

Screen Shot 2019-05-26 at 7.29.54 AM

https://help.twitter.com/en/using-twitter/following-faqs

#ZombieApocalypseRoom207

IMG_3248
The Zombies of Room 207

I am NOT against play.

I wish there were more time for it. And, time is my enemy. I have a lot to teach in a very limited amount of time.

Time is against me in another way, as well: I constantly ask myself, “How will this learning stand the test of time? Why would my students remember any of this?”

One answer to this question:

#ZombieApocalypseRoom207

It was the first day of ELA standardized testing. I still had several math concepts to teach IMG_4199before students took the Math PSSAs (Pennsylvania’s standardized tests for elementary schools).

How would I present math when students’ brains were fried?

Serve them up for Zombie hors devours!

I wonder, now, if it was the metaphor of brain-eating, zombie-creating testing that got me on this kick. Either way, everyone loves a good apocalypse theme… And, I delivered. As soon as I got rid of my PSSA tests and dropped my students off at lunch, I recovered my stowed away phone and went to work.

Screen Shot 2019-05-04 at 6.34.16 AM
Problem from ReadyMath that I revamped with zombie theme

Earlier in the year a student had shown me the app Chatterpix. I used this to snap a pic of our classroom spider and make it talk. This spider, EEKK, named after the way students are supposed to sit on the carpet while pair-sharing; Elbow, Elbow, Knee to Knee; has been hanging out in our third grade classroom since his introduction early in the year. I was moving him every now and again, suggesting that he wanted new vantage points from which to witness students’ good behavior/sharing skills. The students love pretending things are alive, and we had fun with it. When I wasn’t moving him for a while students began grumbling and commenting, so I hid him away. Now, 5 min. away from kids, I took a picture of EEKK who was in a cabinet next to the squirt bottle I use to mist the plants. When students watched the video, they exploded in predictions of where EEKK was hidden!

The message of the video was simple: There are zombies lurking, and we need to learn capacity.

IMG_9030
Pic of 2nd day: Review Gallon Guy and workout perimeter problem

Just as I had predicted, my third grade students didn’t care that a toy spider wasn’t alive; that, if it were, it wouldn’t be able to handle a squirt bottle; or that a tiny squirt bottle of water wouldn’t be enough to fend off zombies! They were thrilled to learn about standard liquid measurement and copy my Gallon Guy drawing from the board. I got out containers, and we discussed capacity. 

The next day, was Tuesday, the second day of standardized ELA testing (PSSAs) in the morning. As per law, I put all electronic devices away, until I had rid my room of PSSA materials. While the students were at lunch, I made a new movie. This time, I got fancier. I took a snapshot of EEKK on red tile and used Apple’s Keynote App to erase all of the red background with Instant Alpha. Then I stuck him on top of a pic of a moat.

Chatterpix was used to make EEKK present a new problem of creating a perimeter to protect the classroom spider from zombies while he rested. He couldn’t be on guard 24/7!

With each passing day, I added increasingly difficult problems to EEKK’s predicament. After digging a moat, EEKK had to fill it with water. If it took him 5 minutes to get one gallon, and each linear foot of moat required two gallons, how long would it take to completely fill the moat? Was this question real-world? Well, minus the zombie theme, yeah, I think so;)

img_1572.jpg
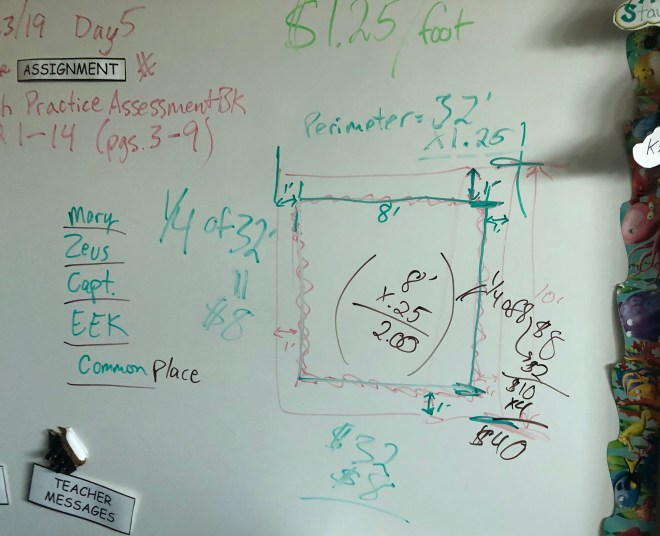
EEKK wasn’t completely secure, surrounded by only a moat. He decided to build a fort on

MW Teaching
I had to review this several times.

the land he had partitioned from the zombie-infected outside. Luckily Amazon was still going strong and available to drone-drop an order of lumber on EEKK’s land square. But, we needed to figure out how much it would cost us. While the outer perimeter of the moat was a 10′ X 10′ square, the moat took up some of the inside space. If the moat was exactly one foot wide all the way around, what would the perimeter of the inner square be? Students needed some perception help with this one. I even had to break out the clay and make a moat to demonstrate the inside square being smaller than the outside one.

Once we figured out the perimeter of the inner square, which would be the length of fence that EEKK would construct, we had to calculate how much this material would cost. Each foot of lumber was going to require $1.25.

The #ZombieApocalypseRoom207 was so much fun that more characters wanted in on the action! Enter the #PolitePirates. Now, #CaptainIronKnee, Mary (pronounced “muh-ree” for a different story), and Zeus want in on EEKK’s pristine perimeter project. They are a little picky, though. They each want their own space. Now, we must figure out how much more  lumber we will need in order to build walls within our fort to partition individual spaces for each of the four inhabitants. Plus, they need a “Common Place” for all of them to eat and converse together; a shared space.

For this part of the project, I had students use the geoboard app on their iPads. They had to make the perimeter of the fort, 8 units by 8 units, with one “rubber band”. Then they could create any size spaces within that for the four characters, leaving an additional, fifth space, for the common space. The only parameter was that all of the corners must

perimeter of 5 spaces
This clever student had the idea of drawing lines on each unit to keep track of counting.

be right angles. (This was so that the linear measurement of perimeter was more accurate. It was enough to figure out the cost and time to construct our forts. I didn’t need to teach the pythagorean theorem on top of everything else!)

Once they designed their fort interiors, they had to figure out how much the materials would cost. “Keeping linear units at the price of $1.25/each, how much money are we looking at spending for your fort?”

One thing that was very difficult to communicate clearly was the fact that you didn’t have to count a unit that functioned as two walls twice: If a room inside the fort shares a wall with the outer perimeter or another room, you only count that structure once. (It is tricky, even, to write about this.)

Self-Reflection: What I would do differently

The apocalypse began in fantastic form. The students loved it. The theme was fun and the problems were challenging and engaging. They quickly became overwhelming, however. There needed to be more teaching. I sat with some struggling students and walked them through the use of geoboard. I had them make the same exact shapes as me, and we figured out the perimeters together. This worked well.

Also, the idea of shared walls was very tricky. Two things could remedy this confusion. Make the parameters so that not walls would be shared, or have kids use popsicle sticks to actually build model forts. I wanted to do this last idea, but Wegmans didn’t have any sticks, and I was out of time. Teams could use clay bases and even fill the moat with water. Manipulative money could be used to “buy” the materials from a Zombie store. Students could earn the money by doing chores or figuring out other problems.


Another lesson-learned: Don’t overdo the theme. I am guilty of this. I tried doing a data lesson using the zombies, and not only did everyone grown, but it didn’t even make that much sense without teaching data-analysis, first. The video is cute, and I’ll use it in the future. Plus, students did love the game of throwing zombies at the school.

Self-Reflection: AWESOMENESS and things to grow

Even though the data lesson was not perfect, it gave us Zombie puppets. I had the students use the puppets for an ELA lesson. They made their own Chatterpix videos where their zombies told stories.

The creativity and open-ended practice was unparalleled.

tricky perimeter
The teaching and creativity seemed endless!

The teaching moments were limitless. I never even got into the cost of carpeting the inside of the fort with different flooring styles! We discussed and figured out area, but it was enough to reteach/learn fractions with four quarters equaling one dollar and division with 12 being broken up into groups of four (quarters) to see the money problem different ways.

drawing
This student began erasing her art because she thought she was in trouble. “NOOOOOOOO!!!” I shouted. She had drawn the Polite Pirates talking over their fort fence with the misunderstood zombies.

And then there is the artwork. In addition to coloring in the zombie puppets, some students drew illustrations for their videos. I had given the class the premise for their zombie stories: The zombies didn’t really want to eat brains. They just wanted to be smart, and they thought that eating brains would help them. The Polite Pirates explained the problem of this misperception to the zombies and everything was fixed. Each student made up his/her own rendition of the story.

The Future of #ZombieApocalypseRoom207

In the future I’d like to incorporate some supplemental reading and ELA components. My friend, Julia Dweck has written a couple of cute kid books about zombies that I would love to incorporate.

Can you recommend others in the comments?

Any other zombie must-dos?

Seamless Simple iMovie Integration

IMG_3324iMovie 1.o

I finally introduced iMovie to my students this past week. We’ve had our iPads since Christmas, but we’ve been busy. Last week my students read text and watched videos about St. Patrick’s Day from a Google slideshow (1). They took notes as they learned.

When they concluded the slideshow/I told them time was up (2), they began making their iMovies. Before opening the app, they acquired four images (3) to import into iMovie. IMG_1218
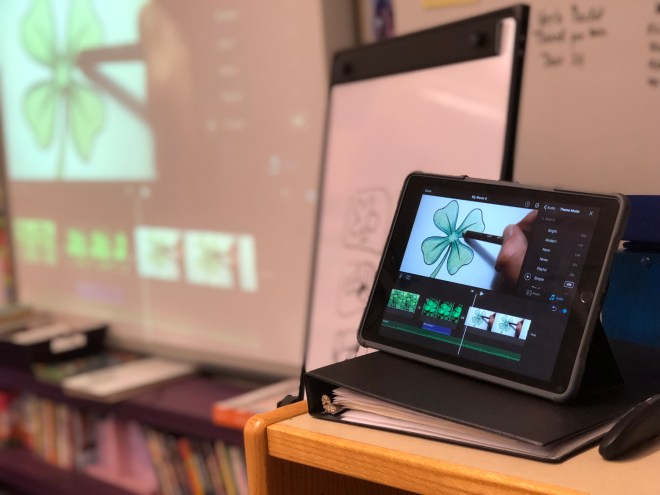
After making the first image a title slide (4) with information about themselves and their project, the students produced voiceovers for each of the remaining three pictures. They recorded themselves reading their notes. To finish off the project, students added background music. “How would the students share these videos with me and each other?” I wondered. Without skipping a cognitive beat, I thought of importing them into Flipgrid. This worked without a hitch. I made a new topic in my classroom Flipgrid, and kids figured out how to import their movies. They loved being able to watch each other’s movies and comment on the pictures and information.

iMovie 2.o

IMG_1298
Mr. Weimann teaching iMovie to a combined rooms 205 and 207

Immediately following the St. Patrick’s Day project, I had my class begin a new iMovie. This one was going to be about how animals communicate. There is a “Photo Essay” in the STORYtown textbook that I frequent for lessons called “How Animals Talk”. The How Animals Talk written responseaccompanying assessment for this text has a written response asking students to explain why it is important for animals to communicate. I thought it would be fun for my students to publish movies about this, rather than simply writing about it. Using pictures would reinforce the nature of the “Photo Essay” genre that STORYtown was presenting.

Building on the introduction to iMovie students just experienced, I added the element of picture in picture (PIP) to students’ production tool knowledge. This time students would have more images, and instead of using voiceover, they would videotape themselves reading a script. This video would be added to their movies as a frame on top of the slideshow of images. Additionally, students would use an iMovie built-in theme: I had them use the News theme because they were reporting on animals. Also, this theme has awesome text graphics! We used the News theme music, as well.

This time students would collect specific images. They had to find pictures that illustrated their animal communicating. There should be three or four per animal. And, students were to report on three or more animals in their movies. The notes about animals “talking” to each other should be written as a script. The script could be typed into an online teleprompter program (5) or app. This is neat because it makes the font big and easy to read, plus moves so kids can keep a reasonable pace. IMG_1236

After students acquire their images and record their videos, they are ready to make their movies. Just like last time, they import all of the pictures, first. They move the pics around, stretch them out, adjust the Ken Burns, if they like. Then students add the theme effects. Next, they insert the PIP. At this point students should include text on some of the images. I had my students provide sources for the information that they shared. They could tell the name of the animal, also. Kids will need to resize and position the PIP so that it doesn’t cover any of the image that is important, and so that it does not get covered by the text.

iMovie 3.o will involve showing students how to fine-tune volume, fading, and generally polishing their productions. I want them to understand the importance of quality before moving on to greater and greater quantity.

iMovie 4.o will teach detaching audio. This is neat, because watching someone talk for too long is boring. You can videotape yourself speaking, and break up the video by inserting pictures, all the while keeping the audio track playing in the background. (It is important to learn all about adjusting volume before this lesson, because when you detach audio iMovie automatically makes it louder.)

Notes:

  1. Obviously, this kind of project could be conducted on any topic. St. Patrick’s Day just happened to be the event that corresponded with me finally being ready to have my students use this tool. The main thing to consider is having the students only wrestle with one thing at a time. I recommend already having information compiled for them. Don’t have them research, conducting all kinds of steps before ever getting to making their iMovie. Then they won’t remember how to make one. My students had a one-stop shop of a trough of info about one topic within the Google slideshow.
  2. I gave them plenty of time, but stopped everyone at the same time, regardless of finishing the slideshow. (Honestly, it had too much information in it, anyway.) This way I could help everyone with iMovie at the same time. They were all on the same page. They could go back to the slideshow to learn more when they finished their movie.
  3. Here is where digital citizenry comes into play. Kids are already familiar with Google Images. Because we are going to be making  movies using the pictures, and we plan to published them, images that are copyrighted are a no go. Kids can use “advanced search” in Google Images to find usable images,
    or Richard Byrne provides a list of 9 websites that have images available for “reuse”:
    https://www.freetech4teachers.com/2011/06/9-places-to-find-creative-commons.html
  4. “Slide”–I called the images in the iMovie app slides because my students are used to Google Slides, and the pics look like lined up slides. “You can stretch each slide so that it takes up more time in your movie, for a longer voiceover. You can rearrange, delete and add more slides. Also, you can add text to your slides.”
  5. A teleprompter program I found through a grad class at Kutztown University is https://cueprompter.com/

IMG_1246