
 iMovie 1.o
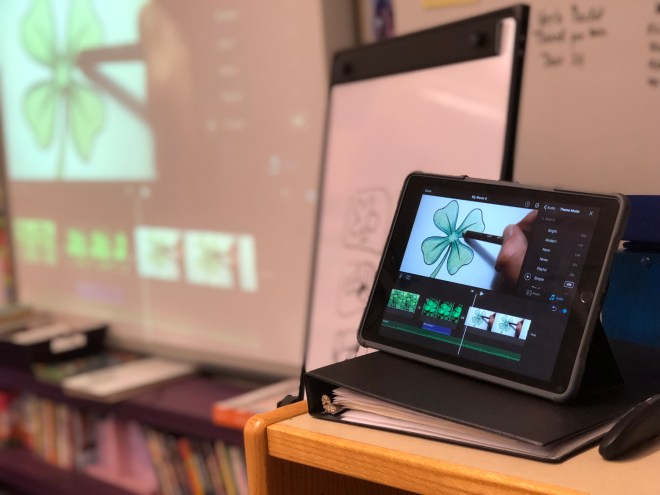
I finally introduced iMovie to my students this past week. We’ve had our iPads since Christmas, but we’ve been busy. Last week my students read text and watched videos about St. Patrick’s Day from a Google slideshow (1). They took notes as they learned.


When they concluded the slideshow/I told them time was up (2), they began making their iMovies. Before opening the app, they acquired four images (3) to import into iMovie.  After making the first image a title slide (4) with information about themselves and their project, the students produced voiceovers for each of the remaining three pictures. They recorded themselves reading their notes. To finish off the project, students added background music. “How would the students share these videos with me and each other?” I wondered. Without skipping a cognitive beat, I thought of importing them into Flipgrid. This worked without a hitch. I made a new topic in my classroom Flipgrid, and kids figured out how to import their movies. They loved being able to watch each other’s movies and comment on the pictures and information.


I wrote on the morning board “Import iMovie into Flipgrid” & provided the code for new grid.
1st Ss asked “how?”
I told her to figure it out.
Not only did they get their videos uploaded without a hitch, they figured out how to include their famously funny selfies. pic.twitter.com/DIICrpnQcF— Matthew Weimann (@MrWeimann) March 19, 2019
iMovie 2.o

Immediately following the St. Patrick’s Day project, I had my class begin a new iMovie. This one was going to be about how animals communicate. There is a “Photo Essay” in the STORYtown textbook that I frequent for lessons called “How Animals Talk”. The  accompanying assessment for this text has a written response asking students to explain why it is important for animals to communicate. I thought it would be fun for my students to publish movies about this, rather than simply writing about it. Using pictures would reinforce the nature of the “Photo Essay” genre that STORYtown was presenting.
Building on the introduction to iMovie students just experienced, I added the element of picture in picture (PIP) to students’ production tool knowledge. This time students would have more images, and instead of using voiceover, they would videotape themselves reading a script. This video would be added to their movies as a frame on top of the slideshow of images. Additionally, students would use an iMovie built-in theme: I had them use the News theme because they were reporting on animals. Also, this theme has awesome text graphics! We used the News theme music, as well.


This time students would collect specific images. They had to find pictures that illustrated their animal communicating. There should be three or four per animal. And, students were to report on three or more animals in their movies. The notes about animals “talking” to each other should be written as a script. The script could be typed into an online teleprompter program (5) or app. This is neat because it makes the font big and easy to read, plus moves so kids can keep a reasonable pace. 
After students acquire their images and record their videos, they are ready to make their movies. Just like last time, they import all of the pictures, first. They move the pics around, stretch them out, adjust the Ken Burns, if they like. Then students add the theme effects. Next, they insert the PIP. At this point students should include text on some of the images. I had my students provide sources for the information that they shared. They could tell the name of the animal, also. Kids will need to resize and position the PIP so that it doesn’t cover any of the image that is important, and so that it does not get covered by the text.
This was lesson two on using #iMovie
Ss learned #themes and #PictureinPicture. Ting, streaming #AppleTV #Awesome
Themes: music, transitions, and titles.Production assessments are the best! pic.twitter.com/rf8SbKSuP3
— Matthew Weimann (@MrWeimann) March 21, 2019
iMovie 3.o will involve showing students how to fine-tune volume, fading, and generally polishing their productions. I want them to understand the importance of quality before moving on to greater and greater quantity.
iMovie 4.o will teach detaching audio. This is neat, because watching someone talk for too long is boring. You can videotape yourself speaking, and break up the video by inserting pictures, all the while keeping the audio track playing in the background. (It is important to learn all about adjusting volume before this lesson, because when you detach audio iMovie automatically makes it louder.)
Notes:
- Obviously, this kind of project could be conducted on any topic. St. Patrick’s Day just happened to be the event that corresponded with me finally being ready to have my students use this tool. The main thing to consider is having the students only wrestle with one thing at a time. I recommend already having information compiled for them. Don’t have them research, conducting all kinds of steps before ever getting to making their iMovie. Then they won’t remember how to make one. My students had a one-stop shop of a trough of info about one topic within the Google slideshow.
- I gave them plenty of time, but stopped everyone at the same time, regardless of finishing the slideshow. (Honestly, it had too much information in it, anyway.) This way I could help everyone with iMovie at the same time. They were all on the same page. They could go back to the slideshow to learn more when they finished their movie.
- Here is where digital citizenry comes into play. Kids are already familiar with Google Images. Because we are going to be making movies using the pictures, and we plan to published them, images that are copyrighted are a no go. Kids can use “advanced search” in Google Images to find usable images,
or Richard Byrne provides a list of 9 websites that have images available for “reuse”: https://www.freetech4teachers.com/2011/06/9-places-to-find-creative-commons.html - “Slide”–I called the images in the iMovie app slides because my students are used to Google Slides, and the pics look like lined up slides. “You can stretch each slide so that it takes up more time in your movie, for a longer voiceover. You can rearrange, delete and add more slides. Also, you can add text to your slides.”
- A teleprompter program I found through a grad class at Kutztown University is https://cueprompter.com/


Great stuff
LikeLiked by 1 person