“I don’t know how I got it; I just know that this is the answer,” a frustrated student defends himself against the inquisition of an even more frustrated teacher who wants him to “SHOW YOUR WORK!”
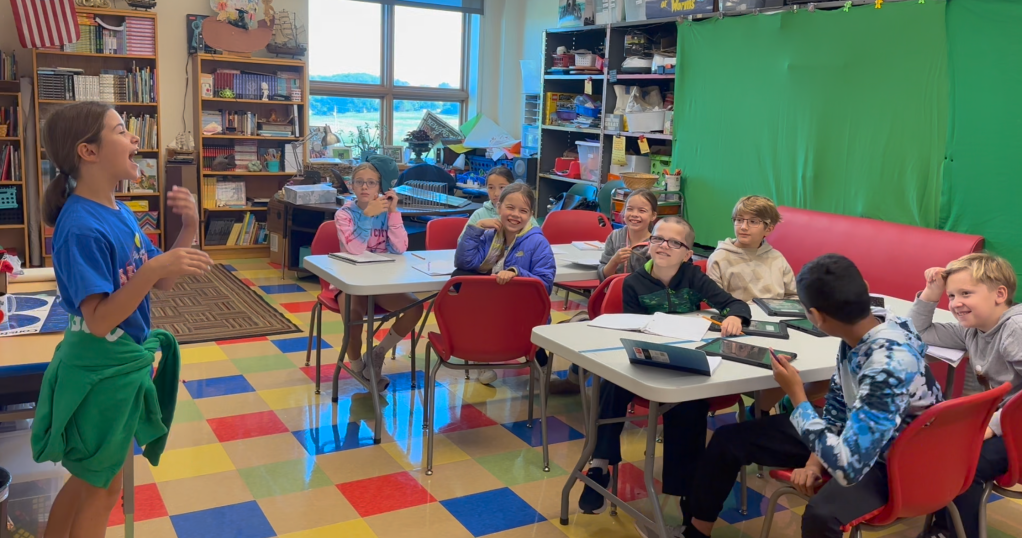
You should have seen the students’ eyes bulge when I told them I was going to give them candy! LOL They were happy to gobble up the math, though.
But, what if he actually doesn’t know where the number came from? We don’t ask the toaster to “Show us how it heats up our bread.” When was the last time you insisted that the mechanic “Show you HOW they fixed your car”? (They always try to explain it to us, and I’m like, “Does it work? How much does it cost? I got stuff to do.” Ha ha;)
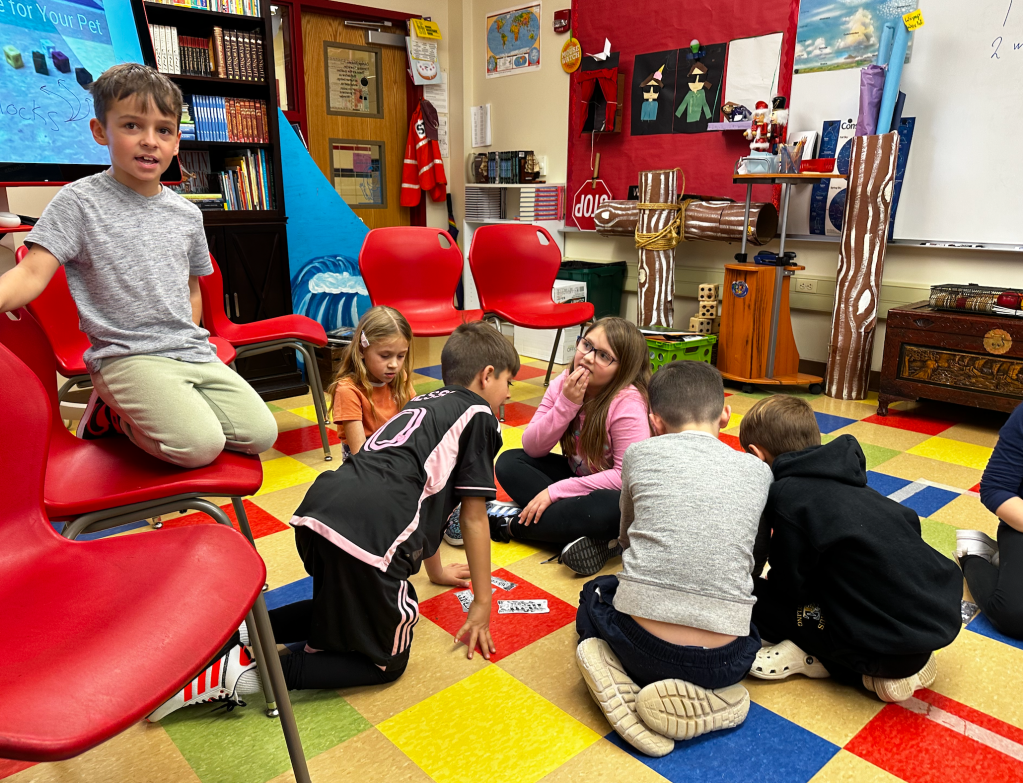
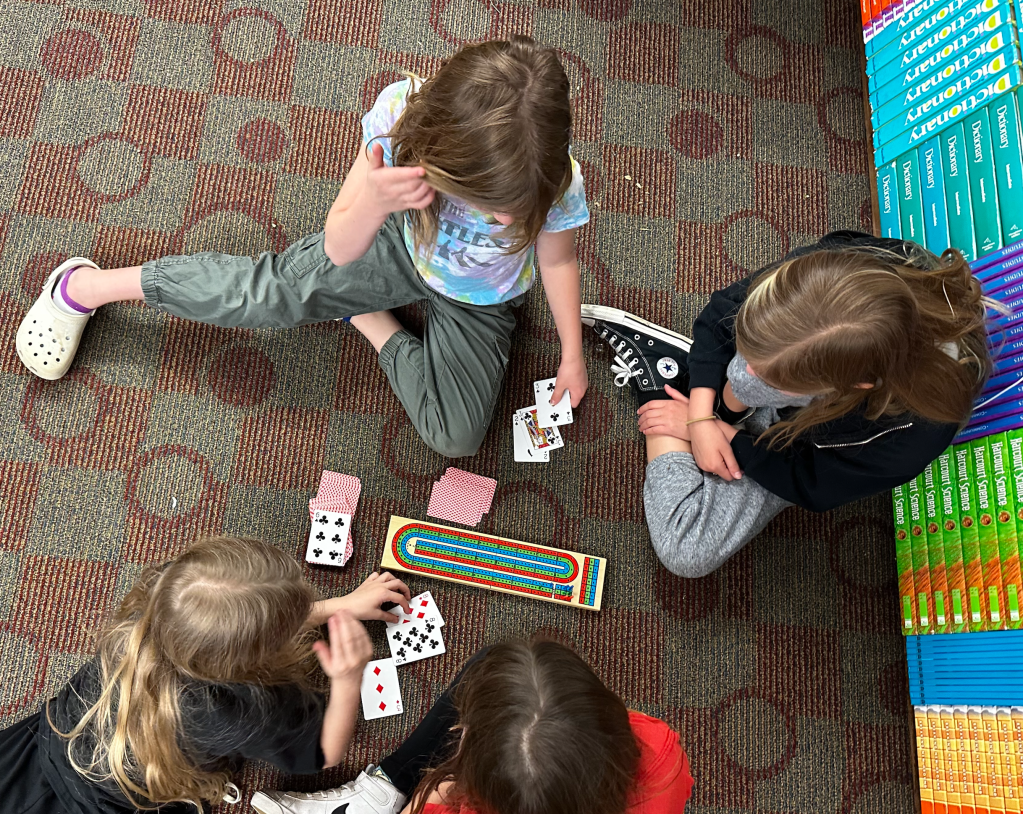
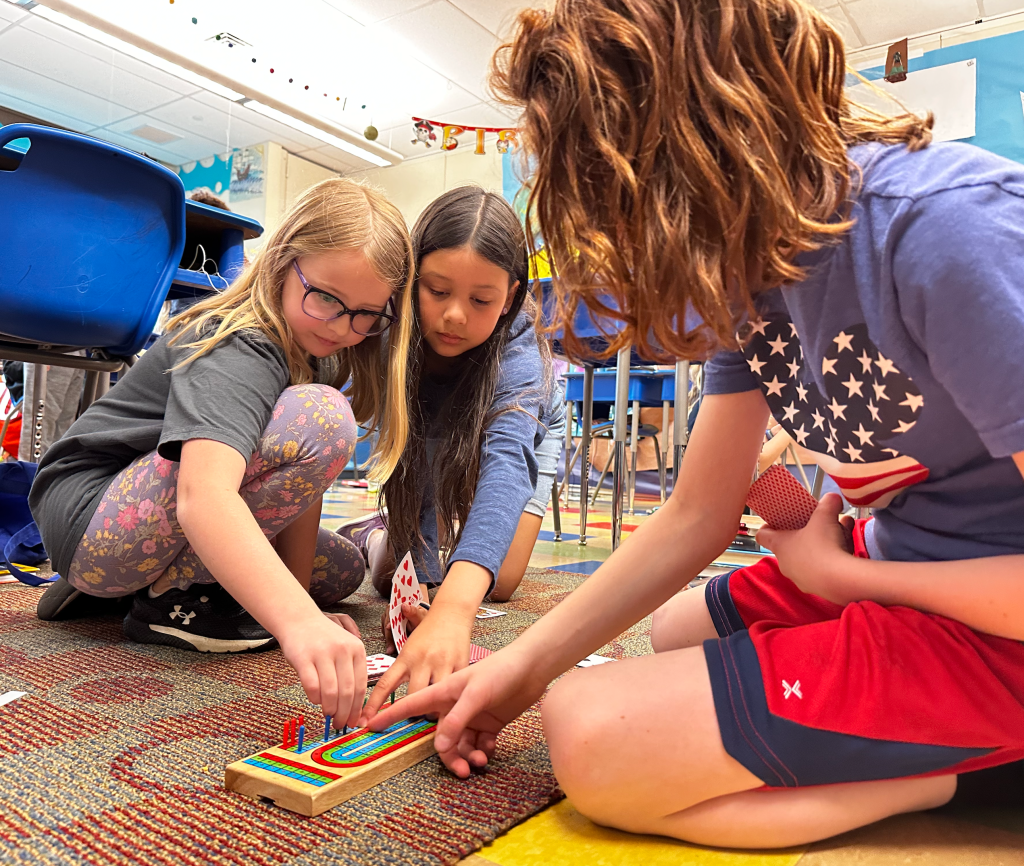
I recently had a math enrichment lesson with second graders where I told them what they didn’t know they did with a couple of mental math problems. We were working on comparing three-digit numbers. I had printed pictures of snacks that had prices on them. Teams of students were first asked to arrange the snacks in order from least to greatest price. Then I asked the class to compare the cost of three items to the cost of two others. The students didn’t have paper or anything to write on.
Please pardon my penmanship;)
After I received some successful answers, I asked the teams, “What did you do in order to produce those answers?” I got a variety of responses. Most teams told me the names of the operations. “We added the three numbers together, and then subtracted…”
One group explained what they did to complete the operations, and I was very impressed. While students were sharing, I took some notes on the board. I clarified what the group was communicating by drawing circles around numbers and pulling out concepts.
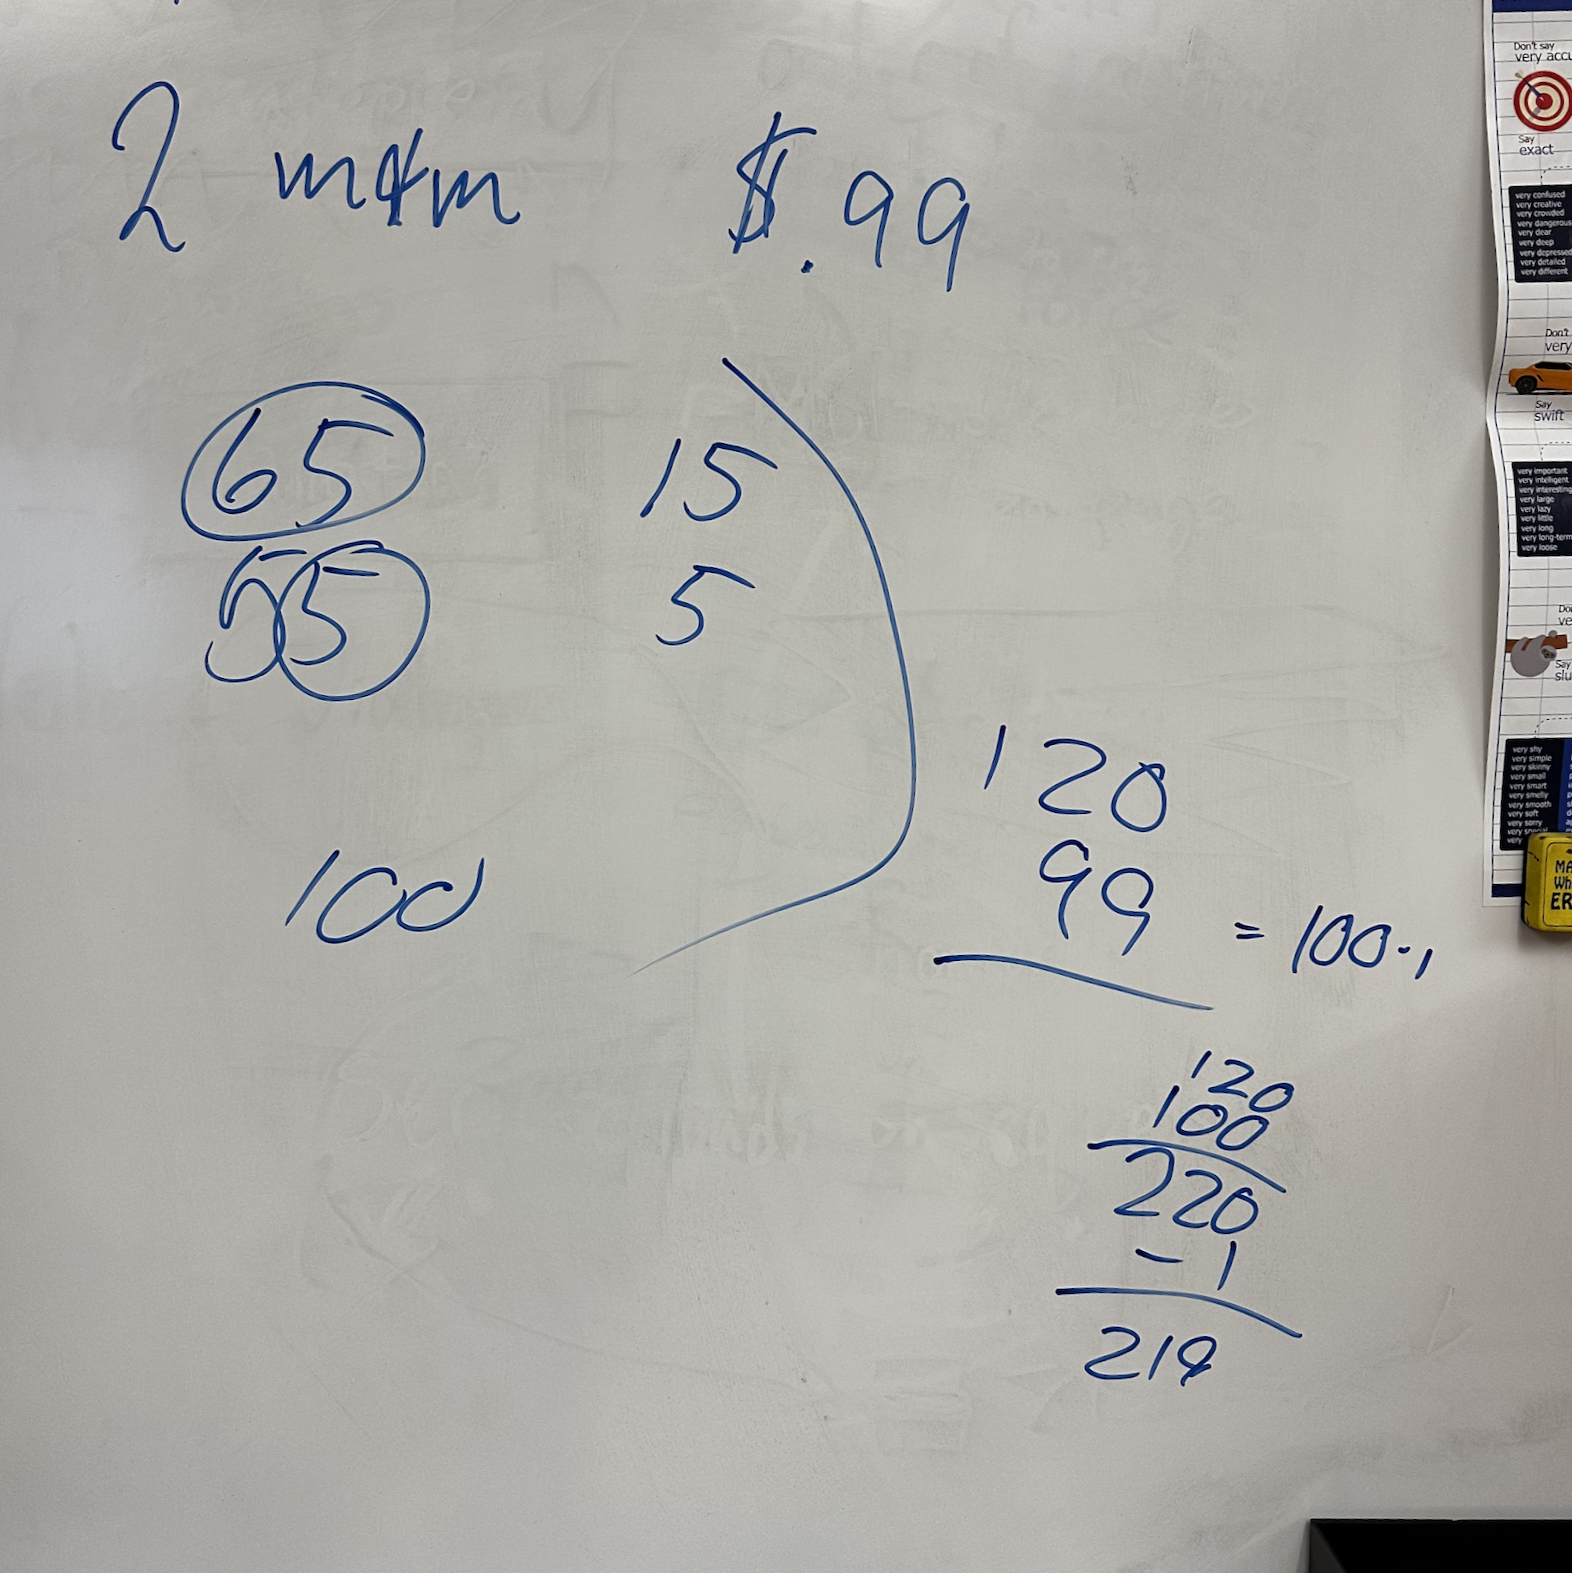
“You began by adding 65 cents to 55 cents,” I reiterated. Nods of heads confirmed the accuracy of my statement. What happens in a creative mathematician’s head is a little different from what one would do on paper, however, and I wanted to pull this out. These students hadn’t used an algorithm.
Here’s a post that shows 3rd graders communicating the use of compatible numbers to multiply.
“Fifty!” the group called out. We have been identifying compatible numbers, so they already knew to look for something more manageable.
“That’s right. And, in order to get to fifty, you have to adjust these a little.” I circled the 65 and wrote 15 on the side. Then I circled only the 5 from the ones of 55, and I wrote that near the 15.
If a student had paper in front of them, they might line up 65 and 55. Then they’d add the fives from the ones’ column and regroup with a “one” above the tens column… But, do we grown ups do this in the grocery store when we are comparing one item with another? No, we use mental math. We develop creative tricks that we may not even realize we use!
My aim is to unlock this mathematical creativity early in life. A secondary goal is to help students be able to communicate it.
“After adding the two 50s together, what did you do?” Everyone can see that there is still a 15 and a 5 written on the board. I wrote the sum before anyone called out, answering the rhetorical statement myself. “Now, you need to add this $1.20 to 99 cents. That sounds hard,” I teased, knowing that they’d already smashed that algorithm in their minds.
Letting students work in teams allows them more than just Social Emotional Learning (SEL). They help one another remember and recall sums and differences.
When I told them about using 100 instead of 99, several students silently shouted, “That’s what I did!” No one is going to carry a one from the tens to the hundreds column of a mentally constructed algorithm. And, we don’t always have paper. AND, do you really want to teach your students to be dependent on paper?!
Now, think about it, reader. Students are using subtraction in order to add numbers together. What 8 year old is going to be able to explain this abstract use of arithmetic in writing on a test or assessment?
Here, I’m having the group of 2nd graders “play” with numbers by lining their teams up in order of least to greatest, having constructed the largest number possible with the loose number cards I’d given everyone in each team. Get-up-and-move-around-math.
And, we (myself included) expect them to “Show their work!” I’m happy if they know what they are doing and get the correct answer. I’m nearly 50, and I only just learned how to show MY own work! LOL
What I found myself doing in the past was asking students who had performed mental gymnastics to achieve a remarkable mathematical feat to write down the steps they took. In other words, if you added up three numbers (65 + 55 + 99), and then subtracted a fourth from that sum, write it all down…
Even if you can’t describe the exact process of creating the sum or exactly what you did to subtract. Just tell me what you did with the numbers. I, like every other math teacher in the world, wanted to see more than just an answer!
I think that having students use mental math, and then having them explain what they did VERBALLY is helpful in sharing the mechanics of the creative math. It’s easier to verbalize than it is to write. I bet there are books written about this. (If you know of any, please share. Thank you.)
Didn't she do a great job. I love how every kid does it differently. One girl wrote on the screen, while she explained. As a T, I am thrilled to witness these Ss talking about their #ReadyMath. I can write comments and give #StandardsBasedScores in @Flipgrid #EastPennPROUDpic.twitter.com/Kux2rJbZTm
A tool I’ve enjoyed having students use to verbally communicate their creative math skills is Flip (formally known as Flipgrid). Kids can make videos of themselves talking about the math. They can also write on their screens to show what they did while talking about it. If they did the math on paper, they can take a photo of their work to include in their video. Finally, they can watch each other’s videos, get ideas for future creative math projects, and leave encouraging replies to each other. The platform is easy to navigate and teacher-friendly for leaving feedback and assessment info.
In conclusion, while I always instinctually knew that forcing a kid to write down everything they did in their head could squash their creativity, I never knew how to bridge the gap between teacher and student; The chasm between the answer (what the student produces) and the process (what the teacher cares most about) before now. I’d tried varying techniques with varying results. My new thing is to verbally walk them through tricks I’d use to do mental math. Through this process, they recognize some of what they are already doing in their minds. They are learning how to communicate it. And, some students are learning creative ways to play with numbers.
How do you challenge yourself as a teacher? I’ve been working on making my pedagogy more powerful by pushing lessons forward with STEAM. Originally known as STEM (Science, Technology, Engineering, and Math), STEAM introduces the Artistic element to the closely related fields. When you are teaching a STEM subject, it is common to integrate more than one letter of the acronym (Hertz, 2016), but one of my modus operandi is to try to incorporate as many of the letters as possible into any given lesson. Powering my teaching with as much STEAM as possible is an art form to me.
I sometimes use art as a reward for completing work. “Once you finish solving the math, you may draw the aliens you encounter on your adventure!” I told enrichment students at the beginning of this math lesson.
Some lessons are more successful at incorporating all five letters of STEAM than others. A recent math lesson got my creative juices flowing, and turned into a beast of learning for my 4th grade gifted students. It all began with an enrichment lesson from Ready Math.
4th grade gifted students use art to get even more out of STEM.
Fourth graders had been reviewing place value as well as adding and subtracting large numbers. This is the perfect example of a math concept becoming boring for advanced students, those who have shown mastery of the subject matter. Once these kids conquer the use of algorithms, plugging in numbers to get sums and differences becomes mindless. Adding and subtracting is like riding a bike. Why make them pedal a stationary one when we could take it on a trip, instead? This is where I come in.
My first stop on developing math enrichment lessons is to check out the iReady Teacher Toolbox for ready-made resources that I may build upon. Curriculum Associates, the makers of Ready Math, has developed an enrichment assignment accompanying nearly every lesson. These are worksheets that can be printed for students to work on independently. You can push the assignment out digitally via Google classroom, too. The Ready Math team has provided a “Teacher Version” that contains answers; Even potential answers to open-ended questions, so that teachers know what to expect!
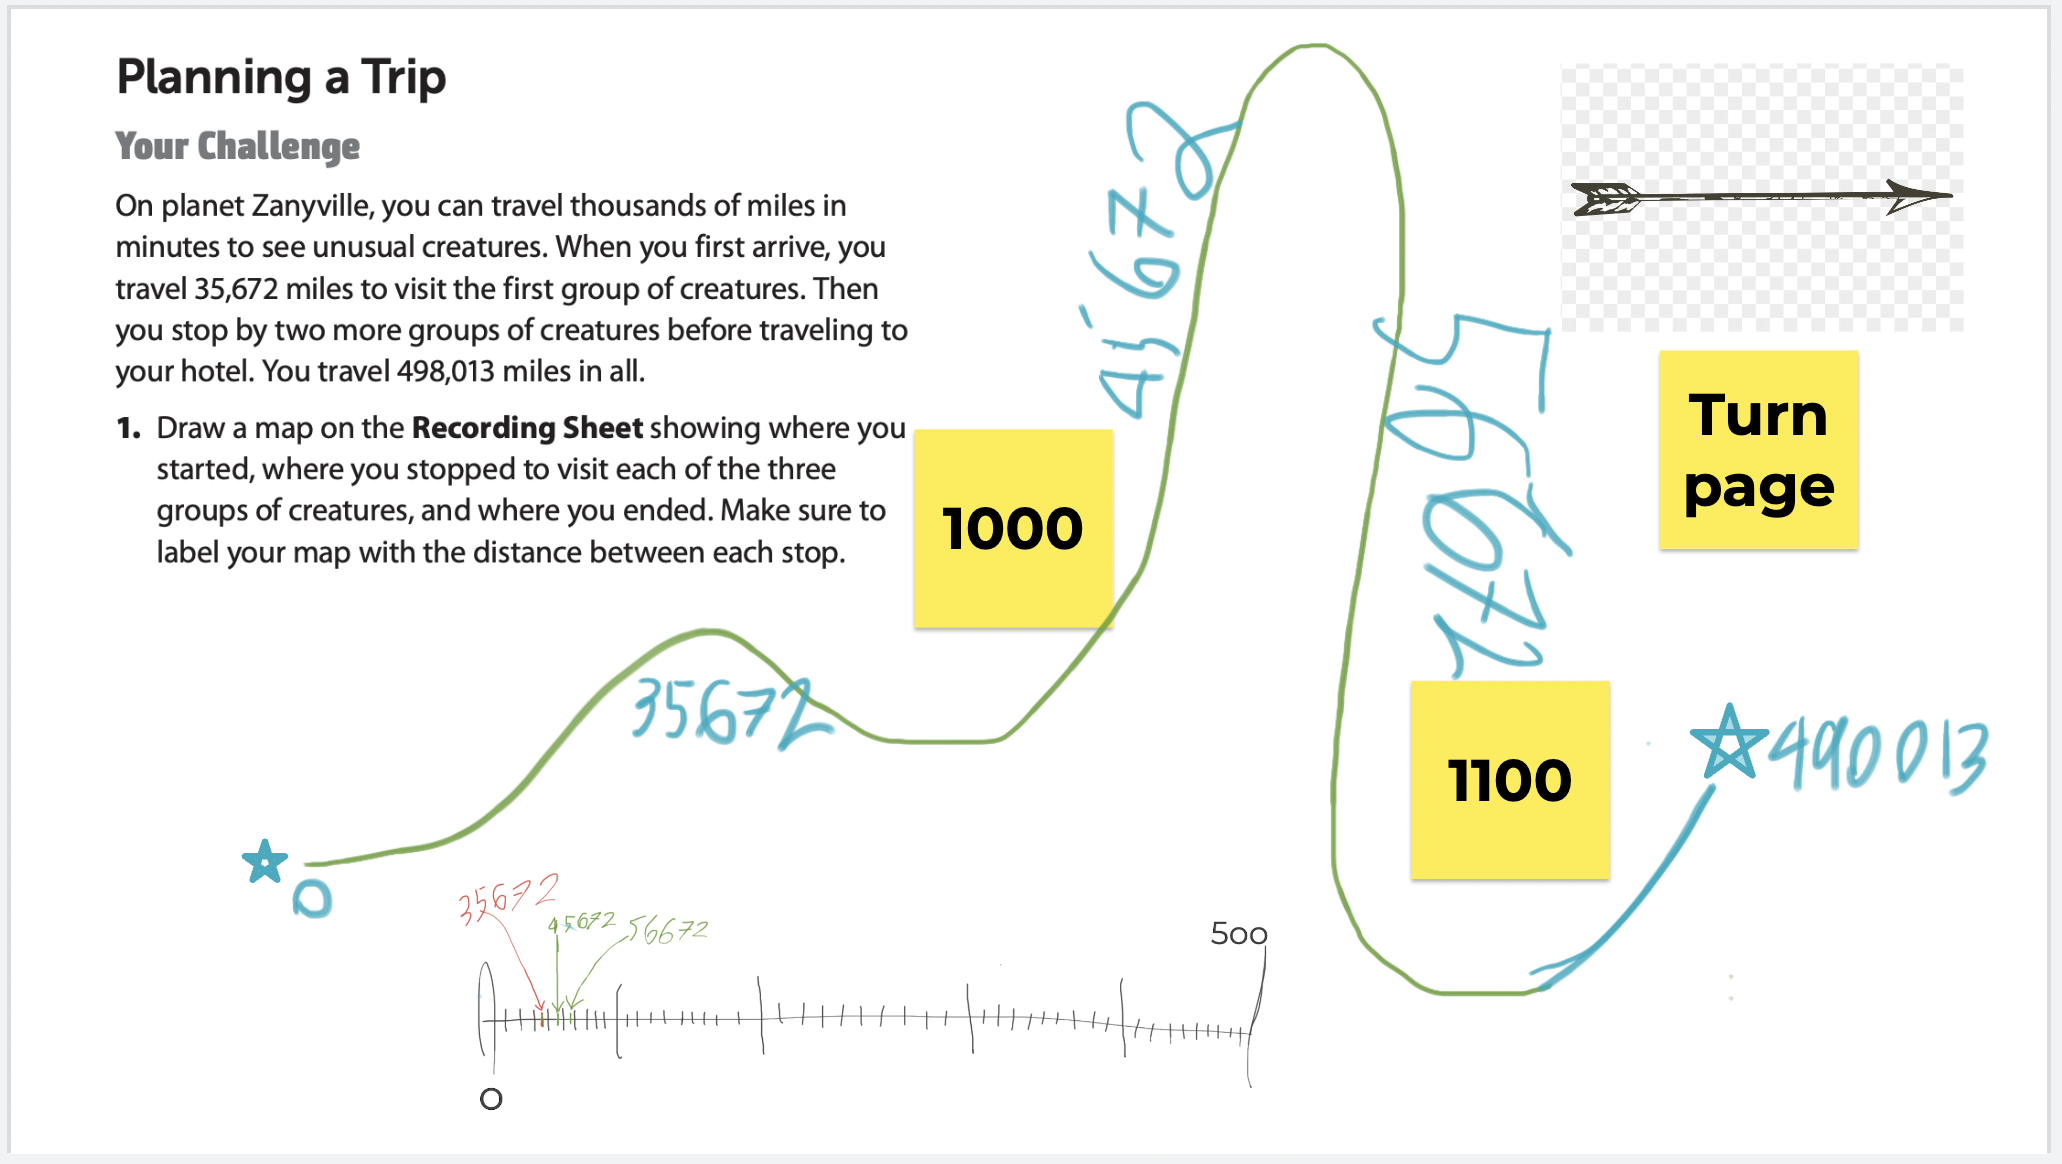
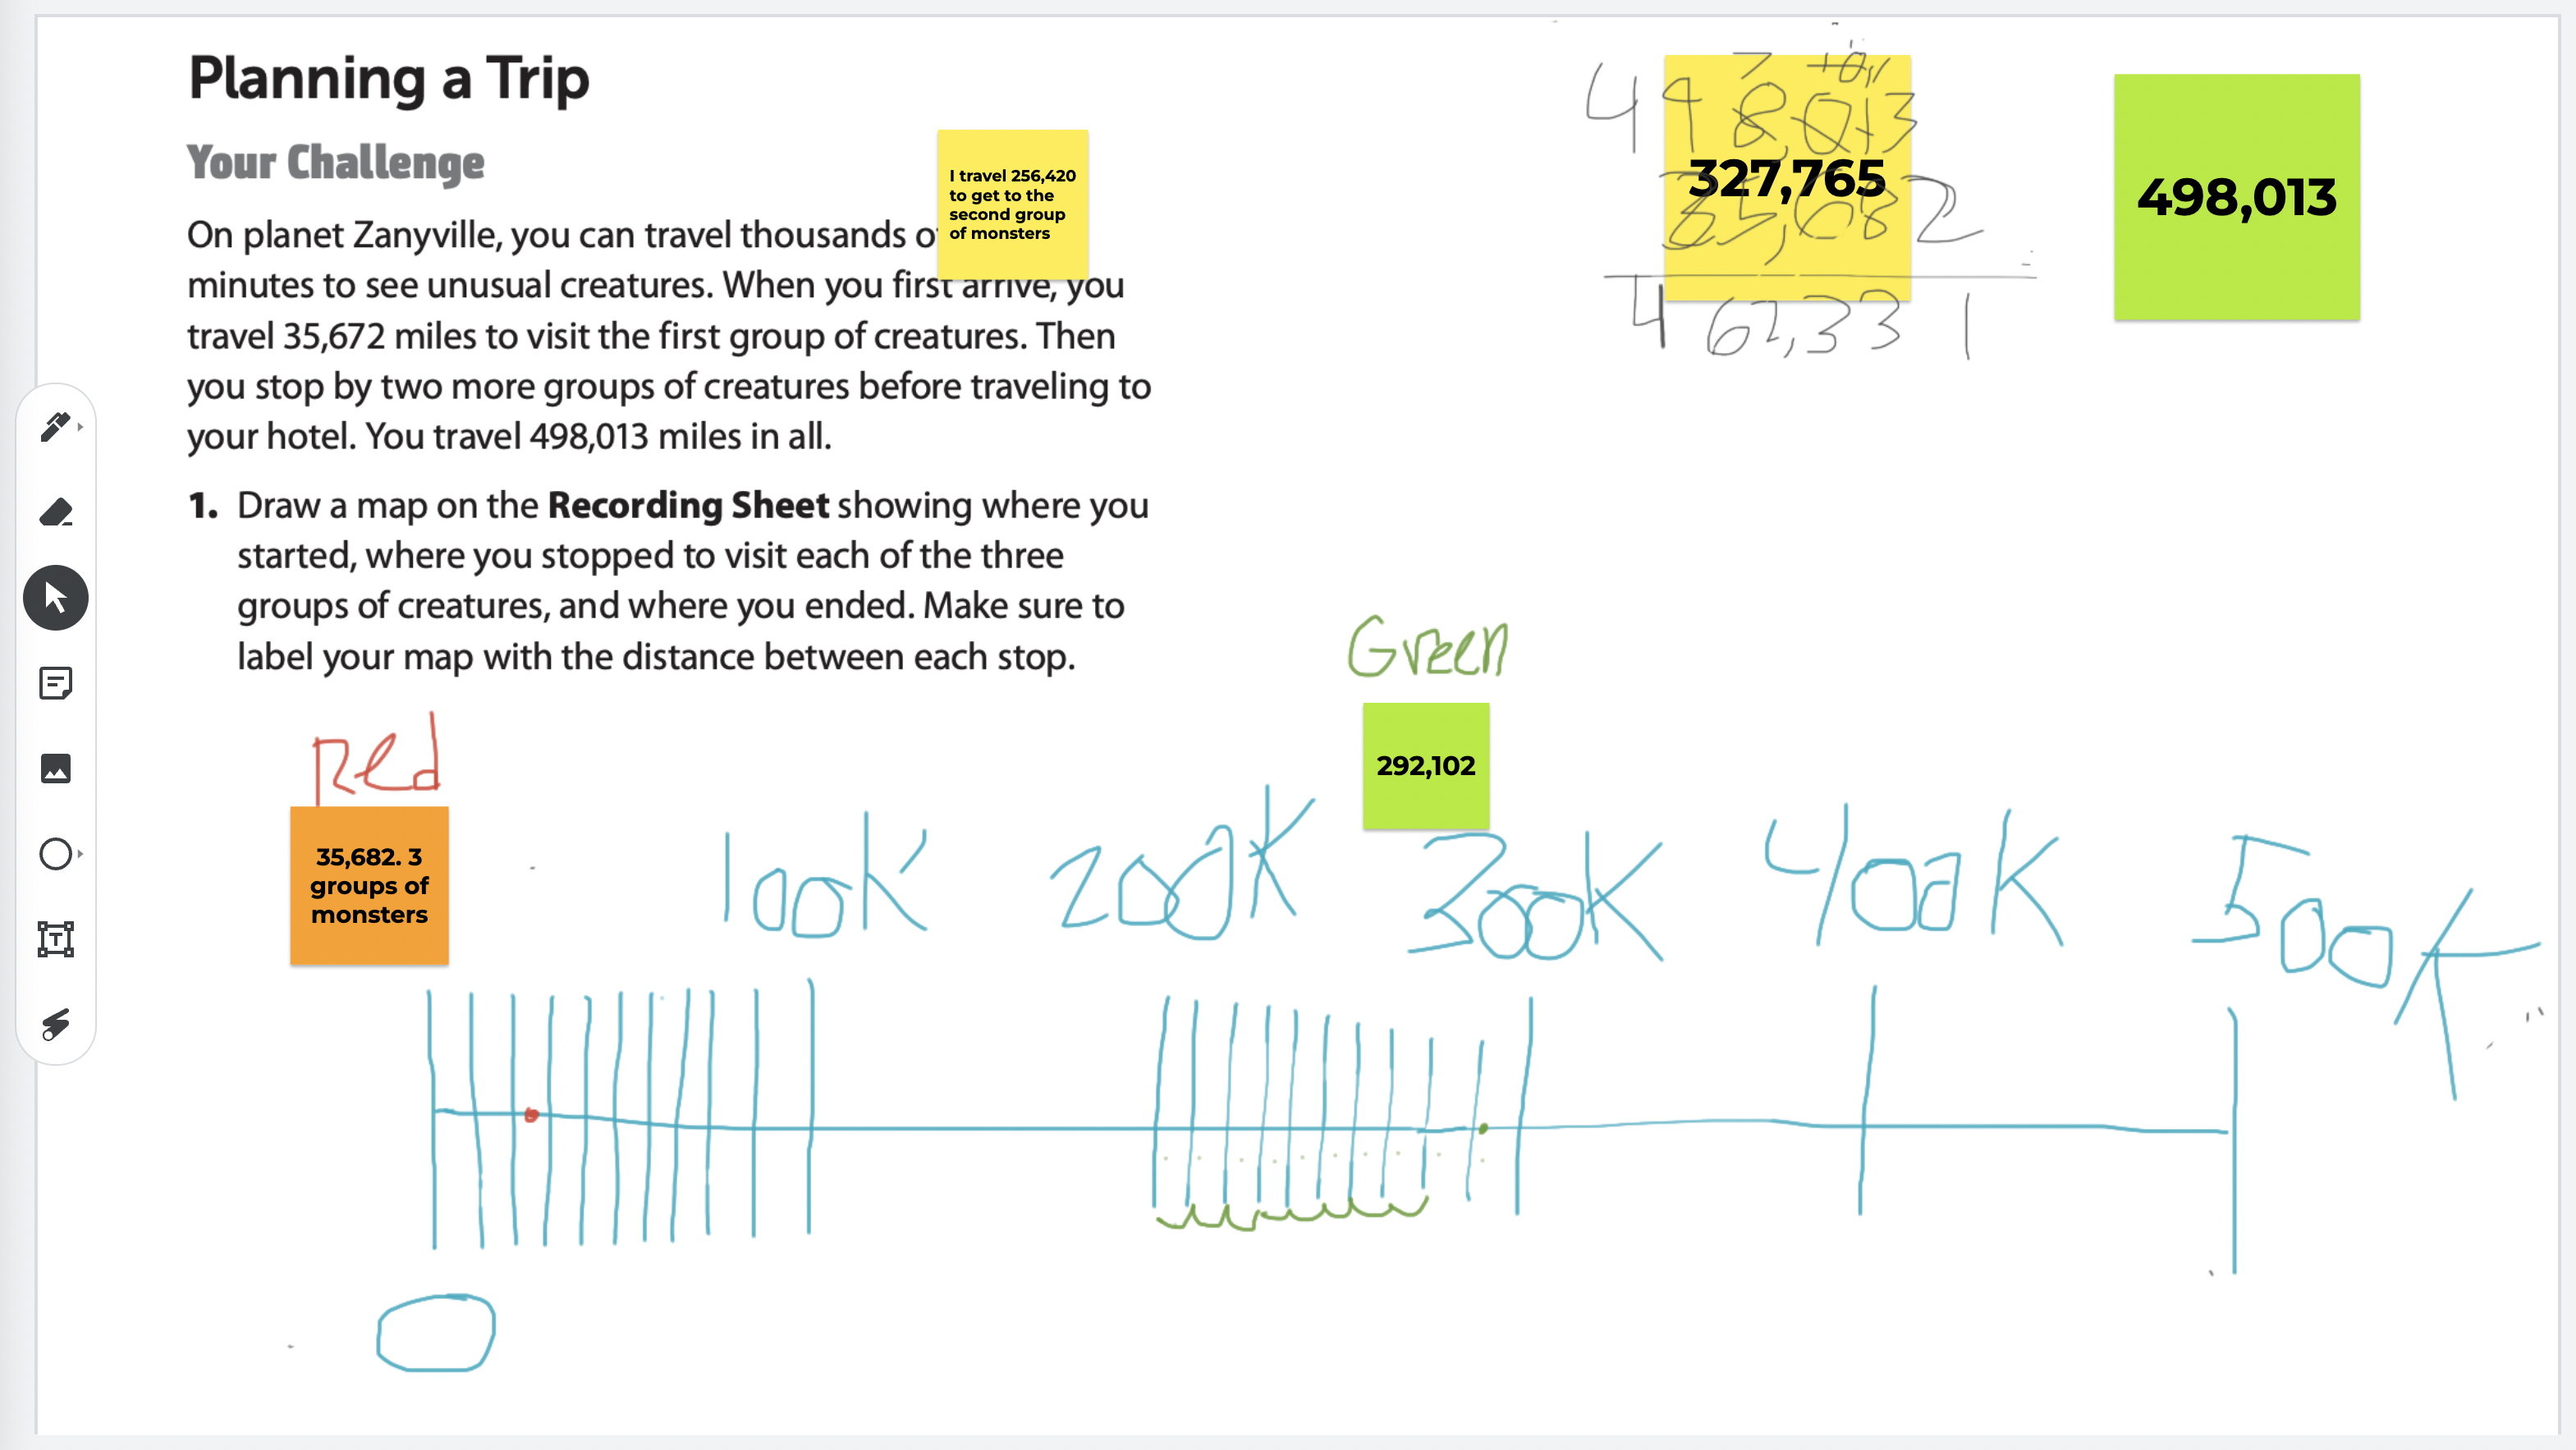
For this lesson, I took a screenshot of an iReady enrichment assignment, and used it as the background of a Google Jamboard. I like Jamboards because my students can draw and write on their iPads. They can create new blank slides, as well as duplicate the one with the instructions on it. It is easy for me to make a template, and then create a copy for each student through Google classroom.
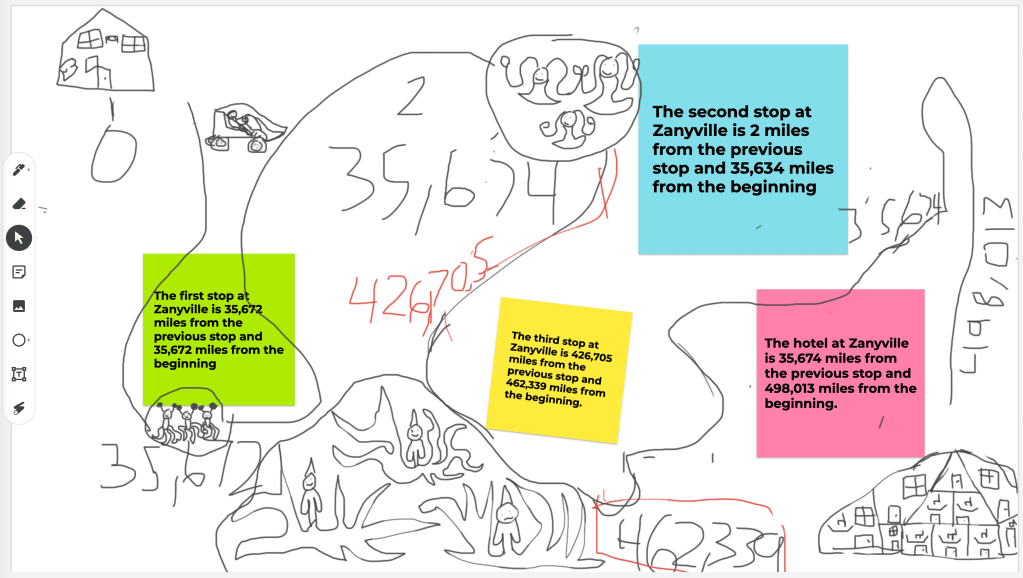
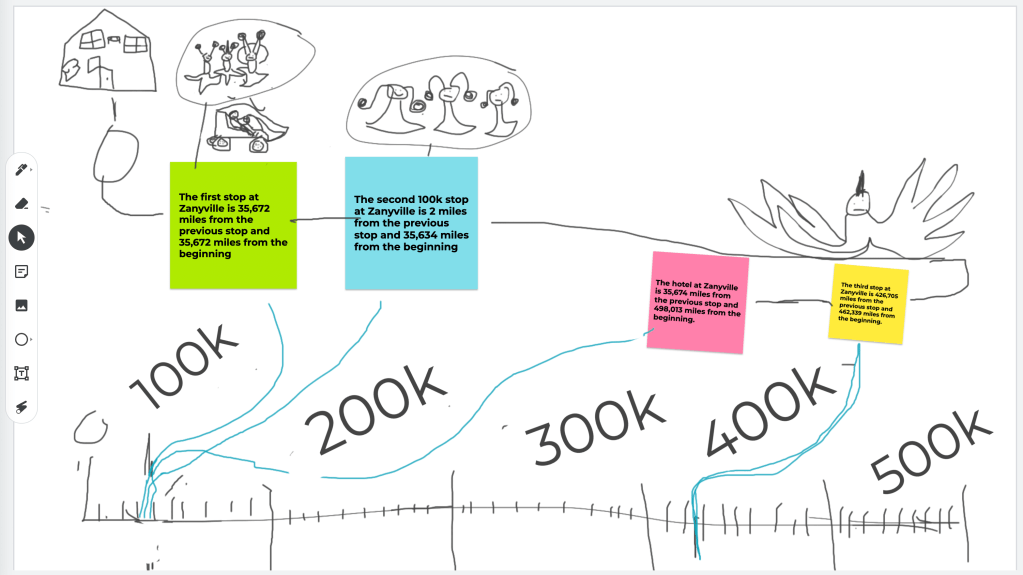
This zany lesson, “Planning a Trip,” had students pretend to explore an imaginary planet, Zanyville. It introduced gigantic numbers and was very open-ended. I included some more instructions that I shared orally, when I initially rolled out the project. “You must tell me the number of miles from the beginning of the trip where each of the stops happen. Also, you have to provide the distance between the stops.” Students were instructed to use “sticky notes” in Jamboard to share this information. They showed their work on other slides.
The 4th graders worked hard and were engaged in making their maps. Only, the maps were grossly disproportionate. Some students made the third stop only “one mile” from the end of the trail, but placed it a fifth of the distance from it along the route they drew in their Jamboard. In actuality that distance would represent tens of thousands of miles! It is true that I did not instruct students to partition their maps with accuracy, but when I witnessed the misuse of proportion, I saw a fertile opportunity for learning. Enter, STEAM!
My vision for math enrichment is to dig into each concept, finding riches that deepen the understanding of my students.
The next time that I met with the 4th grade math enrichment students, I taught them proportionality. There weren’t any Ready Math lessons on this, but it fulfilled my mission for the enrichment group perfectly! My vision for enrichment is to deepen students’ understanding on math concepts. We do not rush ahead or necessarily “do more” math. I try to present novel ways of using the concepts that students are learning in the classroom. Sometimes, lessons include real-world problems, using the math that they are learning to perform a task they will most likely encounter some day. Other times, we may play a game that requires students to view the numbers in a unique way. In this instance, I wanted my enrichment students to learn about the relationship (ratio) between numbers.
I modeled partitioning a space on the whiteboard. With students’ input, I placed numbers in appropriate places on the makeshift number line. After a short lesson on this, I had students revisit their “Planning a Trip” lesson from the previous week. They were to make a number line and show where each stop would happen. Their Google Jamboards showed excellent progress in understanding this concept.
From Enrichment to Gifted Instruction
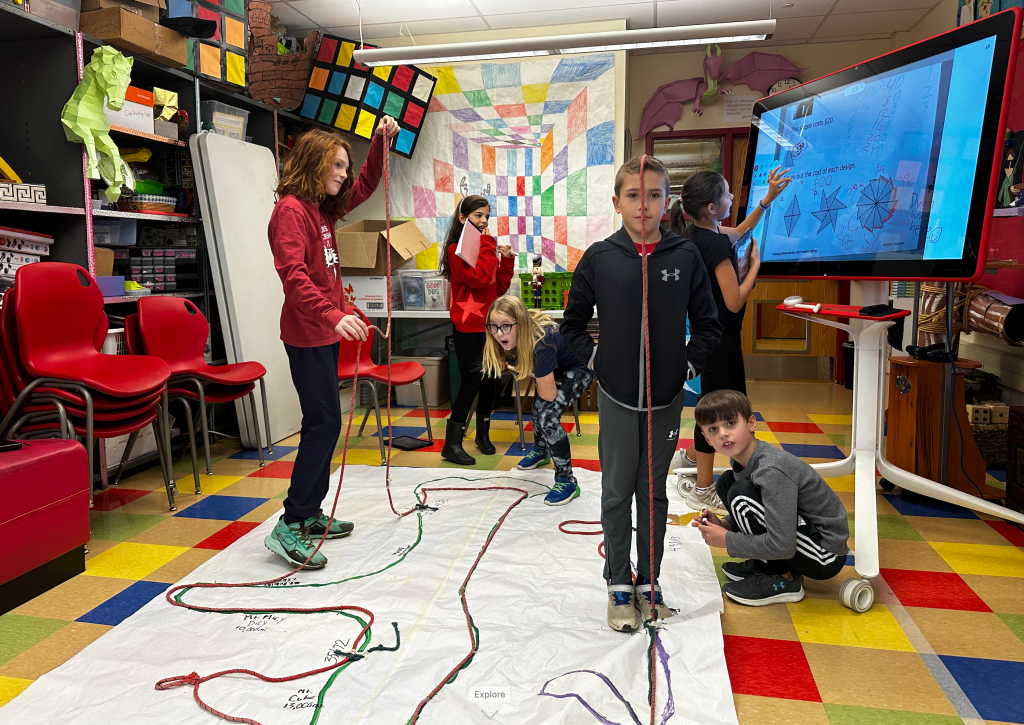
This is where the lesson took a turn from enriching math understanding to present problem-solving and higher-order thinking through gifted instruction. In order to illustrate the disproportionality of the original maps, I’d have the gifted 4th graders use one of their own to display an accurate account of the journey.
How would we do this? I would lift the trail from the map. The trail would become a rope that could rise up off of the map. This would allow my gifted students to account for extra mileage and figure out how someone may have covered the distance of tens of thousands of miles, but look, from only glancing at a two dimensional map, as though they had only hiked a handful of miles. My plan was for the fourth graders to learn about topography.
I gave my students a rope that was about 50 feet long. Their initial task was to tie pieces of yarn onto the rope symbolizing stops on the trip. They used what they had learned from the previous math enrichment lesson to do this.
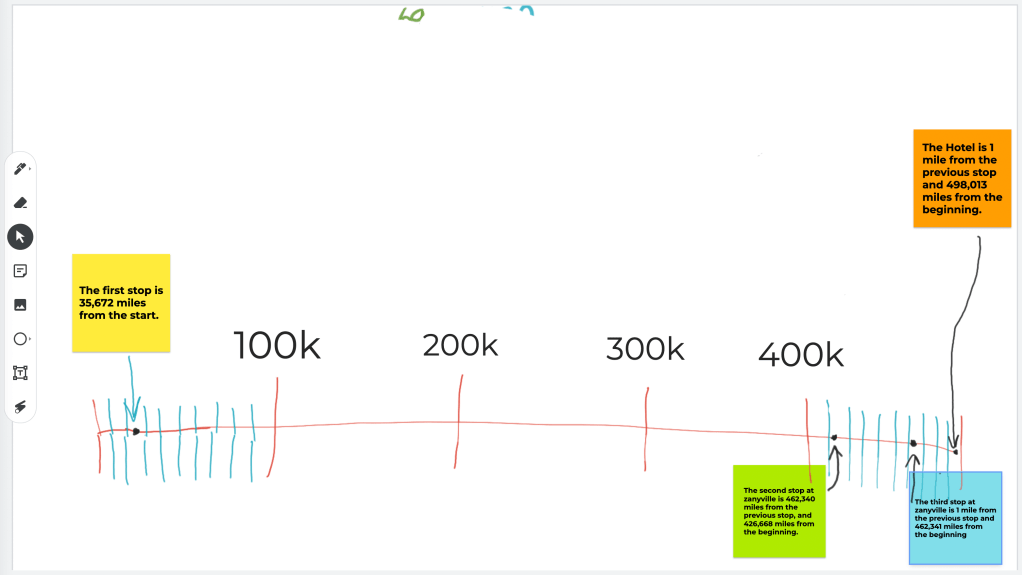
“If the entire trail was 498,013 miles (this was on the planet Zanyville, remember), and the first stop was only 35K miles from the start, you couldn’t mark it halfway along the journey!” I reminded them.
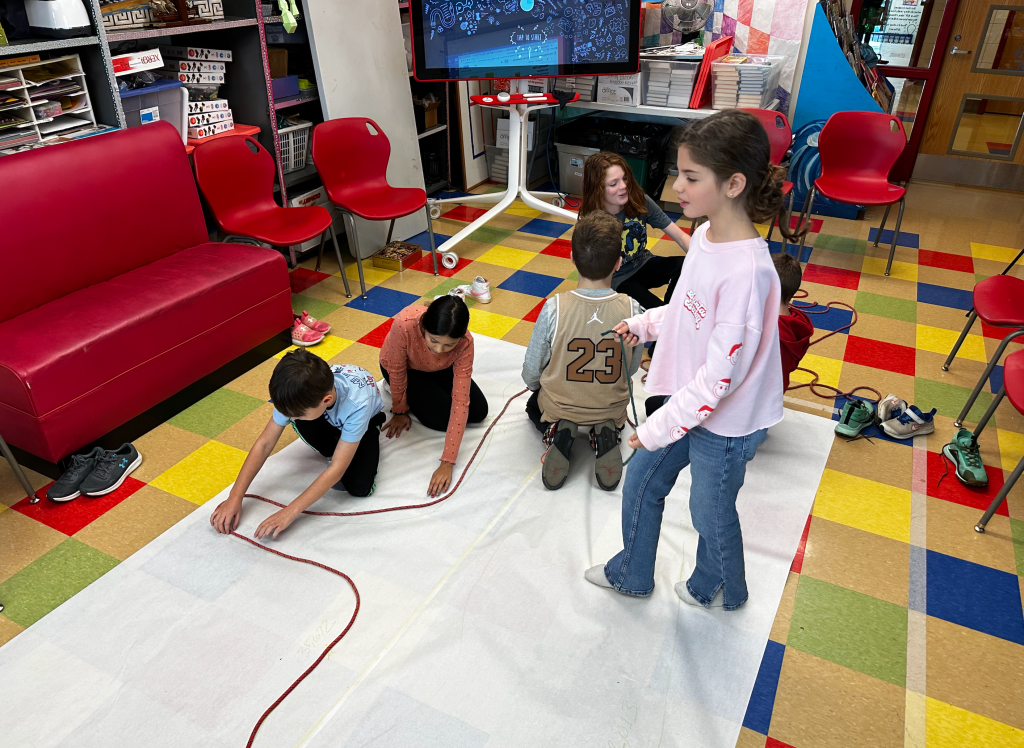
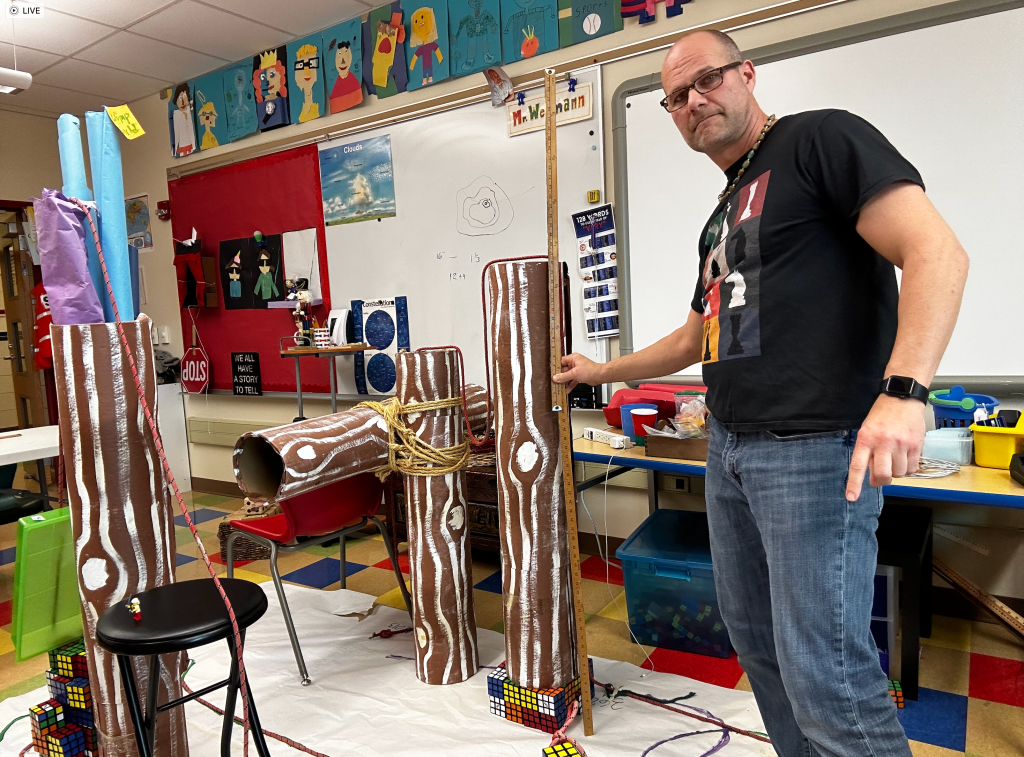
We brought the rope into the hallway, so that we would have plenty of room to #STEAM. The first thing my students did was section the rope into five equal parts. It being a 50 foot rope, each of the five sections was ten feet. As it turns out, the tiles in the hall were one foot wide, so each one symbolized ten thousand miles, nicely. Once we had some reference points, we figured out where each stop would be and tied a piece of yarn to represent the place.
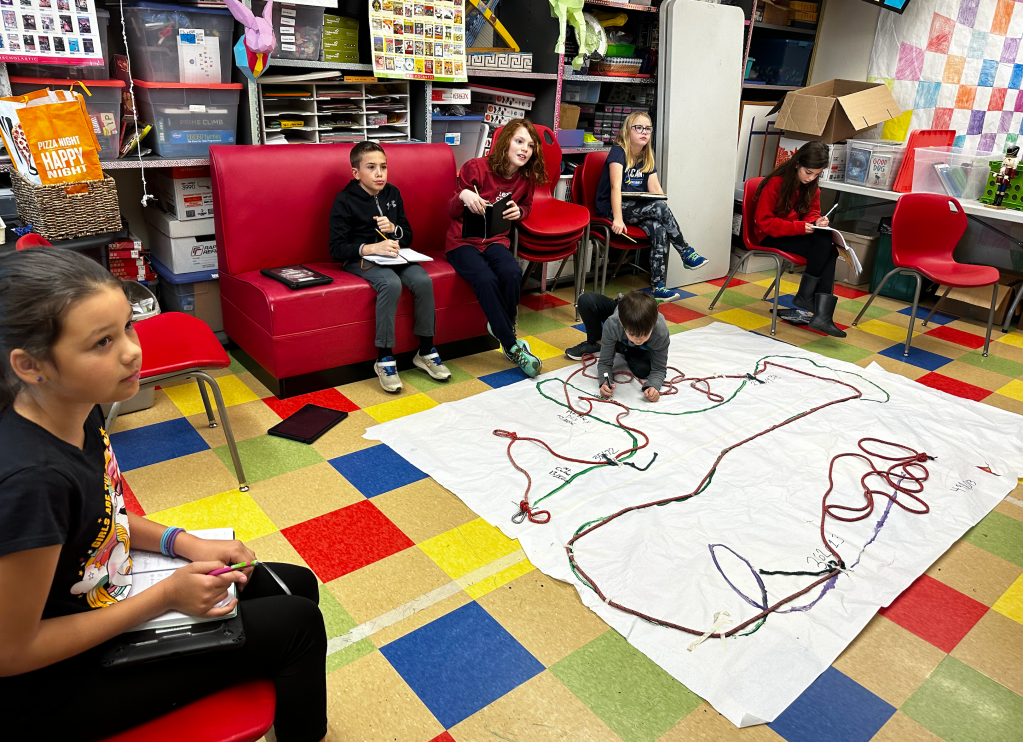
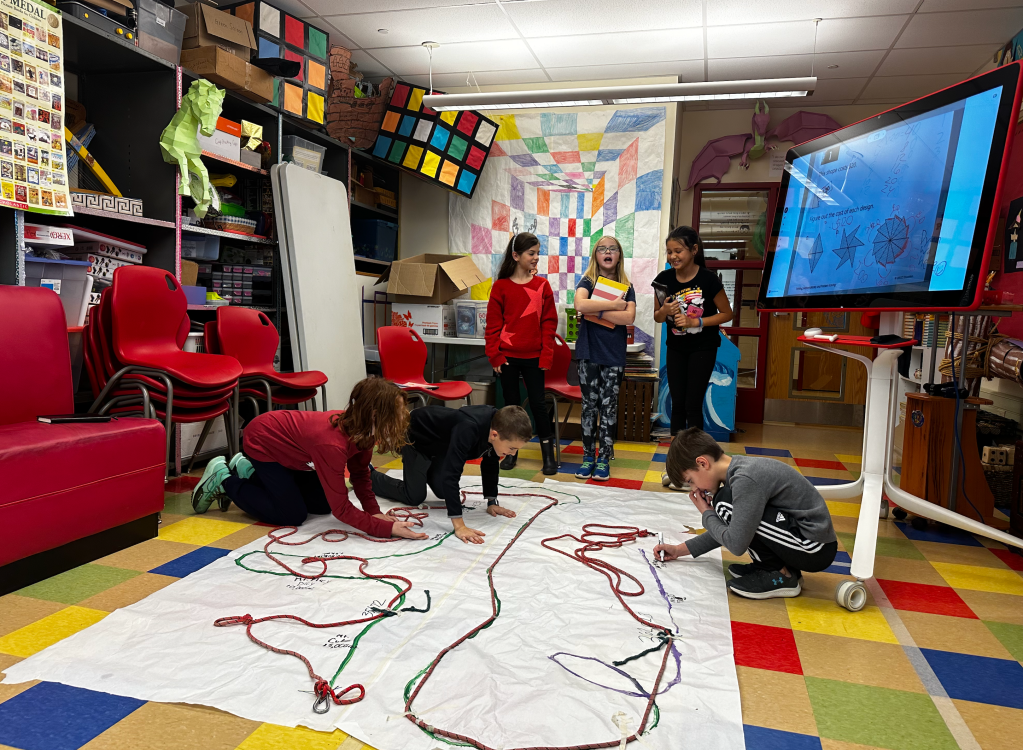
I then took one of the disproportionate maps that one of the gifted students had drawn, and I enlarged it onto poster paper that covered a large portion of the classroom floor. Next, we placed the rope showing our well-proportioned stops onto the map. We taped the pieces of yarn to the stops drawn on the map. There were huge portions of extra rope between some of the stops, and it was too short in other places.
I asked my students to “Imagine that this rope isn’t a rope, but a journey. Someone actually did travel these miles, and they traveled along the route that is represented on this map,” I told them. “How could this be?” Their first idea was that the “journey” coiled around and around; As in, the traveler had actually walked in circles. “There is a loop drawn on the map,” I pointed out. “You should assume that the line drawn on the map is the exact path the person traveled.” I wanted them to discover the concept of elevation on their own.
“The journey (they were very keen on calling the rope ‘journey’ and yelled at me when I mistook it for ‘rope’;) goes up!” several students shouted in unison. Feigning surprise, I encouraged my students to show it. I told them to make it happen. “Elevate the rope to show traveling up off of the paper.”
Watch the time-lapse of my 4th grade gifted students creating a model of their journey.
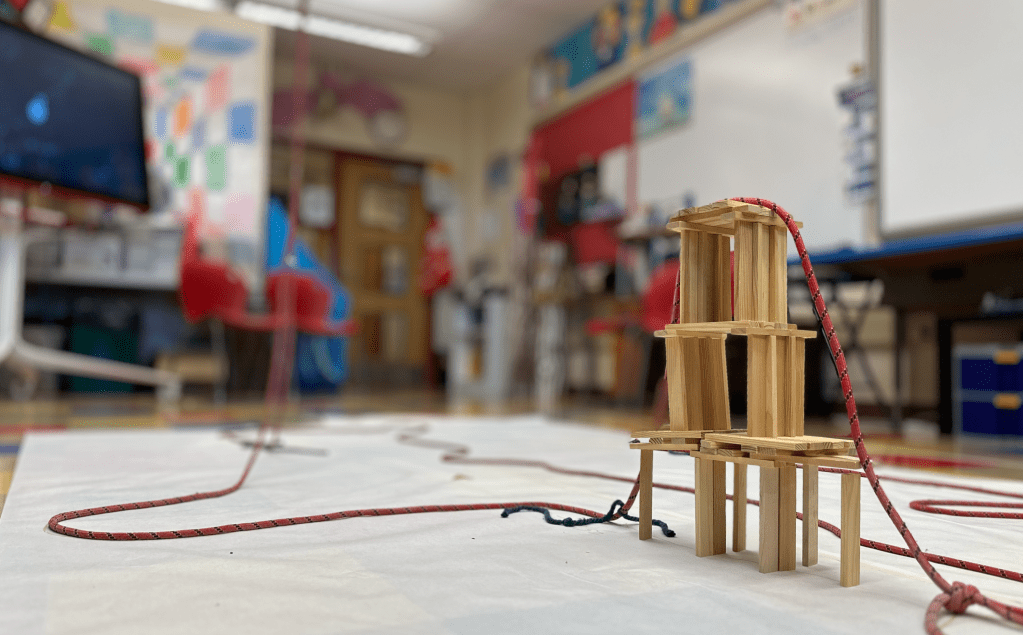
The students started grabbing everything within reach to raise their “journey” off of the paper. I gave them a few parameters: They could use anything in the room, other than my personal things. It had to follow the line of the map. The journey has to stand independently. “It can’t need you to hold it.” I heard the students mentioning how much fun this was several times, as they stacked Rubik’s cubes, built structures out of KEVA planks, and draped rope Journey over the 4’ high faux pilings I’d made for another project.
After finishing, I asked “How could we show these mountains on a two-dimensional map?” This is where topography enters the scene. Before exploring the topic, I had the gifted students brainstorm ways to display three dimensions on a flat piece of paper. They came up with drawing small images, like triangles symbolizing mountains. Information in a key was paramount. I showed them some maps that had varying colors used to illustrate elevation. They liked that idea. Finally, I introduced contour lines. These are drawn around the mountains, and show the incline of the slopes.
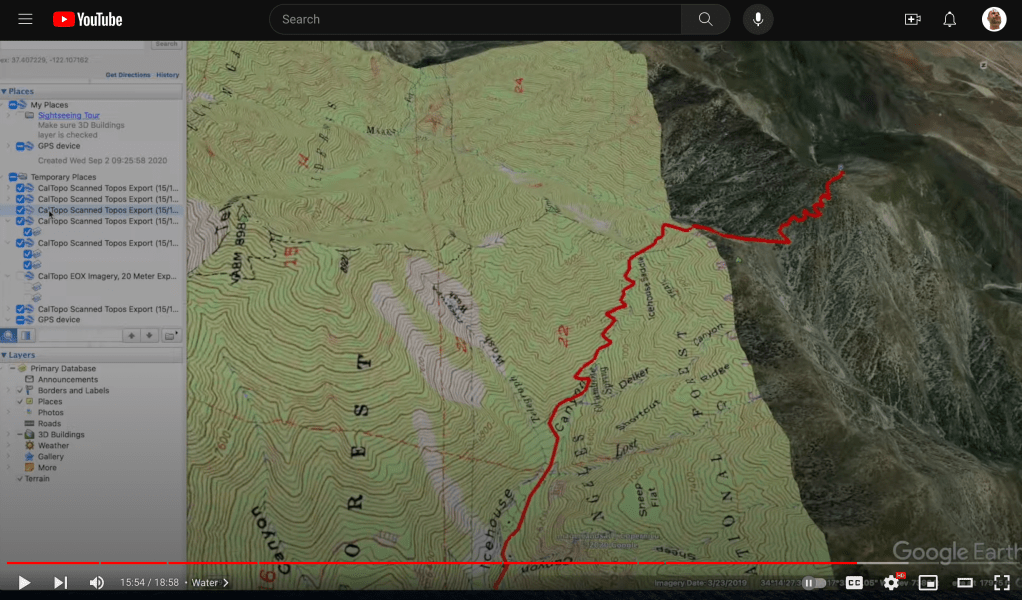
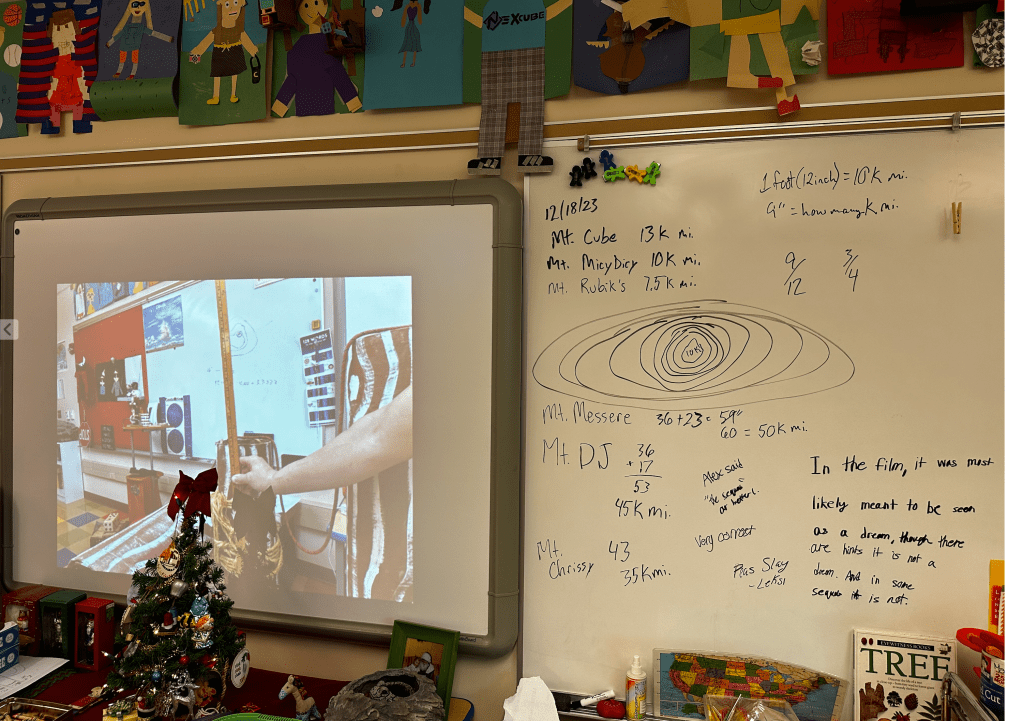
Once I did my best to explain how contour lines worked, I showed my students a video (above) made by HikingGuy.com. In the film, “Hiking Guy” takes a two-dimensional, topographical map and imports it into Google Earth Pro. He overlays the topographical map onto the exact geographical area that it represents. With Google Earth in 3D mode, the Hiking Guy swivels the view, so that you can see the depth of the mountains and valleys. We were in awe of the effects. I could have told my students that a contour interval is the amount of elevation between two contour lines on a given map, but seeing it displayed via three-dimensional modeling drove the concept home.
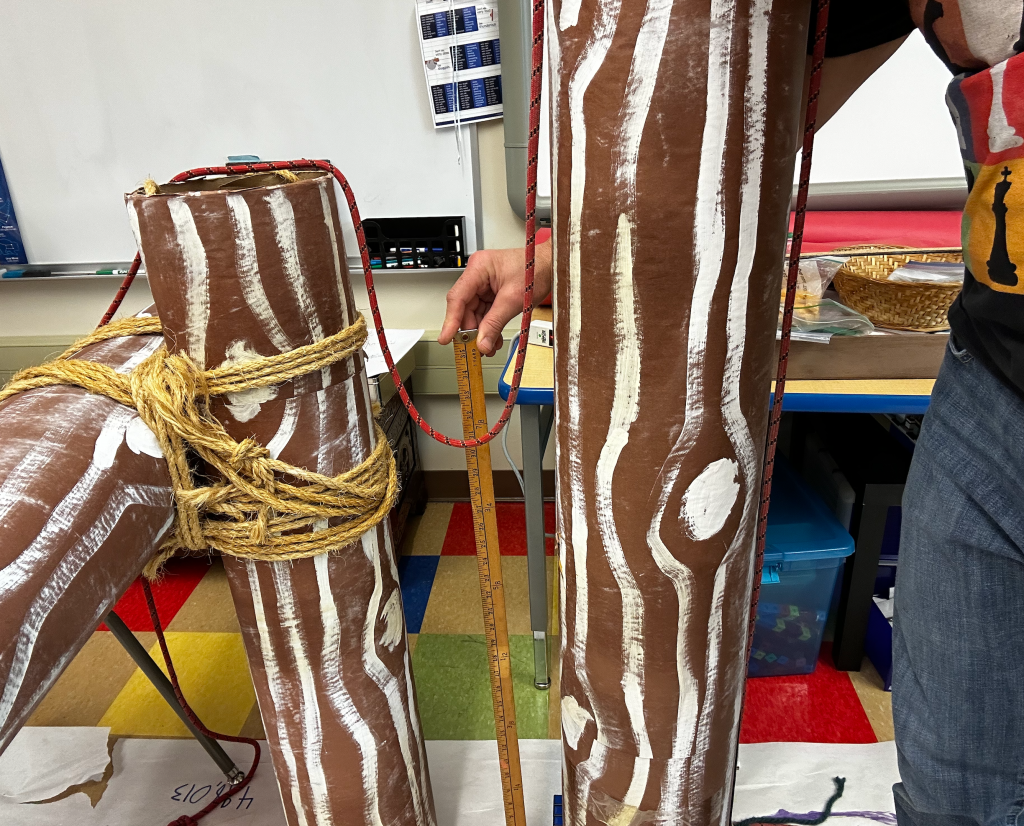
Next, it was time to collect some data to use in our map-making. We used yardsticks to measure how tall our mountains were. (I would have used centimeters as the measuring increment, in order to keep with everything scientific using the metric system, but since the Ready Math assignment had started the project off with “miles” on Zanyville, we kept to the standard system.) Before clearing away all of the materials elevating our journey, we marked the beginnings and ends of each mountain along the route on our map. In this way we would know the edges of the bottoms of our mountains for drawing contour lines.
Prior to drawing our contour lines, we needed to figure out what our contour interval would be. The first thing we did was figure out the height of each mountain, according to tens of thousands of miles. If a mountain is only nine inches high, as was Mount Rubik’s (we named all of our mountains), and a foot (12 inches) represents ten thousand miles, what is the elevation of the summit? We figured out that nine inches is 3/4 of a foot, so we concluded that our nine inch mountain was 3/4 of ten thousand; or 7.5 thousand miles high. The taller mountains required us figure out how many feet fit within the total number of inches. Some rounding was used, and we came up with some valuable summit information that was transferred to the paper map.
Now for our contour interval. How much elevation should each space between contour lines represent? We want the lines to be meaningful, but too many would make the map cumbersome to produce as well as read. We took each of our summits and found a number that was doable.
STEAMing Up Your STEM
Believe it or not, including art with the traditionally scientific fields of STEM has been mildly controversial. “The focus of STEM is developing rigorous math and science skills through engineering. How can you focus on other subjects (such as art) without losing the mission of STEM or watering down its primary purpose?” (Jolly, 2014). People who think this way are trying to isolate the left side of the brain (Pietrangelo, 2022). They imagine that opening STEM up to the arts would allow right-side brain activity to infiltrate and weaken STEM, but Jolly (2014) points out that this is viewing it all backwards. Art is already used in engineering, product design, creative math, and out of the box science. Strengthening our artistic use of STEM will make all four subjects so much more powerful.
Slow cookers like crock pots use lower heats to cook food over longer periods of time, deepening flavors and breaking down meat muscles, so that food becomes soft and tender (2022). A pressure cooker, on the other hand, cooks meals much faster. This mechanism has a seal that helps maintain the pressure within it. Steam builds up and pushes into the meats and other ingredients, breaking down the foods to make them tender, as well as infusing the flavors. You may not have tons of time to teach a STEM lesson. Use art to make the learning more memorable.
Saunas are small rooms that are heated up to 160 Fahrenheit. The health benefits of sitting in one of these hot beds for a short amount of time include clearing the pores of your skin, relaxing muscles, and burning calories, as well as increasing blood circulation (Hussain & Cohen, 2018). Add some water to the hot rocks in these wood-paneled spaces, and you have yourself a steam room. A steam room can help clear ones sinuses, loosen joints, and repair broken skin tissue (Johnson, 2023). [One thing to watch out for in a steam room is dehydration. It may seem ironic to dehydrate when surrounded by so much water, but the heat will cause moisture to leave ones body. Make sure to drink plenty of water and keep your time limited.] Using art in your lessons can add health benefits to your teaching. Students who favor their creative right side brain work might remember the lesson more. The artistic element could clean out misconceptions for visually-oriented students.
The difference between STEM and STEAM is as subtle as sauna vs steam room and slow cooker vs pressure cooker. I’d say that teachers are most likely using some art in their STEM lessons… I can also imagine a STEM teacher feeling pressure to utilize art which could lessen the lesson. Does titling teaching “STEAM” allow for art, promote its use, elevate art to STEM prominence, or simply point out the fact that it was there all along?
I like to think of art as the glue that holds the Science, Technology, Engineering, and Math together. I’m surprised we could see out the windows; There was so much STEAM happening in our classroom!
Enriching the Enrichment
A lesson that I began in the middle of this long mapping of a “Journey” project involved slope measurement. I thought that figuring out the value of the angles of the mountains would be useful. As it wasn’t helpful in completing the drawing of our map, I dropped it after spending only a little time on it. The information was very interesting, however, and I can foresee using it in on a slightly different angle of the lesson; Switchbacks.
Our Journey would not have gone straight up the sides of the mountains. A switchback is when a trail travels at an incline, but also more parallel than perpendicular to the mountain’s rise. After a short distance, the trail will “switch” directions and zig zag up the side of the incline. This means that the hiker will walk a much longer distance in order to get to the top of the incline, but it is an easier hike. What does this mean for our Zanyville trek? The journey, being its given length, will not go up as high; This will lower the peak or summit of each mountain. But, by how much?
Students can explore steilhangs, learning more about earth’s geography. Furthermore, they could research the differences between Earth and other planet’s geographies.
I had students conduct a scientific examination through dropping small plastic cubes on top of one another to form a miniature naturally formed mountain. They were not allowed to touch the mountain with their hands. What was the angle of elevation? We placed a ruler parallel to the side of the slope and used a protractor to measure the angle of elevation. It was about 15 degrees.
It will require some advanced geometry to recalculate the distance from the base of the mountain to the summit, given new measurements of switch back angles and lengths between directional changes. I might incorporate these elements to the lesson when I do it next year. It’s time to wrap this up.
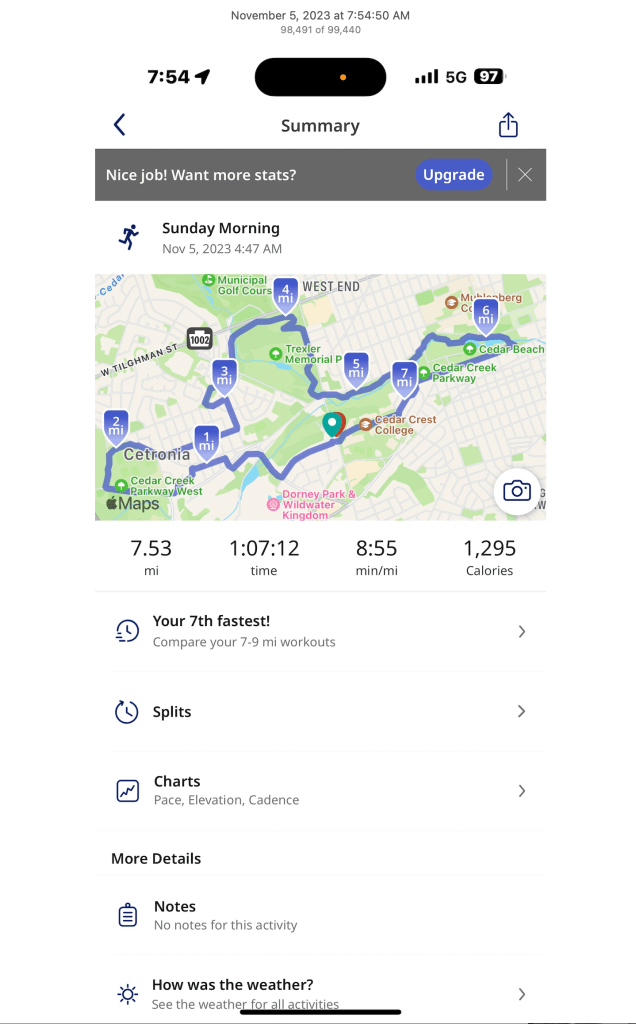
Finally, I would like to see my students graph the elevation of the trip. Between zero miles and 498,013 miles, where did the trail rise and fall, and how much?
I use a running app that uses GPS to track my progress. It calls out my splits at five minute intervals. It also provides charts showing variations in my speed, cadence, and elevation. I want my students to create an elevation chart similar to the one from my running app. It ought to display where the traveler would begin and end hiking up/down mountains, as well as how high the peeks were.
Have you ever wanted to do a project, but there was something preventing you from getting started? Maybe you desired to create something crafty, like a birdhouse. Perhaps you were interested in starting a remodeling project on your own home!
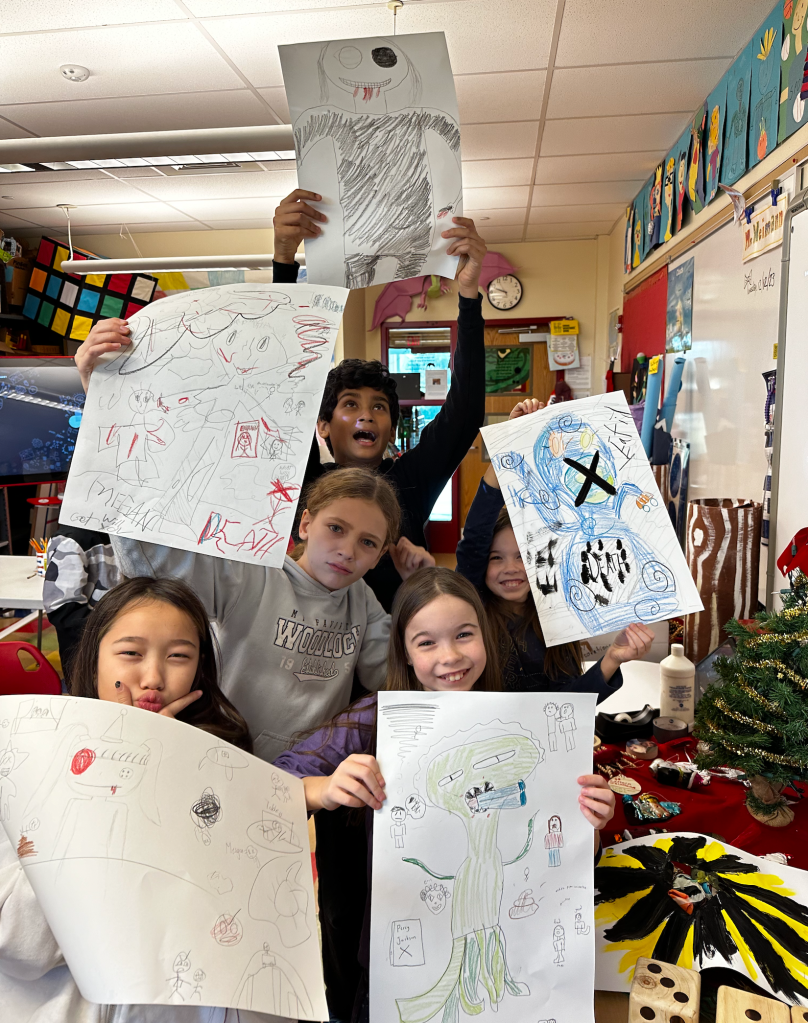
Of course lack of funds or ignorance in the area of woodworking could hold you back, but how many times is it really our own inner dialogue that keeps us captive? As I prepare to start my gifted students down the road of writing a novel, I had the idea to clear their paths of mental blocks right out of the gate. Instead of witnessing my students being tortured by inner demons telling them they’re not good enough, “You’re too young,” “You don’t have any good ideas,” and the like, I decided to preempt these messages with a little mini lesson about fear.
The first thing I did was I had my 5th grade gifted students brainstorm things that frightened them. We discussed ideas like dying and scary people breaking into their homes. Clowns and aliens (the outer space kind) were mentioned.
Whenever a student presented something that they were scared of, I had them dig deeper. “What is scary about death? Everyone and everything experiences it.” These ideas gave them pause. We talked about the idea of not wanting to feel pain. Also, there is the whole unknown-ness of it! One student professed that if only he could go wherever you go after death and then come back, he would feel better about it. Wouldn’t we all!
That idea reminds me of a fun Kurt Vonnegut book; one of his last. In “Timequake” (1997) Vonnegut has his favorite character, Kilgore Trout, repeat a large portion of his life after there is a “timequake” which brings all of existence back in time from 2001 to 1991. Kilgore dies in 2001, and he knows it. Because of this he is afraid of nothing. He knows that there isn’t anything that can hurt him. It’s a mind-bending book exploring free will and determinism. I highly recommend it (too grownups).
Without mentioning Vonnegut by name, I discussed some of these ideas with my 5th grade gifted students. We also talked about “why” someone breaking into your home was so scary. “Your home is the most secure place in your entire life,” I suggested. “The intrusion of a person intent on causing harm introduces more than just fear of losing valuable possessions. It would be a violation of privacy, the destruction of the mental constructs of security one builds up around your place of residency. If your home is not safe, what is???”
Clowns. Why are clowns so scary? They have that painted on smile, but we all know that no person can be happy all of the time. Also, it is so hyperbolic that it appears grotesque. The idea that someone could be feeling something completely different under such an absurdly happy look is disconcerting; creepy!
Perhaps the laughing clown is a metaphor for being “laughed at.” To be mocked or ridiculed is frightening.
After our mini discussion about things that scare us, I instructed my students to make a work of art that displayed something that scared them. I was sure to inform them, “This is not meant to be beautiful. It isn’t for display, and no one is ever going to see it.” I wanted them to let go of their imaginations. Capture their fear on paper. They worked uninterrupted for several minutes.
Then, I got everyone’s attention and explained the project further. “What you are making is a monster.” I paused, so that students could reimagine what they had been working on.
I tacked my talk. “Right after winter break I had planned on us beginning to write our novels,” I informed my 5th grade gifted students. “As I was looking through lesson plans that Mrs. Dweck (my predecessor) had used in the past, I found a Google document that was 116 pages long that she had shared with novel-writers. Mrs. Dweck would share this doc through the Google classroom, so each student would get his or her own copy of it. They had to read it, and add information to it. Mentors would comb through the document, finding and commenting on your work.
“One hundred and sixteen pages.
“I was afraid this was too much, too long, too independent… I was scared.” The looks on my students’ faces were fearful. What is about to happen? They were wondering. Teachers aren’t supposed to be scared!
“You might be scared, also. Maybe you are afraid this project will be too much work for you. You could very well worry that you won’t have anything good to write. It is common to feel insecure about the quality of your writing. And then, there is this dungeon; a pit of despair; that writers fall into called Writer’s Block… That can be a looming fear, even when you aren’t trapped by it.”
I took a breath and waited for the fears to quiet down. “What we are going to do is take these fears; these monsters of doubt, hesitation, worry, insecurity; and, we are going to lock them away. I am going to give you a few more minutes to add to your artwork, and then I’m going to collect them. I’m going to put them into a locked cabinet. This cabinet is locked with a key. I am going to take the key and file it down, so that the points are no longer available for unlocking. Your monsters of fear will be trapped in there forever!”
The students enjoyed drawing, coloring; some even added paint to their creations. A student who hadn’t drawn anything talked about simply stabbing the middle of his paper with a pencil. I spoke over the din of the room and explained, “These monsters are symbols. An empty piece of paper is actually ingenious because it symbolizes not having anything to say!”
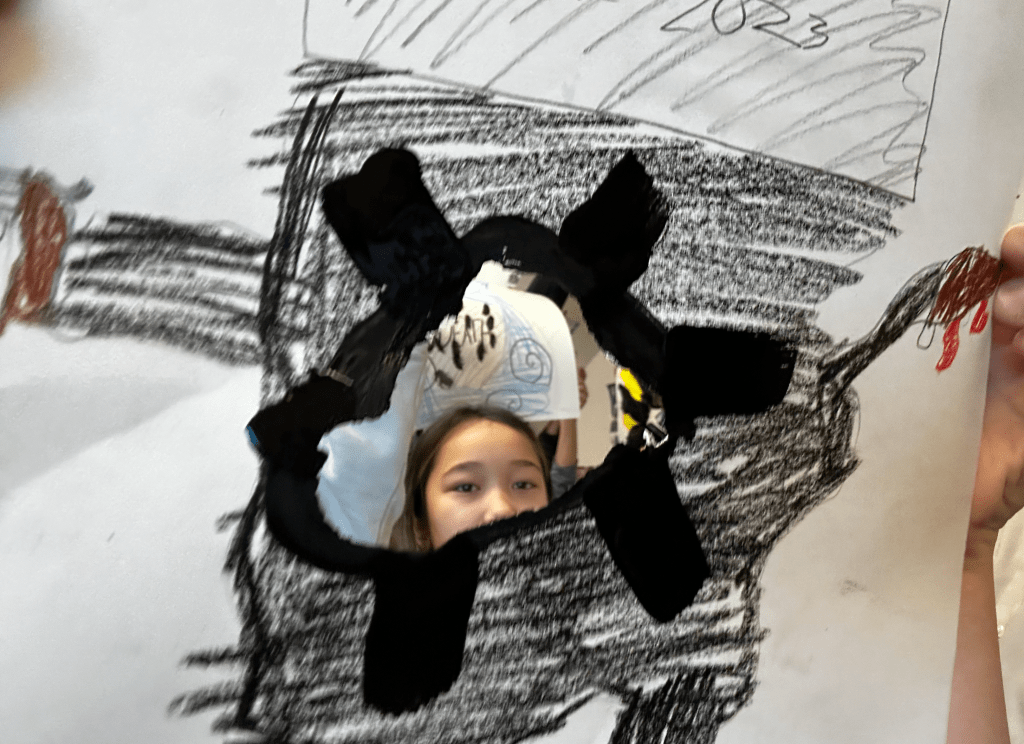
I had been working on my own artwork, while the students created. I had them guess what my fear was. I had taken a piece of every color of construction paper from a box of scrap papers and bunched them into balls. Then I taped them all together to make a sphere. Next, I tore a hole in the middle of the same kind of paper that my students were using. I folded the triangles of the hole in. I used yellow paint to make lines that traveled from the opening in the center to the outer perimeter of my paper. Without waiting for the yellow to dry, I used black to fill in the space between each yellow line. I used black construction paper to hold my colorful construction paper ball in place, at the center of my hole. The black construction paper was stapled to the painted paper, and my creation was complete.
I asked my students what they thought it was. Not only did they understand that it was a black hole, but they knew that the colorful construction paper was matter being sucked into it. I explained to them that adults have so many different responsibilities that suck our attention and time away. “I am afraid I won’t have what I need to be able to write. I am continually protecting my writing time and wrestling mental thought away from the pull of the black hole of life,” I told them. “I frequently find good ideas escaping me.” I pointed to one of the colors in the center of my artwork. “That right there was a great story idea. I thought of it this morning, while I was on crosswalk duty. Now, it’s gone! It got sucked into the black hole of the bell ringing, my reentering the school, coming up here, getting out the supplies for this lesson… All gone!” I made a grown, illustrating the pain of loss of that great idea that will never be remembered. So dramatic:)
“It’s time. Bring your scary creations over here. Mine is joining yours.” I led them over to a filing cabinet that I had recently cleaned out. We placed our artwork into the bottom drawer. They were really into discussing how it would be locked and what would happen to the key.
Now that our fears have been locked up, we can be free to create. When a student tells me that he doesn’t know what to write, I can tell him that he is listening to the monster that we locked up. “Don’t. It isn’t true. You have tons of things to say. They might not all be just right or work with your story, and that is okay. Just get something into text. Don’t worry about what it sounds like, how much sense it makes, or whether it even fits. You may or may not keep and use it. You will probably need to fill in some details to make it work. That’s okay. What isn’t okay is entertaining that fear. Don’t give your monster audience. Ignore it and write; Write about being afraid of not having anything to write! But, write.”
Ready Math has an enrichment activity for nearly every math lesson. These are usually accompanied by a worksheet. The papers can be printed, photocopied, and distributed for students to complete during independent time. The worksheets have thorough instructions on them, sometimes with examples, so that students can manage the assignment without teacher help.
In the “Teacher Toolbox” you can find an array of tools for each lesson for every grade. I like to start off with checking out the “Extend” ideas and adapt them to meet my students’ needs.
The idea is for students who’ve attained mastery of the subject to apply their skills to slightly more challenging tasks. It’s nice for the teacher to have something concrete to look at after the student is done. This evidence of work and proof of advanced mastery can be shown to parents and back up grades on report cards.
One problem with this is that students aren’t always thrilled about being rewarded with a worksheet when they understand and are good at a math concept. It’s helpful for a teacher to introduce the worksheet. They can spice up the assignment with some extra enthusiasm. It might be helpful to pave the way for success with a check for understanding of the assignment. Perhaps the teacher could introduce a twist to the pre-made project, including an additional step or task.
When I am preparing an enrichment activity, I try to provide an opportunity to use the math concept in a real world scenario. We all remember the age-old question, “When will I ever see this in real life?” uttered with a groan and eye-rolls. This is my aim: Show students situations where their math lesson would actually be found.
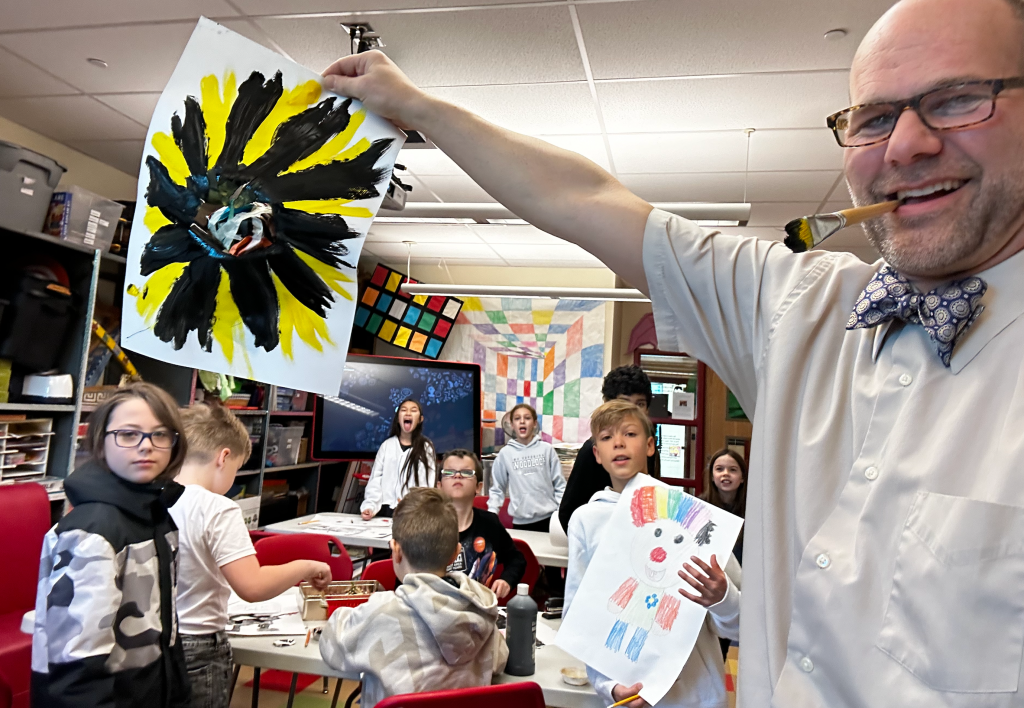
This amazing 5th grade student figured out the last two digits of one of the missing numbers from our #Grinch Escape Room. #Math#MathEnrichment#MathTalk
Another goal of mine is to help students grow their thinking muscles. Perhaps there isn’t a clear use of Pythagorean’s theorem in everyday life, but it can be used to sharpen geometric and algebraic understanding! Puzzles are great for this.
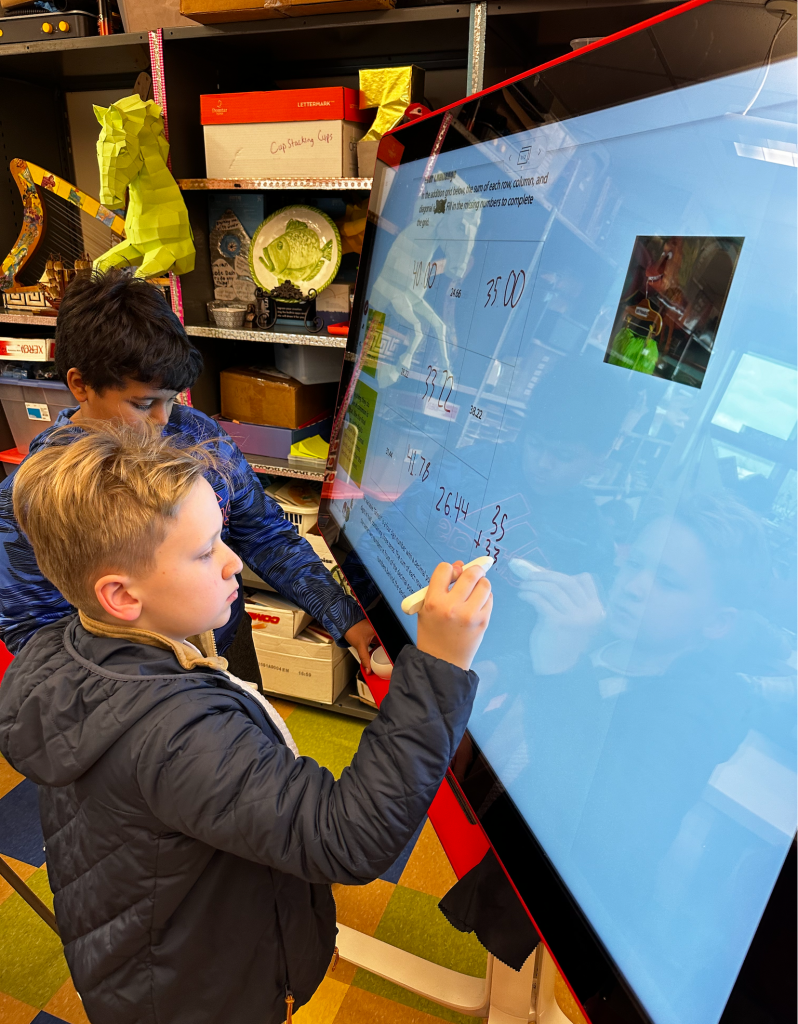
I recently used one of Ready Math’s enrichment assignments to challenge a group of fifth grade students. The lesson/worksheet looked a little like busy work; It involved adding and subtracting four-digit numbers with decimals. You needed to be handy with the math to complete the task with accuracy, but I didn’t see any way that the student would be richer having completed the assignment.
One of the first things I do when attempting to turn a pre-made assignment into an enrichment activity is see if there is some bit of information or number that can be taken away. Can I remove something, and the students still figure out the answer?
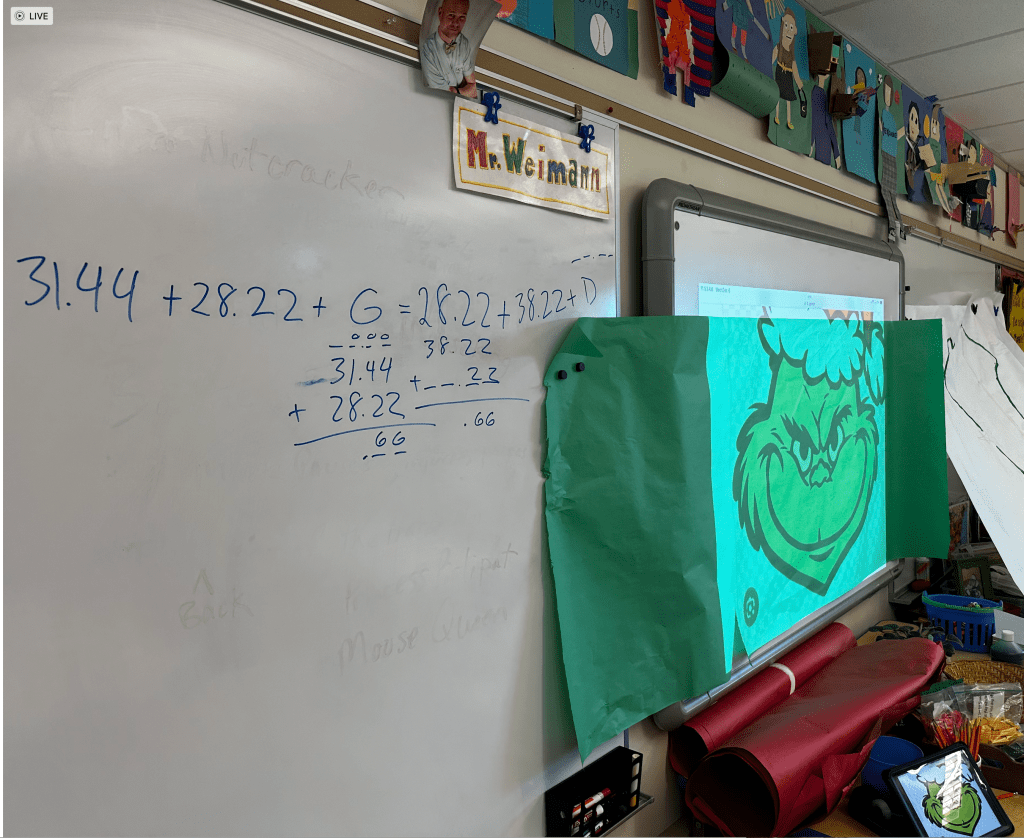
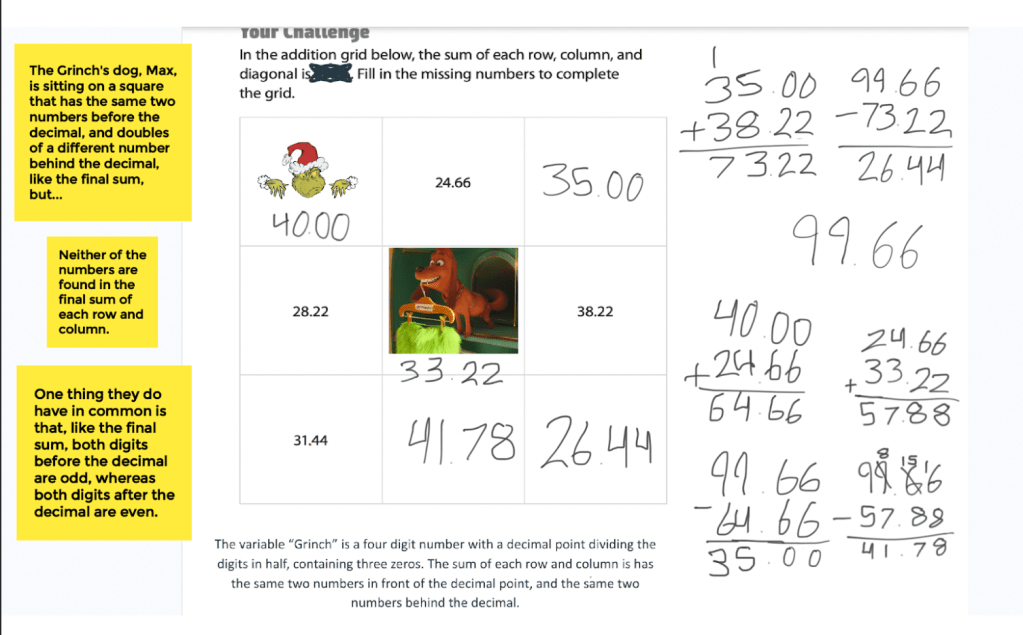
The assignment that I was looking at was a three by three grid with some boxes filled in and others blank. Every row and column, as well as the diagonal lines crossing the center square, all add up to the same number. The worksheet tells the students what the shared sum is. Can I remove that final answer and students still figure out what numbers would go in the boxes?
I tried it out in my journal. The way I saw it, there’s no way around having at least two unknowns. I could ask the students to figure out multiple correct answers; sums of every row and column, but this kind of activity stretches beyond enrichment and requires gifted thinking. That is a topic for another blog; the difference between enriching math and providing gifted instruction.
I tried playing around with the numbers in my journal.
Still liking the idea of removing the sum that all of the numbers share, and making students really dig for the gold of their lesson, I decided to limit the unknowns by providing parameters. I began writing these into hints or clues. Then, the lesson morphed into a type of riddle. I left gaps in the clues, so that students would have to address a few empty boxes in order to solve the entire grid.
As the project evolved, it struck me that I could pretend the problem was a lock that prohibited the class from leaving the room; It facilitated an escape room sensation. This would be the way that I presented the whole problem! I’ve been wanting to explore the use of escape rooms at school. This could be a great start.
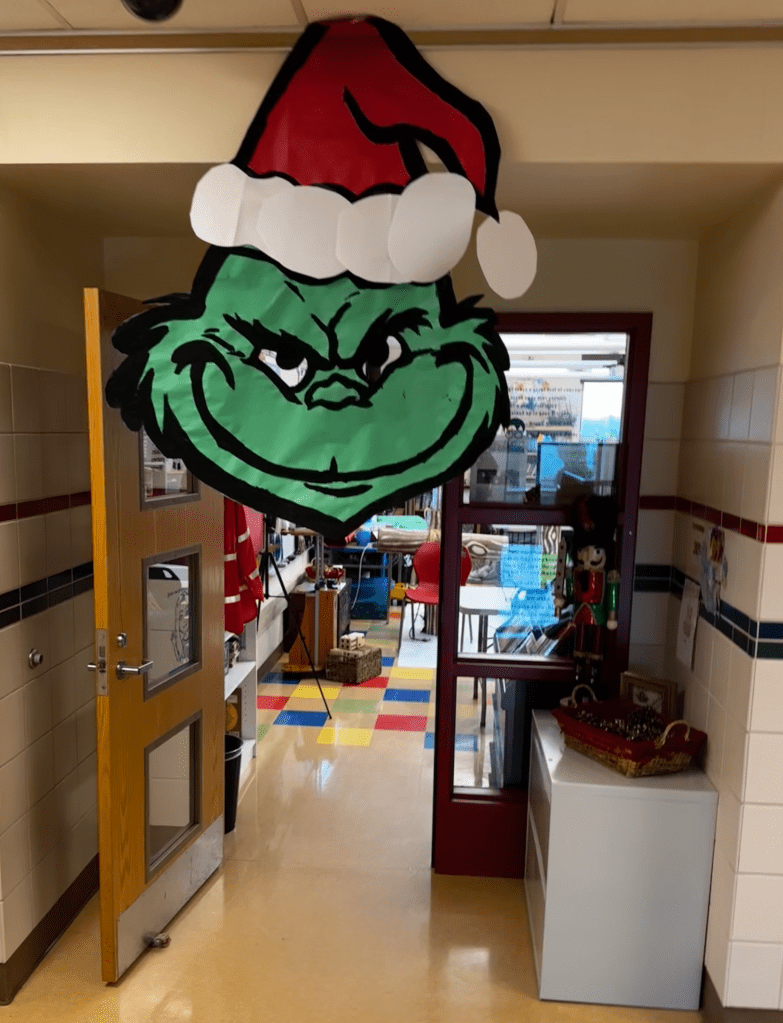
I prepared some more clues for bits and pieces of the four digit numbers within the grid. I put an image of the grid into a Google Jamboard. Then, I copied the riddles and pasted them into “sticky notes” that got spread out around the grid. I themed the whole thing with Grinch, and it was ready for “production.”
The fifth graders loved it. When I told them that they were stuck inside the Grinch’s lair, their faces lit up! “The Grinch, that big ole meany went and scribbled over the sum that we need to solve this grid. He left us several riddles to figure it out. You can’t leave the room until you do.”
Everything was going great… Until… One of the students had actually completed this particular worksheet in the classroom, as an extension activity. My heart instantly sank. Did the Grinch steal my Christmas? Luckily, I’m pretty good on my feet, and I told them that we can still use this whole activity in order to learn how to make up our own riddles and clues, so that we could develop another, future escape room that other students could have to solve. Everyone was cool with this new plan.
I wrote an equation on the board, using as much information as was available. Then we filled in missing pieces with information from the clues. I showed them how they could do this on their own in the future! It was still fun.
We continued exploring the clues, now with a new purpose. Granted, we were working backward, since we already knew the final answer, but that was okay because the students were able to see how the clues functioned. I showed them the way you can start with an answer, analyze the number’s attributes, and make up hints that color and shade the number, without giving it away. They seemed to like it, and we still had to do some adding and subtracting of four digit numbers containing decimal points!
This lesson wasn’t over when this group of students left, however. The way fifth grade math enrichment works in my school, I meet with a different group of advanced math mastery fifth grade students in afternoon. I told the AM students to not tell the afternoon math students the answer, just in case none of them had completed this particular assignment. Then the Grinch let them out;)
Between the groups, my fourth grade gifted students painted a giant Grinch face to hang up over the door. That was fun.
When the afternoon students entered the room, I pitched the escape from the Grinch’s Lair idea the same way I had with the morning crew, but with the understanding that they may already know the answer, like the first group. One student of the eight or so kids had done this assignment and knew the answer, but he was a good sport about keeping it a secret.
Since I had thoroughly examined the entire riddle with the first group, I was well-versed in the clues and could easily present them to this final class. I let them wrestle with the ideas. As it turned out, you could figure out the final answer before getting all the way through the final clue. That was interesting to learn. The experience was pretty fun, and they got plenty of practice adding and subtracting numbers containing decimals.
I’m definitely looking forward to making more lessons containing clues and using the escape room scenario to encourage tension and motivation! It was really nice to have a pre-made template from Ready Math to build from; or, more accurately take away from. But, in the future, I’ll have to be careful about assuming kids hadn’t used the lesson before.
My daughter Scarlet is almost 12 years old. She’s a “Tween.” For a while I’ve been wrestling with knowing when to let her make her own decisions, versus my telling her what to do. I’ve noticed that the more Scarlet has a say over what is happening, the more motivated she seems to be when completing a task or participating in an activity. We see this in our classrooms everyday. Teachers give their students tasks to choose from. Our goal is for them to work independently.
This book is put together for kids. It explains what #power is, why kids don’t have it, who has power over adults, how to get it, how to use it, and what kids can do to get it. pic.twitter.com/x959Iv5LKH
Children feel powerless, and this feeling may cause them to act out.
Is independence synonymous with autonomy? Scarlet and I explored the definition of autonomy with sidewalk chalk. It means “Self-governance.” This is quite different from simply “working by yourself,” independently. Do teachers strive to empower students to govern themselves, or are we simply trying to get them to work quietly?
What is power? Are power and control synonymous?
I’ve been mulling over the idea of power for a long time. I’ve read several books on the subject. I’ve discussed it with Scarlet. We read a book for kids together. Power is a subject that is explored, lost, earned, used and abused in every story, book, movie, play, and poem. I want Scarlet to feel and be independent; I want her to feel powerful. What does that mean? Am I saying that I want her to have a lot of power? What is power?
One of my favorite activities to share with Scarlet is read alouds. My fondest memory with my late mom was her reading to me. She read classics like “A Wrinkle in Time” during long car rides, and we labored over the vocabulary in “Swiss Family Robinson,” sitting in bed at night. Is this a novel or a botany book? I remember wondering! We gritted through it, and the experience bonded our relationship and a love of reading.
Scarlet is reading on her own now. She is becoming autonomous. Have I lost power over her? Does it just shift?
I’m proud to continue this family tradition with my daughter. The other day Scarlet and I finished reading a book together. If I were to say, “What do you want to read next?” I would be putting power in Scarlet’s hands. I’d be empowering her. She knows that we are not going to read any ole’ book that she suggests, however.
“What’s your favorite book?” my daughter Scarlet inquired, only to reveal that our current read aloud #Holes is hers.
She wouldn’t let me stop reading… Then, she wanted to save the very end for tomorrow.
There are limits; Parameters. If she were to say, “Let’s watch Sponge Bob Square Pants,” I could point out the fact that I asked what we were to “read” next, not “watch” next. Her decision must fall within the parameters of text. Am I being controlling by fencing in her choices?
Could she choose a graphic novel? Yes. There is a lot of text in most graphic novels. Some argue that you read the pictures, and illustrations tell their own story. Could she choose a book that was far below her reading level for us to read together? Yes, as long as it contains text, and even some books with only pictures could be considered “readable.” However, just as I would guide Scarlet away from choosing a book that was too difficult to understand or one that had grownup situations in the plot, I’d steer our read-aloud away from texts that were too simple, also.
The term steering, providing guidance through suggestions, makes me think of the word “influence.” This term originates in medieval latin influentia which means “flow into” (2020). When you are causing thoughts and decisions to flow in a particular direction, you are influencing them; you’re being an influencer. Teachers do this all day long when they get conversations back on track. “Let’s return to the topic at hand…” a teacher suggests. They just put up a barrier, prohibiting the stream of students’ thoughts from meandering in other directions.
A2: I'd say a key ingredient is #Autonomy. Give kids reign and responsibility. That puts power into their hands. If you tell someone to collaborate, and then you tell him/her exactly how, it is sinister rather than synergy. #MasteryChathttps://t.co/Sri8XkmkNZ
The more influential you are, the more powerful you are. Having the ability to move people’s thinking is powerful. I think we can all agree that a person with the authority to command others to stop an action or require them to do something is a person of power. Can an influential person have more power than a person in a position of authority? On the flip side of that coin, can an authority figure “un-influence”?
Going back to the concept of influence controlling the flow of water, what is more powerful, a pressure-washer whose motor pushes water at 3,500 pounds per square inch, or gravity? The pressure washer not only creates an astounding force behind the water it pushes, but there is a wand that has a trigger, so the water can be turned on or off. Is the pressure washer influencing the water?
That might sound like a silly question, but when you apply the analogy to “influencers,” and imagine a person wielding information, you can see that influence can be very forceful. Social media companies have built almost literal engines that limit and force users to view information (posts) tailored for them. “On social media platforms, algorithms are mainly designed to amplify information that sustains engagement ” (Brady, 2023).
In the same way water dripping on the same surface over and over for hundreds and thousands of years will affect a hole right through even the hardest rock, people cannot withstand constant influencing on a specific subject forever. And then, put the power of the media and other influential sources behind those ideas, and you’ve got yourself a pressure washer of information!
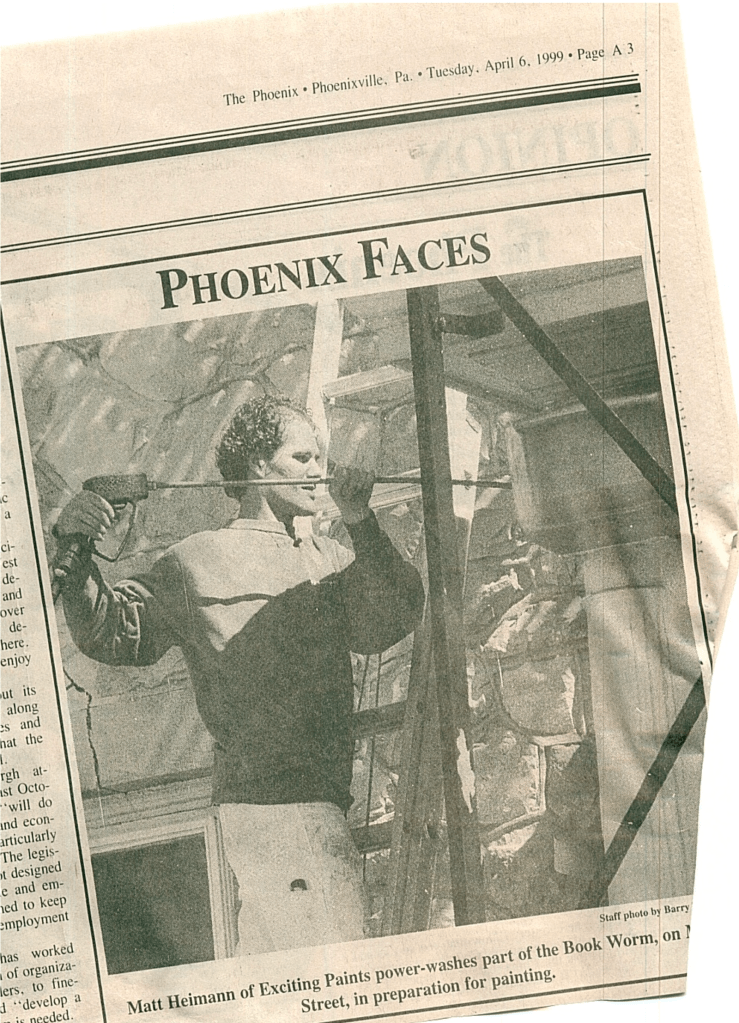
My fiancee Sonia powerwashes the outside of the “Bookworm,” a used bookstore in Phoenixville, PA that we painted together (1999).Here’s a photo of me with hair! The year was 1999. I was using a power washer to clean the outside of a building before painting.
A term that has been popularized in recent years is saying an idea has been “weaponized.” This means that someone is using a concept; usually one that would typically be benign; in a negative way against someone else. They have turned what would be a gentle drip of an idea into a harmful stream of thought. “This is sometimes referred to as cognitive hacking” (Wigmore, 2017). You could try to shield yourself from the onslaught of weaponized influence, but you might need to simply remove yourself from the strong stream of information, if it is too overwhelming. If you find yourself drowning in a river of ideas that are too deep and wide to navigate, get yourself a raft, climb out, and find a shore, even a hill to climb up.
Some people put a lot of effort, money, time, and resources into diverting, changing, and even hiding information, so that their audience does not get influenced by it. These people are wielding power over others’ thoughts in a way that has been termed gaslighting. This nefarious behavior is hard to spot yourself. It usually requires someone observing it happening to a victim. Basically, if someone is trying to convince you of something that you know to be false, or they seem to be working at discrediting your system of judgment, generally, they may be attempting to gaslight you. Get help. Explain to people outside of your situation what is happening. Find people who will support your personal mental autonomy.
My good friend, the late Julia Dweck, was an extremely influential person in my life. What gave her so much power?
Controlling the thoughts of others, or a more subtle and polite way of putting it might be “influencing others’ opinions,” is only one form of power. This might seem like a dark subject, but if you are not thinking about power, others will lord it over you. Do not be vacuous. Also, water may be clear, but if you get enough of it in the same place, it can block out the sun. Those same ominous rain clouds might save your life if you are a farmer experiencing a drought or firefighter looking for help battling a wildfire. Context matters. Who you allow to influence you, and how much you allow them matters.
A person who influenced my teaching and thinking a lot was Julia Dweck, the gifted teacher from my school. She and I shared opinions, teaching styles, likes and interests. If Julia recommended a book, I would be more likely to read it than if someone else did. One that of the books that Julia suggested I read was “Circus Mirandus” by Cassey Beasley. This book explores the theme of influence as power more clearly than most. It has an illusionist who alters characters’ perceptions. And then, there is another character who is bent on accumulating and abusing immense power over others (birds and people) through both magic and persuasion. Autonomy gone bad. It is very thought-provoking.
I plan to write a few blogs exploring power; What it is, how it is used rightly and wrongly, how to help those around you have it (empower), and how to protect (shield) oneself from those who are using theirs against you. I hope you join me on this journey of thought.
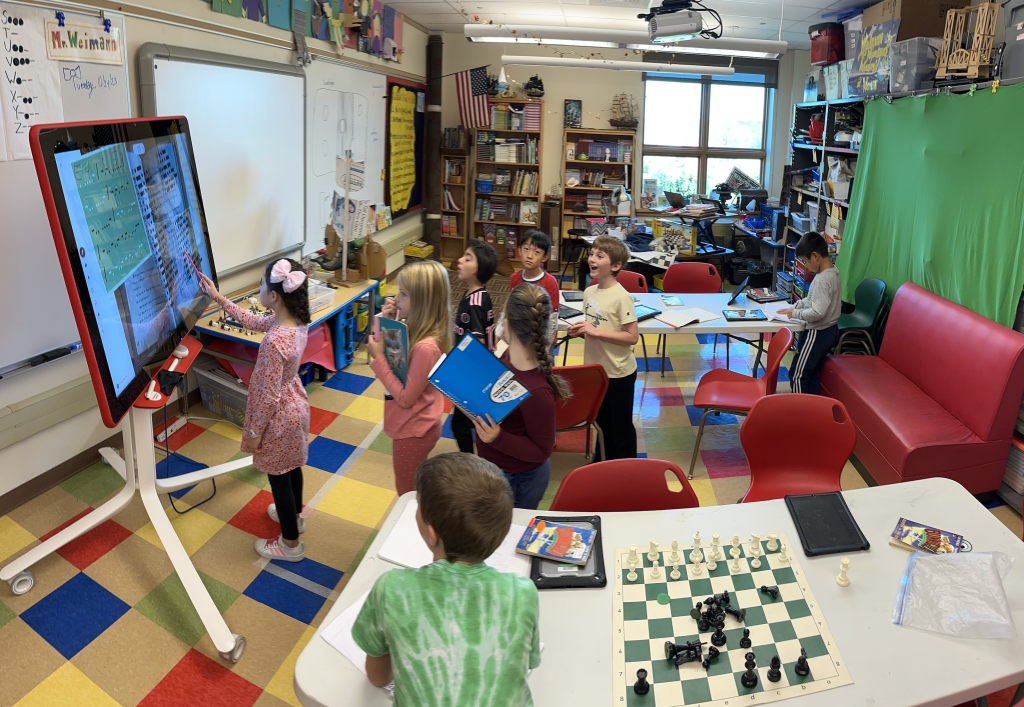
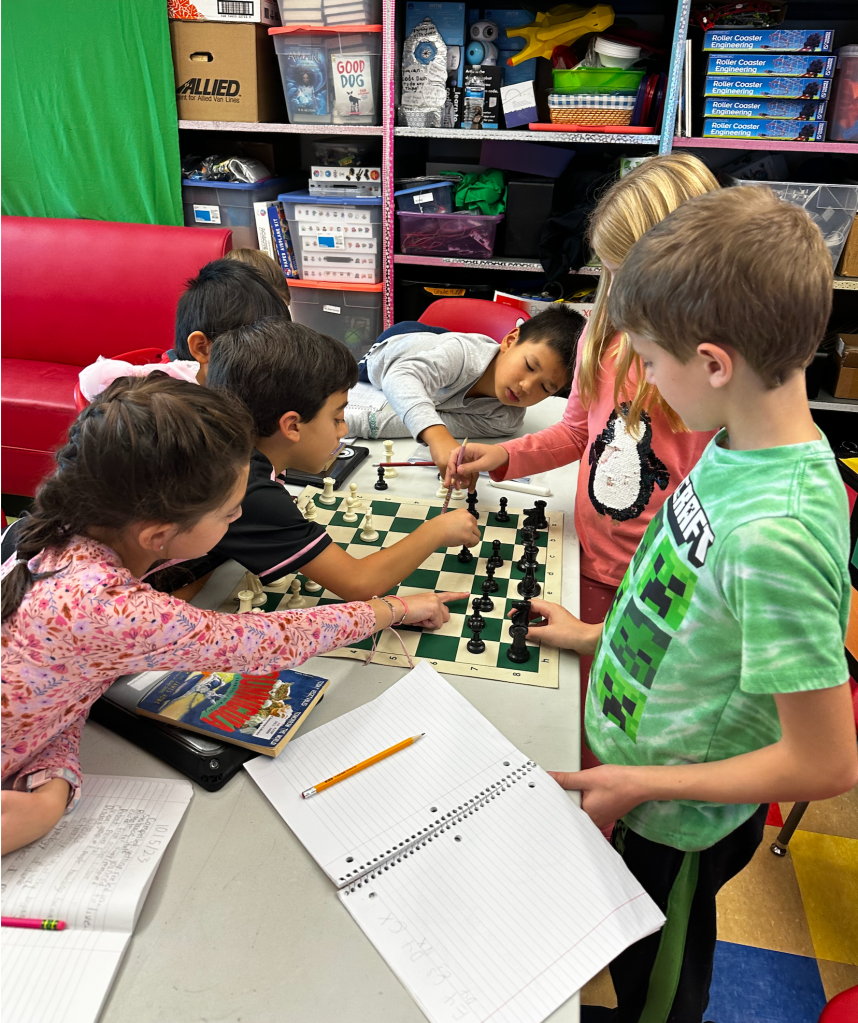
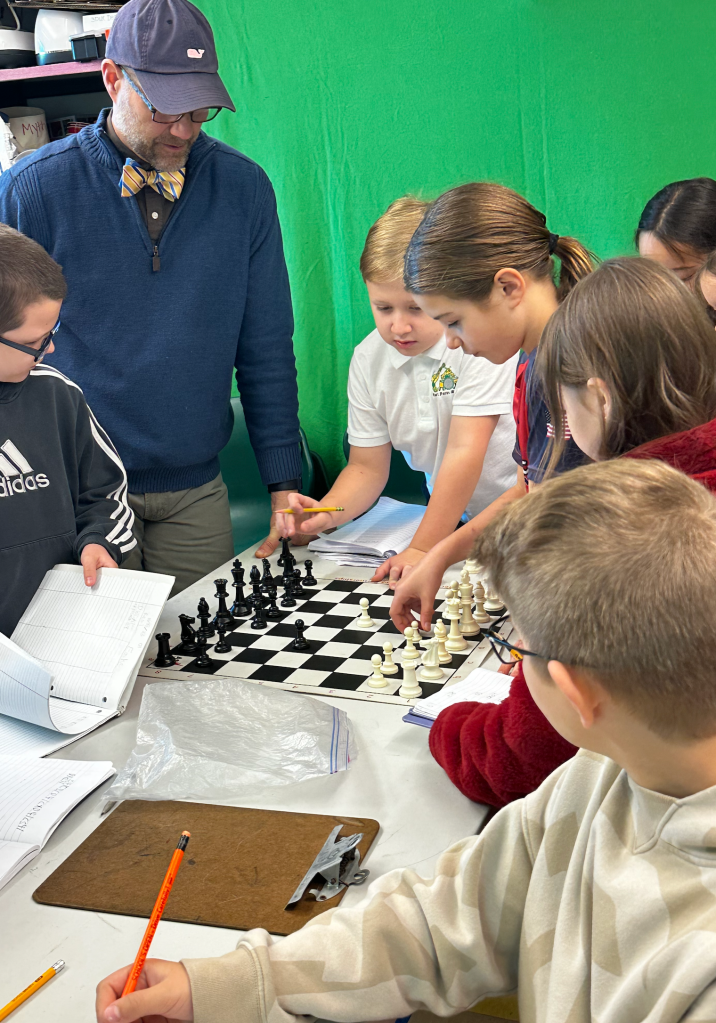
“How many more squares is White attacking than Black?”
This problem was awesome on a few fronts. Students had deciphered a Morse code message that shared a short sequence of chess moves written in algebraic notation. They played out those moves and discovered that one player had a huge advantage over the other. “How much of an advantage? Be specific. Can you put a numeric value to the advantage?”
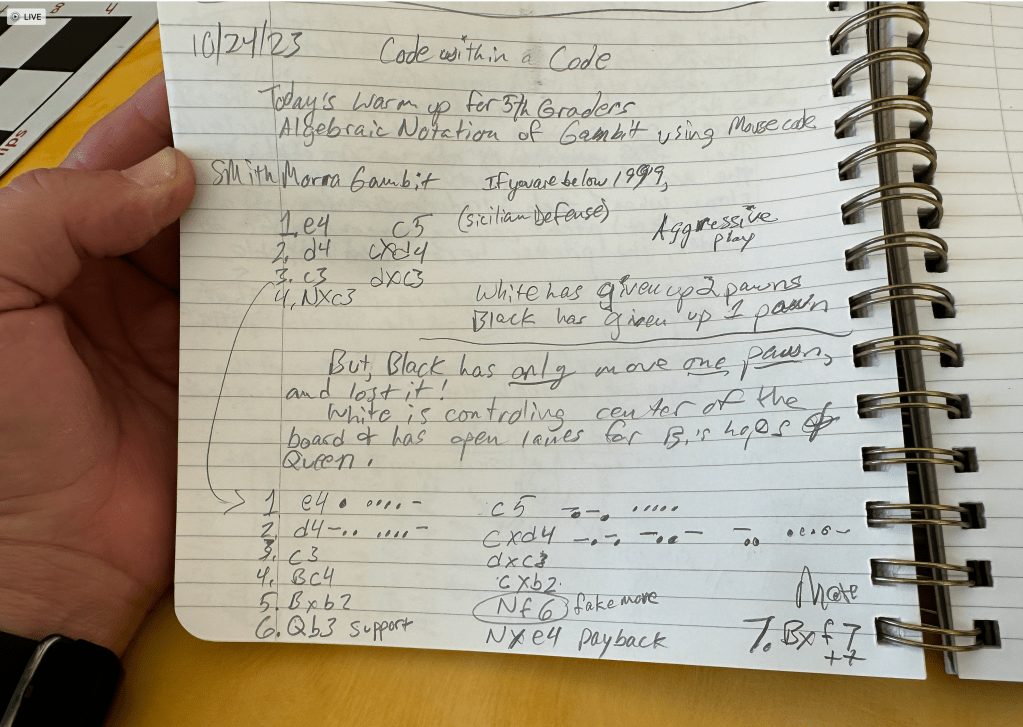
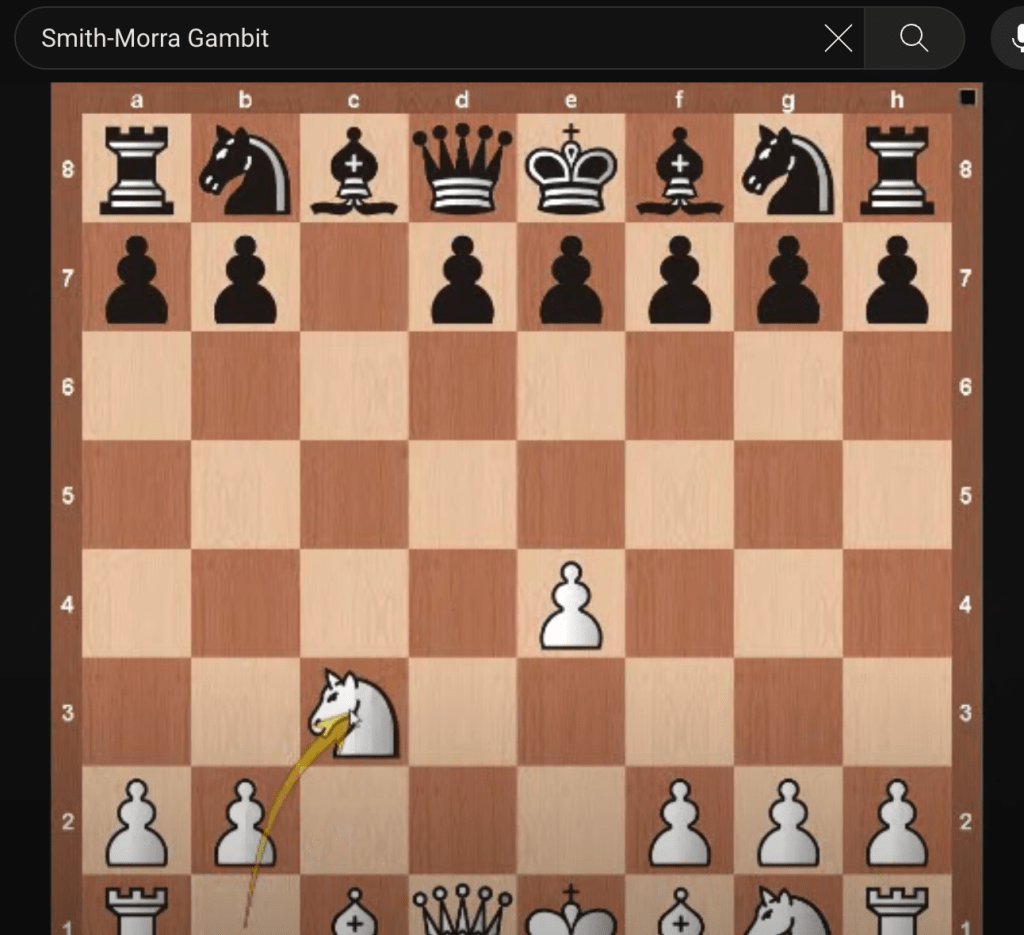
It all began with my preparing a lesson for chess club. I was going to teach club members about gambits. I researched the more common gambits and landed on the Smith Morra Gambit. I found a succinct video on Youtube that explained the gambit. While watching the video, I wrote down the algebraic notation.
But, I wouldn’t just give them the chess code to learn the gambit; I decided to have my gifted students decode the code! My fifth grade gifted students were the first ones to see the code. They had only dabbled with decoding Morse messages.
I had used Morse Code Translator to change the chess play sequence into dots and dashes. Rather than writing the number of the move; This was going to be confusing enough as it was; I decided to change the colors of the moves. White’s moves were turned to white dashes and dots. I made the background of the text box green, so that you could easily see the white and black codes. I put an image of my code, along with the Morse Code alphabet and accompanying numbers onto a Google Jamboard. The fifth grade gifted students were on it the moment they walked through the door.
The two things that I shared with the fifth graders was that the slanted line (/) separates the words; In this case it broke up the moves, but I did not explain that. I told them nothing about the actual message. The second thing that I pointed out was where each letter or number’s code ended. The translator that I use makes it much easier and faster to produce Morse Code, but sometimes it is difficult to locate the space between each letter/number. After pointing out these two key factors, I stepped back and watched the struggle.
Right away I heard a couple students divvy up the White and Black “words.” I was glad to hear the idea of collaboration. I wondered how long it would take for someone to understand that these were not actually words. The very first coded move was e4, the most popular opening move in all of chess. I heard a few people verbalize bafflement, but several recognized the move, “It’s chess!” someone shouted.
I didn’t help them with any of it. At least one student knew enough to be able to read most of the algebraic notation and make sense of the moves. Of course I had a chess board and pieces handy, and we set up a game. I let the students figure out the sequence of play. When they came to the gambit on the second White move, I stopped them to explain what a gambit was. This was good practice for my chess club lesson that afternoon. A couple kids would get a double lesson, but that was okay. They could be my co-teachers!
“The word gambit is closely related to gamble. It means taking a risk. A chess gambit happens when one player offers up a peace as a sacrifice in order to draw an opponent into a trap or sequence of moves that would benefit the aggressor (the one offering the gambit). Do you capture the sacrifice or risk the piece taking your own?”
I had the fifth graders play through the short sequence until Black’s pawn was captured. Black had accepted the gambit, capturing the initial White pawn placed on d4. White offered up another pawn on c3. When Black captured that, White might feel a little on edge, because now there is a Black piece threatening the second rank of the White team! It is so close to attacking the Queen!!
I pulled one of my old tricks and gave my gifted students a #code within a code… with a riddle sprinkled on top.
Before any more damage can be done, White captures with the Queen-side Knight, Nxc3. White has lost two pawns, while Black is only down one. If you were to only count points, it would appear that Black has the advantage, being up a point. A mere glance at the board should show even a novice player that White is in a much better position!
I explained to the fifth grade gifted students that the best thing to do at the beginning of a game of chess is to control the middle of the board. With that criteria, everyone can easily see the trap that Black has fallen into. There is a White pawn left sitting on the initial e4 square. And, now a Knight is “developed,” backing up the e4 pawn and attacking four more squares (b5 and d5 as well as a4 and e2).
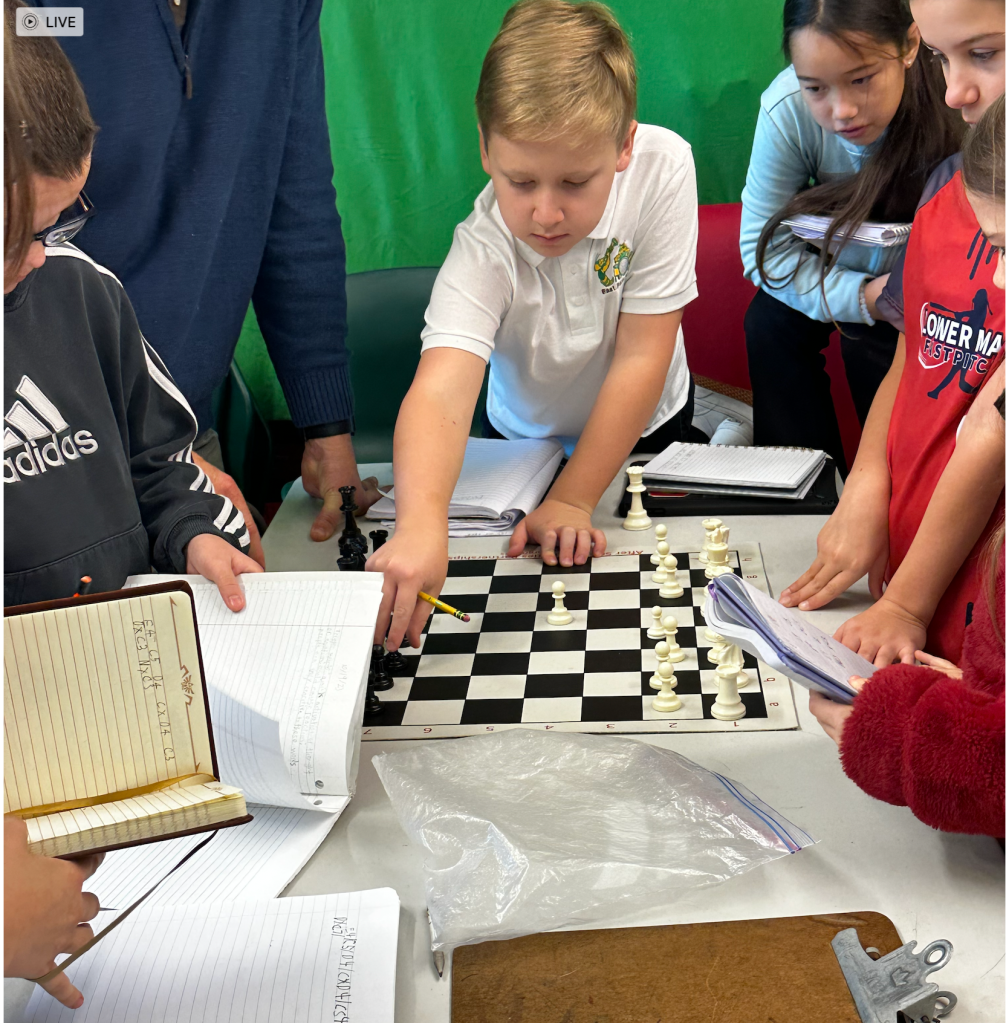
The fifth grade lesson stopped there, but my fourth grade gifted students got a treat. It only took seconds for them to figure out that the Morse Code message was algebraic notation for a chess game. When I heard some groans, I told them, “The first to solve the riddle can play me in a game of chess.” Now, the heat was on. I set the board back up in the middle of a table while my students grappled over letters and numbers seemingly unrelated to one another.
We worked through the Smith Morra Gambit sequence the same way I had with fifth graders. I had the fourth graders figure out the algebraic messaging. They figured out that the Xs meant a piece had been captured. I had to explain that the “d” in dxc3 meant that the capturing pawn had come from the d file. After explaining gambits and discussing the advantages and disadvantages of the board we were left with, I played a blitz round of chess against a pair of students.
Third grade was next, and these students are not only classy, but they are some of the hardest workers I’ve witnessed. Their grit knows no end. I presented them with the same problem. They labored through decoding my Morse Code message. We played the sequence out. I taught them what a gambit was, and we discovered the significant advantage that White was left with. But… Then I was hit with a question that I liked so much that I recorded it on video so that I would remember it: “We know that White has the advantage, but how much of an advantage? Can we put a number to it? How many more squares is White attacking than Black?”
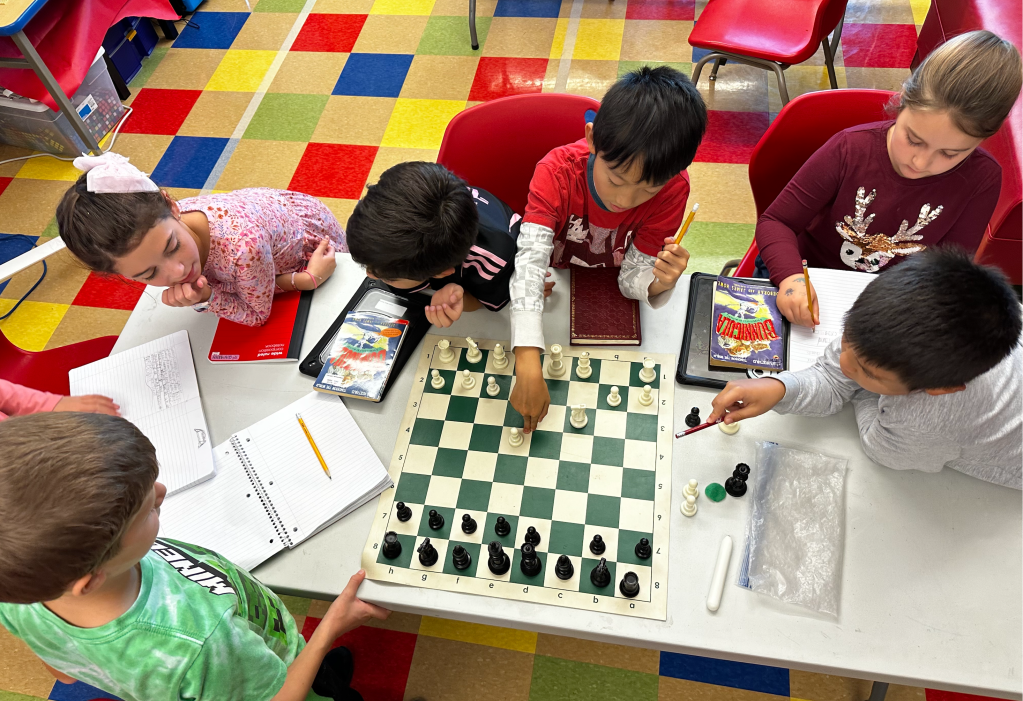
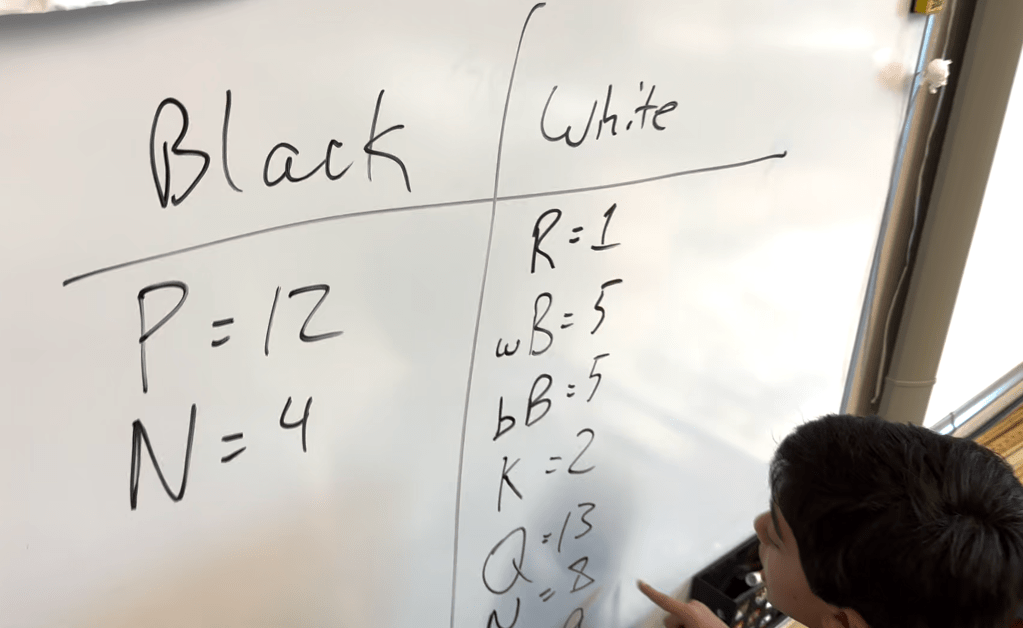
Not all of my third graders know how to play chess. I taught the team how each piece attacks. “How many squares is the King attacking?” I asked. I showed them how it moves. The answer was two squares. “How many squares are the Bishops attacking?” We looked at their lines of attack. I showed them the squares that the Queen attacked, including the Black pawn on d7. We went over how a pawn attacks diagonally and the way a Knight moves. Then I set them loose.
A few floundered, so I guided them to make a T chart. “Let’s do one color at a time,” I suggested. “Also, how about we focus on only one piece?” We carefully counted all of the squares that the Black pawns were attacking (12). Then we counted up the Knights’ attacks (4).
Next we moved on to White. There was an empty square next to the White Rook, so that counted as an attacked square. We continued counting until we covered every piece. I missed a couple of the the Knight’s attacks, but Gray got my back. She caught my mistake, and we corrected the calculation.
In the end, we discovered that White was attacking 43 squares to Black’s 16, way more than twice as many! So, was the gambit worth it? I’d say so. And, what could Black do differently to limit the massive advantage? Don’t fall for it. Don’t take the gambit. Push forward or ignore, but definitely think ahead.
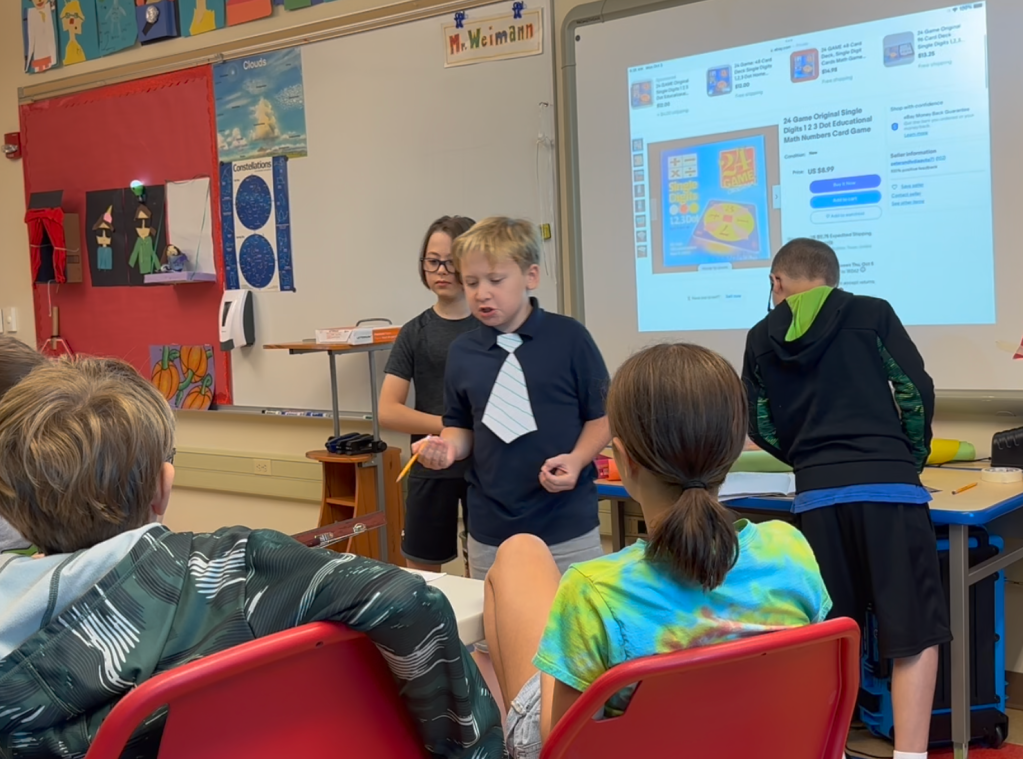
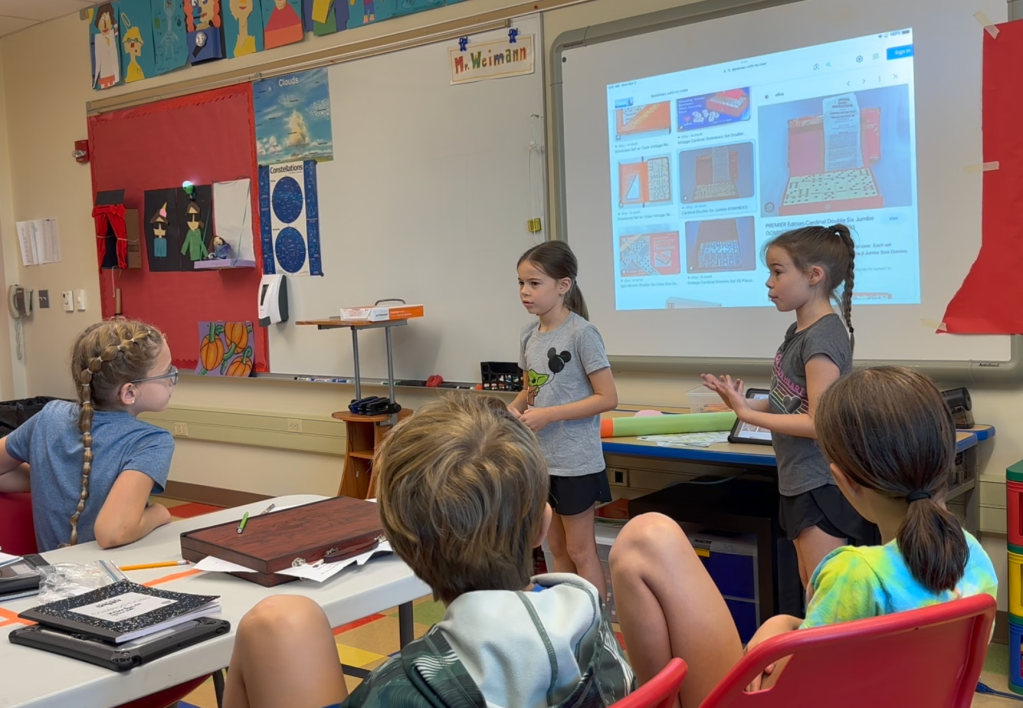
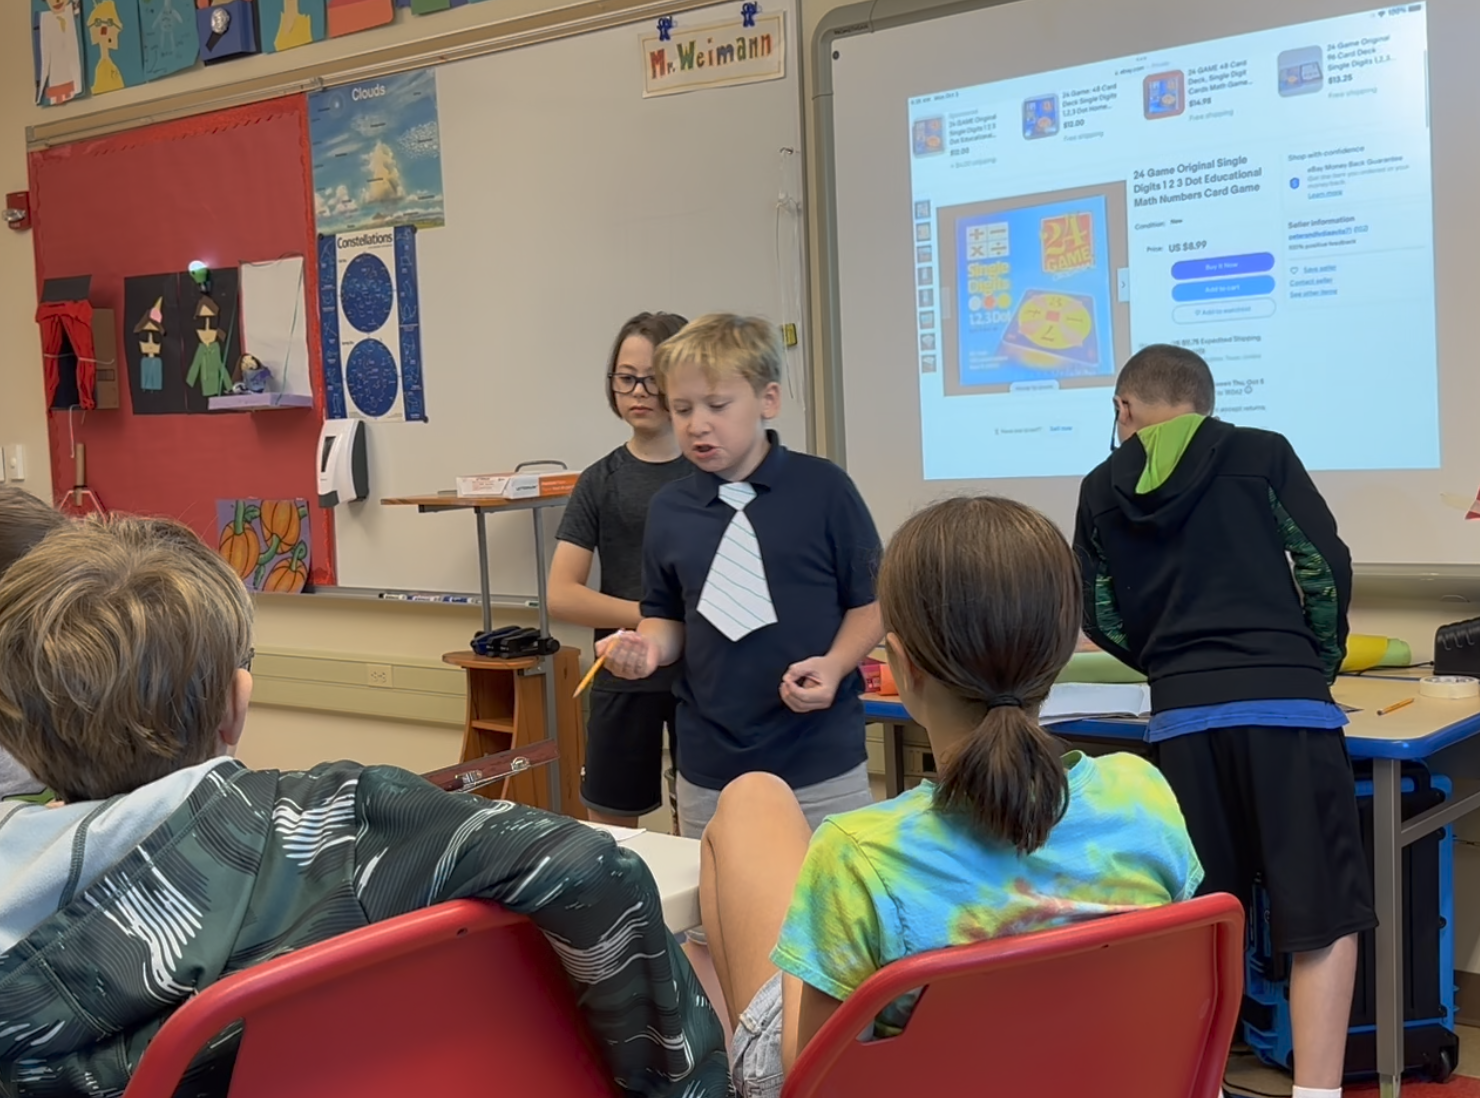
A couple of weeks ago I was introducing the game of Dominoes to my 5th grade gifted students when one of them grumbled that they would rather play Math 24. I did not take offense because I understood why he felt that way. This student is good at Math 24. He already knows how to play it. And, the gifted program practiced it a lot last year, so he was used to doing it. Dominoes was new. It seemed overly-simple. Luck is involved, so you are not completely in control of your success.
If you don’t know what Math 24 is, I’ll explain. The typical game (There is more than one version.) involves cards with four numbers on them. You have to use all four numbers in order to create 24. You can use any operation; addition, subtraction, multiplication, and/or division. There are difficult, medium, and (relatively) easy cards.
Exciting news! My students are conquering the @24game variable cards by finding the perfect factor to make 24 on all four wheels! Can you guess the value he used before watching the video? Teachers, how do you make math fun in your classroom? #MathIsAwesome#CriticalThinkingpic.twitter.com/M4McDviNuS
The way the game works is a group of students will sit around a table, and a card will be placed in the middle. The first student to find the algebraic expression to create 24 taps the card. If they can describe the process of acquiring 24 from the four numbers, they get to keep that card.
There are Math 24 competitions. Our school has done very well in the past. Although I plan to allow time to play/practice Math 24, so that we do well again this year, I want my students to experience more. There are other math games in the world.
— Julia's #STEAMing up Learning! (@GiftedTawk) March 5, 2018
One of the reasons I like Dominoes is because of how old it is. Created in China around 1300AD, our current Domino game was adapted in Europe, where it received sixes and its name. You see it played all over the place by senior citizens. It is a relatively simple game that involves mental math to add mostly single-digit numbers. There is strategy involved, because you want to get rid of all of your Bones before your opponent. You can find Bones (game pieces) in any game room, recreational or community center, and most toy stores.
When my student complained, I assured him that we would work on Math 24, but I also pointed out some of the game’s weaknesses. I don’t think that these 5th graders were used to this; How could a teacher be in any way negative about a teaching tool? Weren’t they all sacred? “Can you play Math 24 with your grandpa?” I asked.
“We could teach older people how to play…” These students are in the gifted classroom for a reason. I can easily imagine them dragging a box of Math 24 cards around with them and spurring on the elderly of retirement communities to rekindle their number sense.
I really like Math 24. It greases the wheels of the computational side of the brain. When you play it, you look for patterns and relationships between numbers. One must have speedy mental math recall of multiplication and division facts, motivating students to memorize their basic math facts.
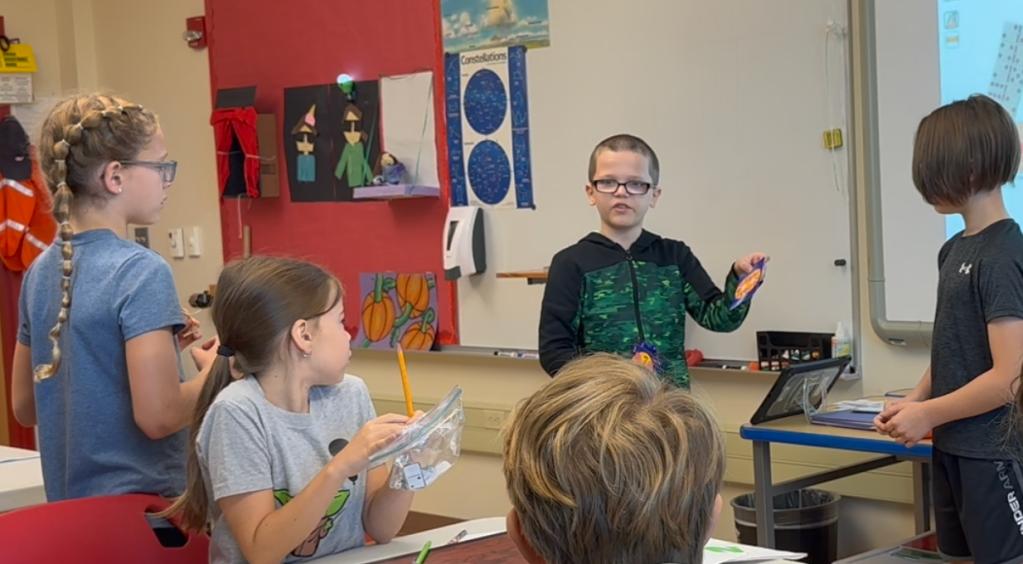
I stuck up for the game of Dominoes. “Yes, it may be simple, but you were unable to solve the word problem that I had presented,” I reminded him. This was a big part of why he had grumbled. I don’t think that my gifted students are used to NOT being able to figure things out. As I made my points in favor of learning Dominoes, a couple of students got on board with my thinking. One student jumped out of her chair and came to the front of the room to deliver an impromptu speech about how Dominoes is better than Math 24. As she wrapped up, a Math 24 supporter yelled, “Objection!” He was interested in providing a rebuttal. And, this is when I channeled the energy into a formal debate: Math 24 versus Dominoes.
Not EVERY gifted student that I teach is thrilled about learning #Dominoes. 1 or 2 was grumbling, and wishing we could do #Math24. Rather than ignore or war against the dissension, I embraced it, and we explored pros/cons of both games. This led to #Debatehttps://t.co/ZyYvxAxzF3
I drew a T chart on the board and had students do the same in their gifted journals. We wrote a few pros for each game in the corresponding sides. I told the students to come up with more on their own. “Don’t just write down ideas that support your side,” I warned them. “Imagine what your opponent will argue. This way you can combat their reasoning. You will have to come up with attacks to weaken their position. It will be easier if you can preempt what they might say.”
With that, they were gone. Back to regular ed, they went, new and exciting plans for the future swirling through their heads.
I’ve done debates with The Polite Pirates (my 3rd grade students) before. They have gone well, but the one thing that I struggled with is the conclusion. Normally, I curate the debate so that both sides are pretty even. Then, in the end, I declare it a tie;) Everyone whines and complains, but we all go home content. I tell them that both sides won, as well as myself, because, “You all worked so hard and got so much out of the experience.”
Idea: We decide (as a class) on what will receive points (and how many). Then I video tape the debate. Afterward, we watch the video and try to objectively score the points. I average all of the scores for each team. Whoever comes out on top, wins. pic.twitter.com/JtmyzULElt
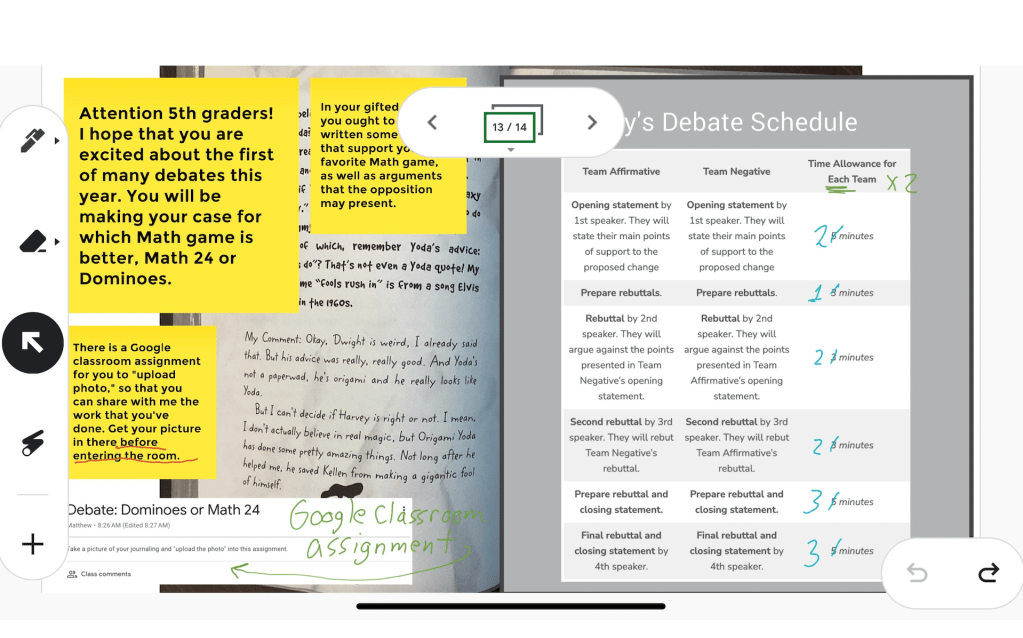
This time, I wanted to try to make the debate a little more formal. If I expected my 5th grade gifted students to work at thinking and planning their arguments, I should do my due diligence and deliver an acceptable format with a point system. I searched online, and found a blog about classroom debates that offered some good tips.
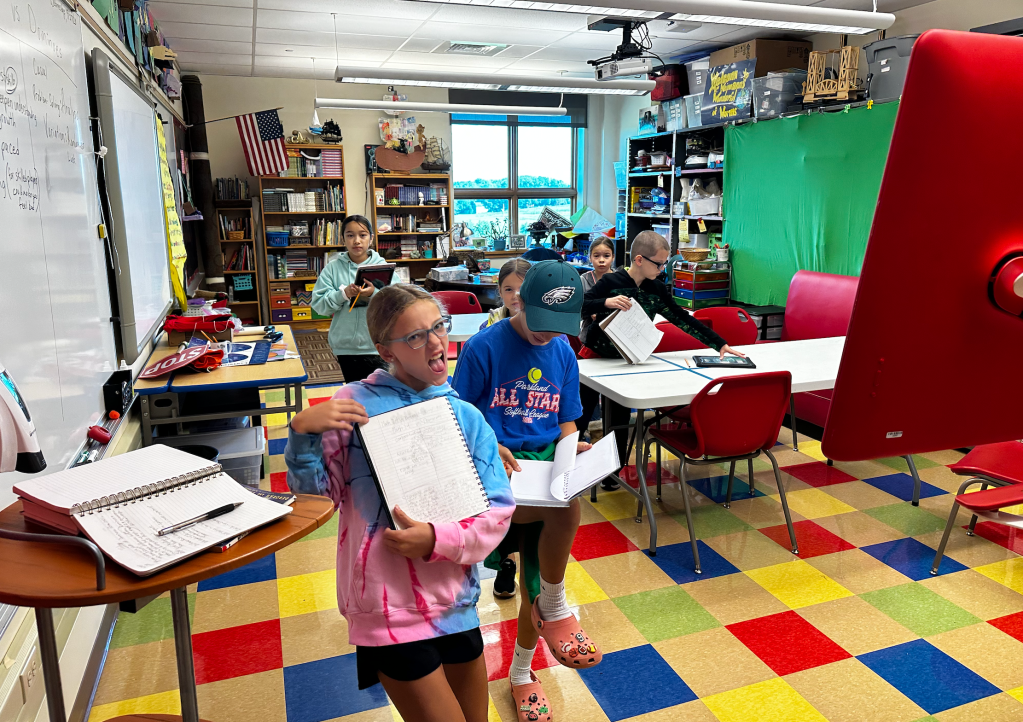
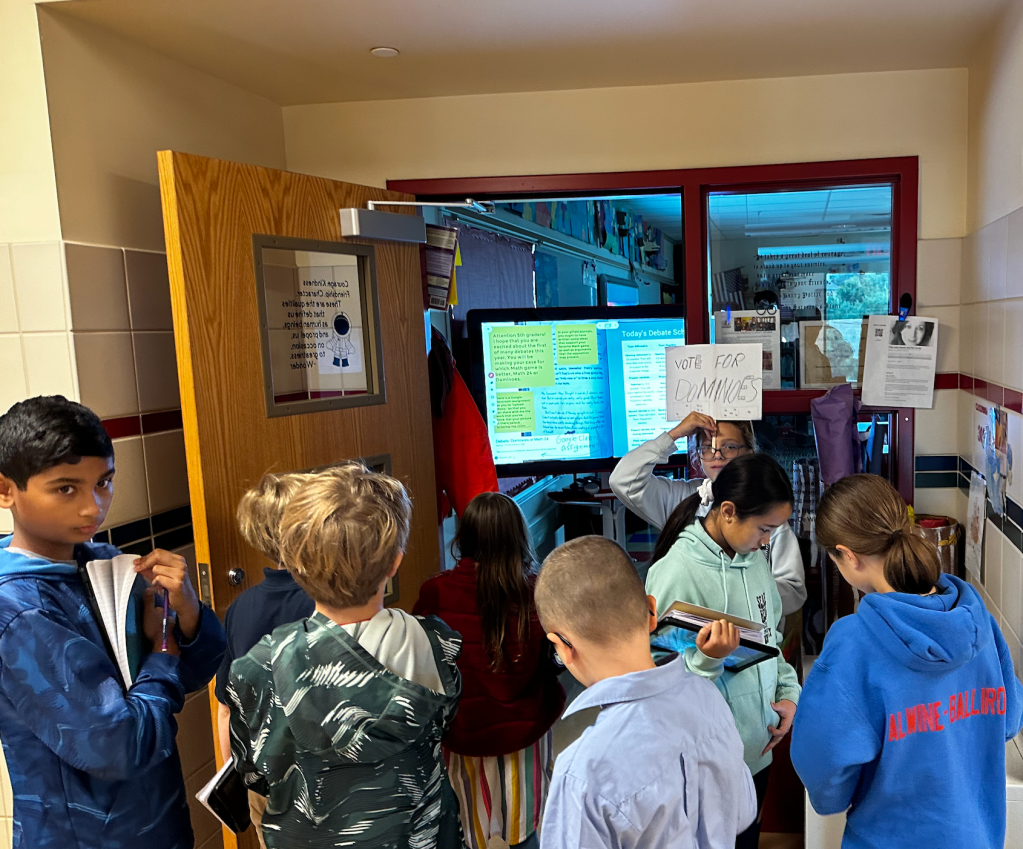
The morning board the next day told them to take a picture of their journals and import it to the Google Classroom assignment I’d just posted. When I arrived at the doorway, after AM car duty, some students were writing in their journals. Others were following directions and taking pictures. I didn’t let the 5th graders enter the classroom without some kind of photo uploaded to the assignment. They could take a picture of what they’d copied from the board the day before. That was acceptable; Not ideal. I praised students for their effort, not the quality of their content. (This will be the topic of a future blog.)
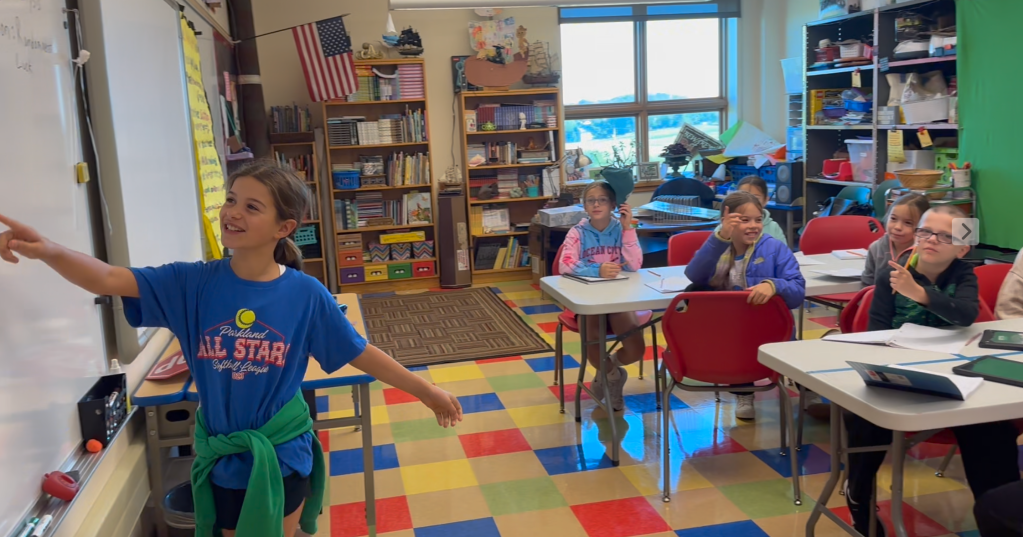
I quickly went over the schedule for the debate. The times were modified to fit within our abbreviated class time. (I have my gifted students for just 40 minutes.) Then I went over the things that could earn points. After securing nods and thumbs-up signaling everyone was in sync, we had our opening statements. The Dominoes team went first. They had written an opening statement that two girls delivered in front of the class. Wearing cool sunglasses, their theme was that Dominoes presented an opportunity to have fun and practice problem-solving in a casual, low-stress style.
Next came the Math 24 team. They came prepared with props, images to share via the classroom projector, and excellent points. In addition to some of the basic differences between the two games, the Math 24 team brought up the idea that the Bones of Dominoes can come from literal bones of elephants. Many sets of Dominoes are made out of ivory, which means… “By playing this game you are supporting the killing of elephants.” Gasps were audible.
Some 5th graders weren’t happy with all of the #Dominoes we’ve been doing. They’d rather play #Math24. I said, ok, make a case for why we should play #Math 24. He knocked it out of the park. Monday we will hear from the Dominoes side. #debate#MathGamespic.twitter.com/5B1ysSJUn5
When Team Math 24 was finished we were scheduled to have a one-minute “Prepare for Rebuttal” time, but there was a lockdown drill. This ate up the last of our time together. I told everyone that, instead of one minute, you have one day.
The day-long break turned into an entire weekend! When I walked up the stairs after finishing car duty Friday morning, the hallway was empty. Fifth grade had gone on a field trip. A couple of girls came to my room later in the afternoon, after everyone had returned, to ask if we could still have the debate. Because I pull students from several classrooms, and I hadn’t spoken with those teachers, I had to say no. “We will debate on Monday,” I told them. “Do more research. Produce strong rebuttals to the arguments that you heard in the openings.”
They were ready on Monday. The first thing that I did was replay the opening statements that I had recorded with my phone. Everyone was glued to the screen, listening for weaknesses. Team Domino got to go first, since their opening statement was first. They focused on the idea of cost. This was one of the points made by Team Math 24, in their opening statement. “There is more than one kind of Math 24 game,” they are argued. “If you want to play with integers and fractions, you have to pay more.” When it comes to ivory Bones, “You don’t have to buy a Domino set that was made out of ivory, and just because some are ivory, doesn’t make the whole game evil!”
When Math 24 came to the front of the room, they were in attack mode. “Dominoes has too many rules, and doesn’t require anything more than simple addition, and a little bit of multiples,” a student suggested with zest. As far as the cost was concerned, he screen-mirrored images of Dominoes and Math 24 sets from the Internet. It seemed to me that the price difference was minimal.
Both teams did an excellent job involving everyone. Different students took turns talking, and they seemed to really listen to one another during planning breaks between sessions.
Some students representing Team Domino got up to refute the monetary attack. They showed more images that made it appear you could get either game for the same price, thereby neutralizing that argument. That seemed smart to me; Like, move along. New topic, please.
No can do. Math 24 people then got up and accused the Domino team of sharing “sale prices.” This was very entertaining for me to sit back and watch. The students were animated and passionate, but they were behaving civil and being respectful. It genuinely seemed like they were enjoying this playful debate about topics that were not life and death. Math 24 ended their time with the idea that someone could accidentally buy a set of ivory dominoes. Okay, possible, but that does not make the game inherently wrong to play.
Finally, it was time for closing statements. The twins tackled delivering the concluding remarks for Team Domino. They mentioned prices, but focused more on the fact that Math 24 is all about computation, speed, and therefore stress. Dominoes is geared toward problem-solving. They pointed out that because the game is common, you are more likely to find it at a friends’ house or game room.
The Math 24 students had what I thought was a thoughtful rebuttal to the attack of stress-inducing play; You could increase the time of the game, relaxing the mood of play. It isn’t impossible to experience a casual, friendly game of number-crunching. Their idea of a box of Math 24 cards having 96 different cards in it, while a Domino set has only 28 bones fell flat, because the computational-quizzing cards can only be used one way; once and done. Whereas Domino games can be played in endless variations.
We had used up nearly every minute of our time together. Before dismissing my 5th graders back to their regular ed classrooms, I praised their inclusivity; teams did a wonderful job of including everyone. I commented on how well-mannered they all were. And, of course, I loved the thoughtful points that were made. “I do have a critique, however,” I warned. They braced for impact. “Everyone got stuck on the price war.” I saw looks of understanding and acceptance on faces. “You kept coming back to how much each game cost, even after someone from Team Dominoes rightly pointed out that they both basically cost the same amount,” I pointed out. “It is easy in a heated debate, when emotions are high, to not think as clearly. That is why I wanted to mention this. As an outside observer, it would have been more powerful to move away from prices and focus on play.”
Thinking back, I wonder if my students focused more on the price of the games because it was the most tangible concept to debate. It came with pictures and concrete proof. You can’t argue that five dollars is more money than ten! This point did not carry any weight, however, because I already own plenty of both games.
This is an image of my journaling prior to ever suggesting the debate. As you can see, I came up with plenty of reasons for playing both games.
More than who won, students wanted to know which math game won. “Which game will we play, Dominoes or Math 24?” they asked me Tuesday morning. We worked on preparing to make videos to share with Columbia University, instead. I wanted to compose this blog before announcing a winner. Little did they know that we’d be playing plenty of both throughout the year!
This student took a picture of himself, so that he had a model for his artwork.
As promised previously (Parameters Are Classy), I can’t help but explore the profound paradox of boundaries liberating thinking. How could a strict rubric extend creativity and help students be even more successful? That seems counter-intuitive. Don’t rules hamper the imagination? Buckle up, because I plan to argue that tightening up the parameters actually helps foster inventiveness and deepen artistic design.
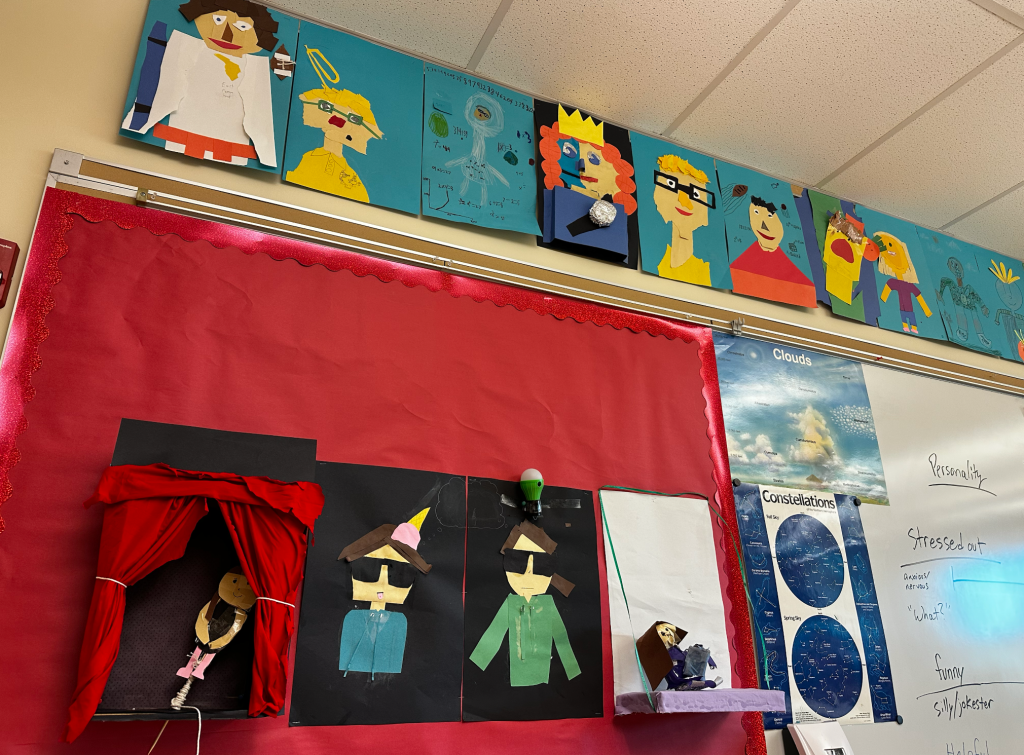
Several years ago, I did a get-to-know-you lesson where I had my 3rd grade students, The Polite Pirates, make self portraits. It was the beginning of the year, and I thought that this would be a fun way to both decorate the room and learn a little bit about the personalities of my pupils.
The Polite Pirates (politely) stormed the art room and used scrap pieces of construction paper and loads of glue; NO scissors or any drawing tools; to make our self portraits. Each student was supplied with a 12” by 18” piece of construction paper. They were told to tear the scrap papers with their fingers, and glue them onto the large piece of colorful paper. “It should look like you, but it obviously won’t be a photograph,” I told them. “Have fun with it and be creative.”
I had made an example the night before. I showed them how mine had some 3-dimensional qualities; my bowtie was a loop that you could see right through if you turned the artwork, and my hair (I still had a little at the time–this was a while ago;) curled off of the paper. I also pointed out that you don’t have to use realistic colors. I made my hair blue and green.
You were supposed to include something that made you unique, and it didn’t have to be your looks. For instance, I made my hair blue and green to symbolize the ocean, because I like the beach. I had curled each hair, so that it stuck off of the paper, not just because I had curly hair, but to simulate waves. I also pointed out that I gave my self-portrait-me a bowtie, because that is kind of my thing. I wear bowties every Tuesday (#BowtieTuesday !).
The Polite Pirates tore it up… Literally! They jumped right into the assignment, and we were nearly done in less than an hour. Only a few needed to add a little more detail to their portraits. They came out great and our classroom was adorned with these magnificent portraits for most of the year.
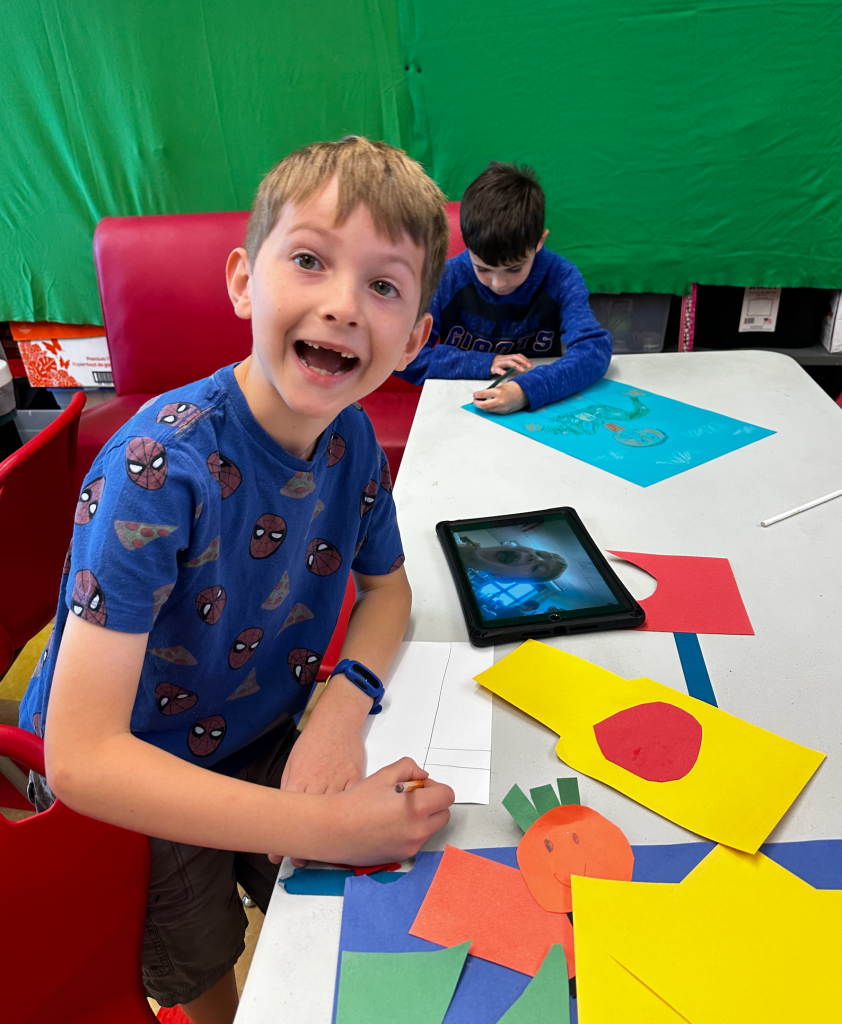
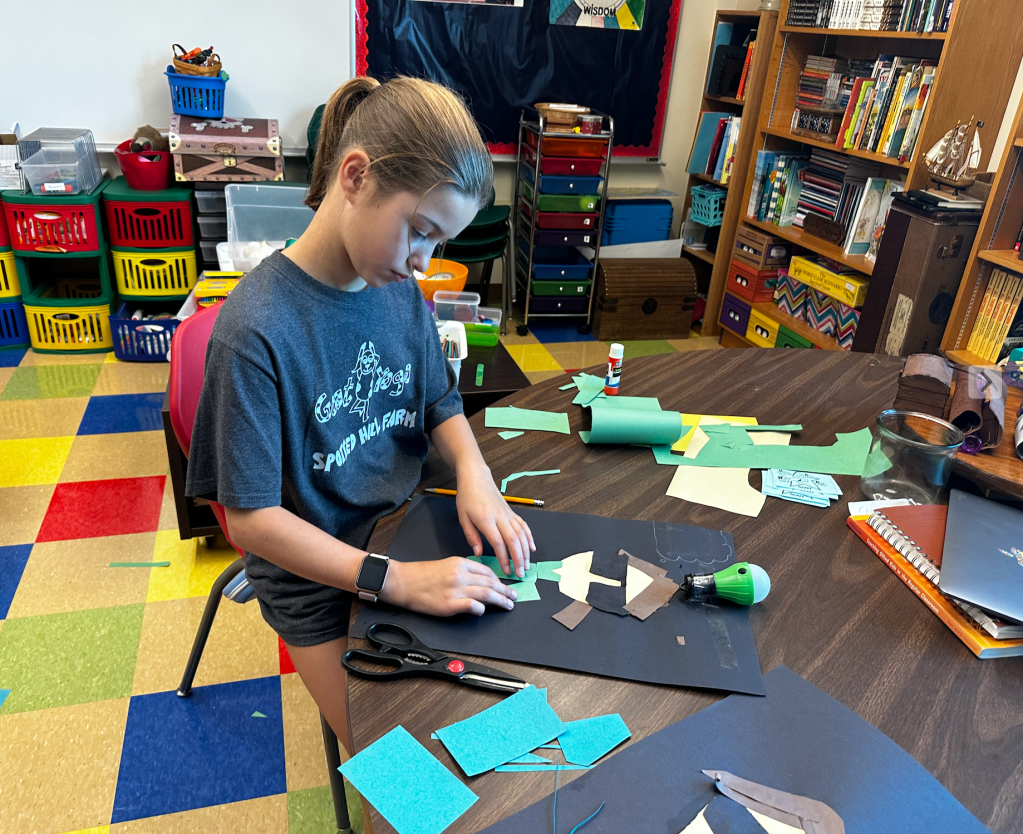
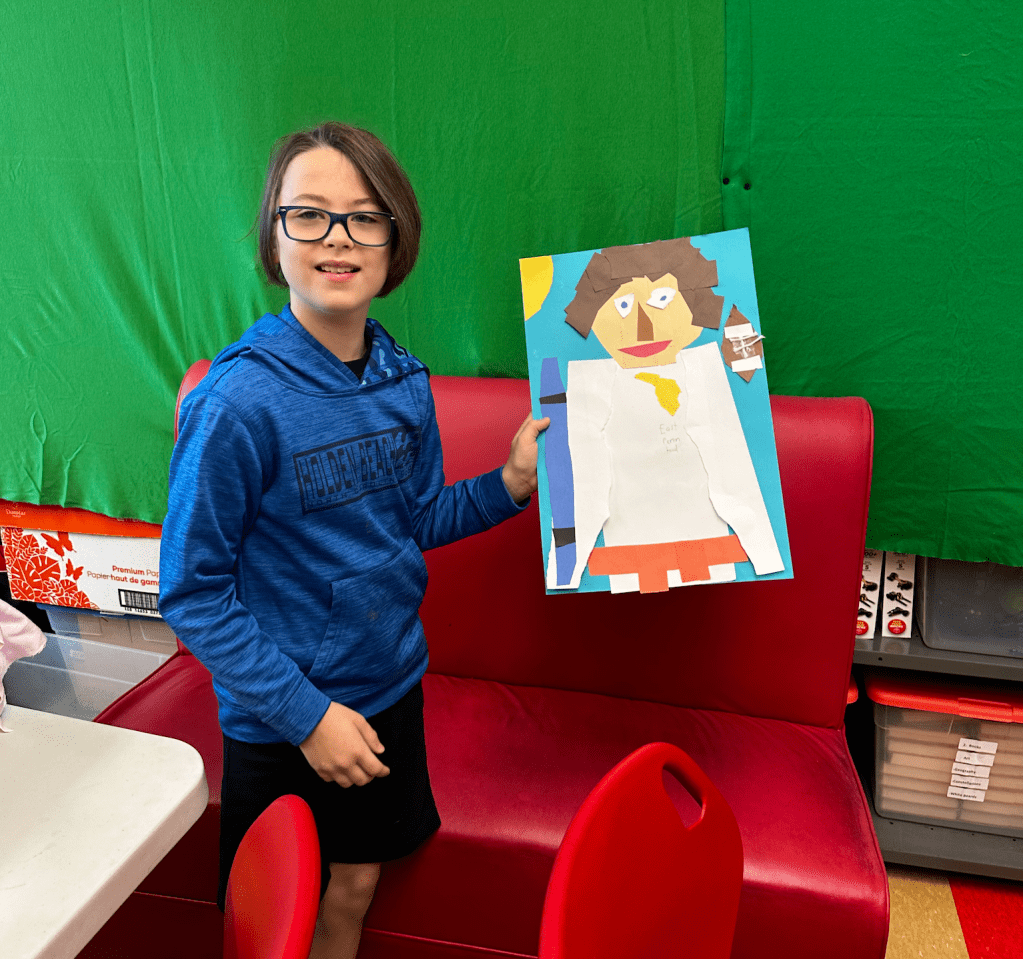
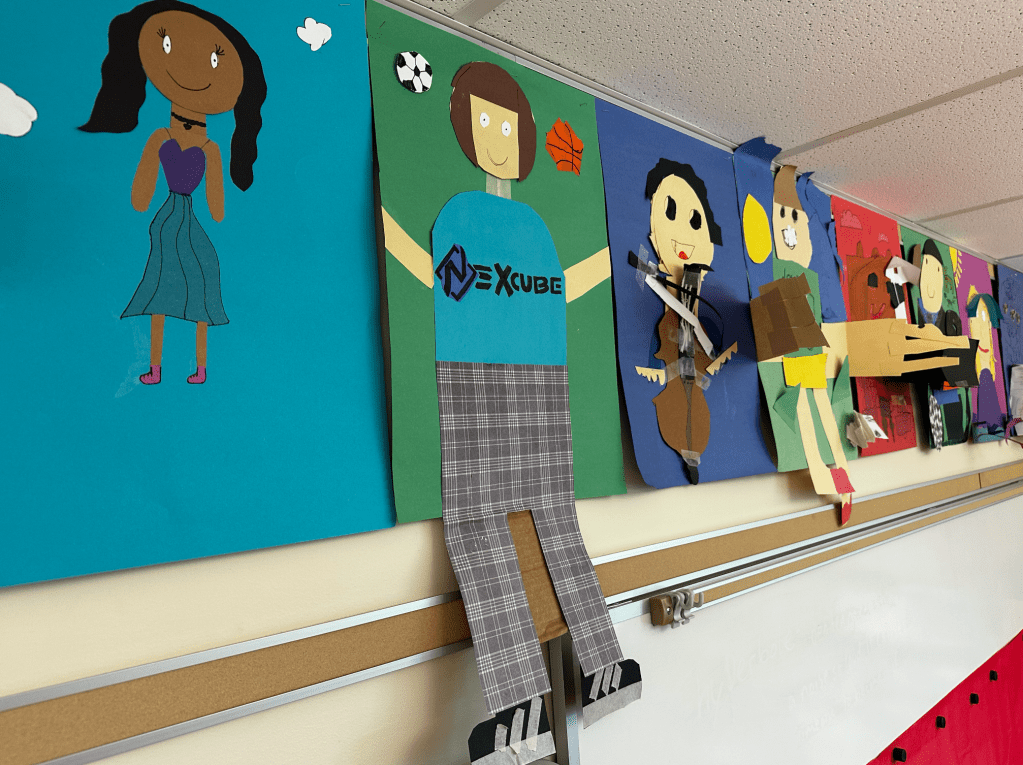
Skip ahead to this year. As I prepared to teach the kindergarten through fifth grade gifted students at my school, transitioning from solely 3rd grade teacher to gifted teacher, I thought about doing this self-portrait lesson again. Only, this time I didn’t want my students to be so limited. I was curious to see what these bright students would come up with if I took away the strict parameters of having to use only scrap papers, and prohibiting scissors or drawing tools. This time, students could cut, draw, and even bring in items from home to stick on their self-portrait.
I showed my gifted students and talked about the self portrait project from long ago. I mentioned the parameters of the previous project, but informed this year’s students that the laws were loosened. I thought that this would free them to be more creative and therefore motivated. I was very surprised at what happened next.
Many of my gifted students floundered. Several had no idea where to start. The students who led the charge into artwork did so by following the guidelines of the previous lesson, tearing scrap papers to glue onto their colorful construction paper. I reminded them that they did not have to do this. They could use scissors. They kept right on tearing away. That was the mental framework (imagination-parameters) that I had set up for them. It was like water running downhill through the path of least resistance.
There were a few rules: The self portrait was to be contained to a 12” by 18” piece of paper. The student had to produce it. No getting parents to do the work for you. And, no printing something out to paste onto the paper. Also, I told them that it had to be done by Friday, but I wanted it to be worked on all the way until Friday. In other words, no drawing something simple on day one, and saying, “I’m done.”
A couple of students used pencils to draw a picture on their papers. They had to be pushed into continuing to work on their portraits. Some students got stuck looking at pictures or using a drawing app on their iPads. They wanted to print out their digital drawings. I eventually had to tell them to put the electronic tools away and focus on their paper projects.
This student made a sculpture of herself out of tin foil, covered it with purple table, and placed a handmade book in its hands.
In the end we completed our self portraits by Friday. They all got hung on the wall. Each one is very unique, represents its creator, and fulfills the requirements. Some of them are super creative. I was able to learn a little bit about the students through witnessing how they tackled the project. In that respect the lesson was a success.
I also learned a valuable lesson about parameters. Generally, students do better when the parameters are tight; not rigid; but clearly and firmly established. Not only was my original self portrait project completed quicker, but if I were to conduct a survey, I think that the first lesson produced more positive vibes when it was all said and done. My gifted students were flummoxed with what to do and how to do it.
When there are strict parameters, every portrait had the same characteristics. Each was made from tearing and gluing paper. There was no flexibility for someone to bring a cool item from home to stick onto their portrait. Even though every portrait was very different, they were equal.
In order to preempt any unfavorable feelings of comparing someone’s portrait to another’s this time around, I put it right into the rubric. I told all of the gifted students on the first day that this was supposed to be fun, and that there will be no judging. Do your best on your work, admire your neighbor’s work, but do not say anything negative about anyone else’s artwork. If someone chooses to draw a stick figure, they can. It simply has to represent the artist in one way or another, be done by Friday, and be worked on until Friday. Good luck making that last parameter stick with your line art!
This student kept the outer boundary of the 12X18 construction paper, but attached a box to it so that she would have a stage for her self portrait to pirouette! Out-of-the-box-thinking inside a box.
When I had very strict guidelines during the tearing and gluing lesson years ago, there was still room to be creative. It was more challenging to make your portrait unique since everyone was using the same mediums, but the uniqueness was more evident. The difficulty-level caused students to stretch their minds. Whenever I am given a task in a grad class, at a professional development session, or at a seminar, I always see how far I can bend the rules and still remain within the parameters of the project. This helps me make a boring (sorry teachers of teachers; they are) requirement fun or at least less mind-numbing.
When you narrow a channel of water, it becomes more powerful. Parameters are boundaries. Like a pressure washer, they focus all of the energy and attention on specific goals.
Experiment: Make a barrel for a projectile to travel through. The parameters are the sides. Shoot something through the barrel. Shoot something with absolutely no parameters. Which goes farther? Which is more accurate? At what point do the sides prohibit the distance? When do the parameters prohibit success?
This student used only different colored tape to make his artwork.He created his own parameters.This student used his 3D printer to make a model of his 3D printer. So cool!
Parameters can standardize results. This is often perceived as a negative thing. Educators don’t like being boxed in, confined, or limited. Rubrics guide our evaluation of students’ work. Using one to score a writing piece does not mean that students can’t use narrative to explain a nonfiction topic. It focuses attention on whether the student developed and mastered the skills taught. If you are looking to see if a student can research a topic, and they decide to show you that they can through producing a play, were they wrong? Did you put in your rubric that it has to be a six-sentence-paragraph? And, if so, why? Are you measuring mastery or how well the kid can be squeezed into a box?
I’ll end this parameter perusal on a positive product from my most recent self portrait lesson. Don’t be afraid to be creative in constructing parameters. I told my gifted students that they were not allowed to get stressed out. I put it in my rubric. If they felt like they were getting worried, they had to talk to me. This was supposed to be fun. If it wasn’t fun, they were not doing the assignment correctly. “I will dock points from anyone not having fun,” I mock threatened to smiles. My aim was to introduce my students to my goal; Which is to make working hard and tackling challenges entertaining.
Pull the string to see the student pirouette; Push the button to light up the idea above another pupil; And, check out the shelf our reader is sitting on!
I already mentioned that, in addition to completing the artwork by Friday, they had to continuously work on their projects when they were in class. If they weren’t working, they were not meeting the expectations. This allowed me to praise them for working, rather than on the product of their work. (More on this later.) Lastly, as mentioned previously, rather than only telling my students to not view this project as a competition, I put it right into the rubric!
There are certain lessons that come off so well that I can’t help writing about them. This is one of those. For several years I’ve used a zombie apocalypse theme (#ZombieApocalypseRoom207) to smash a few last-minute math lessons right before the Polite Pirates take their state-wide standardized assessment (PSSA). This theme is exciting and scary, kind of like the test that my third graders take for the first time in their public-education career.
I’ve made videos of some of our classroom characters expressing the need to understand perimeter and area, as well as capacity in order to motivate my class to learn these concepts. It has worked great! They practice plotting data into graphs and review all sorts of math ideas within a story line involving life and death survival from brain-hungry imaginary horrors. They love it!
Scarlet and I recorded this video of our reading these poems (2021).
This year, as April was winding down, I decided to round out the month of poetry by having the Polite Pirates analyze a couple of poems about zombies. I Googled “Zombie Poetry,” and found a few perfect candidates. One of them was written by Kenn Nesbitt, and can be found on Poetry4Kids.com.
Polite Pirates could watch the video of Scarlet and I reading the poems if they missed the lesson.
“Our Teacher’s Not a Zombie” is a four-stanza rhyming poem (ABCB pattern) about a teacher who behaves like a zombie until she’s had her coffee. The poem compares the educator to a zombie, both her appearance and behavior. It worked out wonderfully to read and analyze this with my students, because I was modeling what they would do between this poem and another! We discussed the way the first three lines from each stanza are simple sentences. The last line of each stanza is a subordinate clause. We had a blast talking about people we know who embody the oxymoron “Living Dead” before drinking their caffeine elixir.
The second poem, “Java Zombie,” is a concrete poem. LIke the first, I found it through a simple Google search. It was created by John Ecko (2013), and is described as a tribute to the show “The Walking Dead.” The poet explains below the poem that he enjoys watching each new episode of the show when it comes out, but staying up late causes him to empathize with the zombies the next day more than he wishes. The content of this free-verse poem has to do with a single individual who mourns Mondays. He ingeniously describes himself as infected with exhaustion from sleep deprivation. Luckily, there is a cure. It’s the same medicine that the teacher from the first poem takes! Coffee.
I especially like the way John Ecko has the speaker of his poem hunger for sleep. He feeds, but not on brains. The speaker eats hours. I love the line, “Victim of the dawn.” My students and I talked about what dawn is and what it means in this poem. “How is this person victimized by the start of a new day?” I help my students explore the meaning of the text. “Who are the many mentioned as monsters of the mundane?” I question. “Do you think that the speaker of the poem like his or her job?” I wrote the answers to these questions and some additional notes on the board as we reread and discussed the poetry.
Typically, at this point I’d have the Polite Pirates (my students) compose a paragraph, sharing the similarities and differences about the two poems. This time, however, I threw them for a loop when I gave them all great big pieces of white paper and told them to draw a zombie. I explained that they ought to make it big; fill the paper; because we were going to write sentences around the outside of it. (They had done this before, so they knew what I was getting at.) We were going to make our own concrete poem, as we discuss a concrete poem! A few of them asked to draw mugs of coffee, instead. They argued that this was one of the main things that the two poems had in common. I was sold. “Yes! Definitely, draw coffee, as long as your sentences compare and contrast the two zombie poems.”
Some of the Polite Pirates watched Youtube videos to help them draw their zombies. Others drew their own unique creations. One girl drew a Mindcraft zombie. Another drew a girl being attacked by zombies. There were big mugs of coffee and small cups of java. Some had zombie hands holding them. One or two have zombie hands hanging from coffee cups. “Yuck!”
Before adding any color to their posters, the Polite Pirates had to first write sentences. Then they had to fine-tip-marker the writing. After that, they had to erase the pencil. Finally, it was time to color… “And, I don’t want to see any white!” They had to color every inch of their papers. “What if I want this part of my coffee cup to be white?” a student asked, pointing to a place that did look like it was supposed to be white. “Here is a white crayon,” I countered, passing a crayon to my student.
In the end, I have a bulletin board full of super cool zombie artwork, and the Polite Pirates practiced analyzing poetry. It was a great way to deepen my students’ understanding of metaphor and figurative language.
At the beginning of each school year I introduce a few fun games that encourage number sense and problem solving. Dominoes are great for mental math, recognizing patterns, and teaching multiples of five (Playification). Another favorite is Cribbage (First “How-To” on Cribbage).
Polite Pirates problem-solve in pairs
Cribbage is a card game that has two parts. I’ve written about the first part, the one that requires players to analyze their hands and decide which cards to keep and which to place into a crib.
During Math Centers, I have students work in teams of two or three to figure out which four cards of a six-card hand will generate the most points. Every student is very attentive, because if a team misses any combinations that provide points, and a student from another team can articulate the potential point-producing combination, this other student gets to claim the points, virtually stealing points from one another. They love that!
The “Starter” is placed face up on top of the deck and shared by everyone.
After a little practice with this, I explain cutting the deck to provide a “Starter” card. This card gets placed face up on top of the reassembled deck and is also used for making point-producing combinations at the end of each round. The Starter is shared by every team and the crib. Now, when students decide which cards to “lay away” for the crib, they should keep in mind the idea of collecting those points later, if the crib is theirs, or potentially providing points for opponents. Students practice mental math and problem solving for a few more Math Centers.
Once my students are well-versed in how to choose the best cards to keep, it is time to learn how to actually “Play” the game. There are loads of rules to learn and remember, but what makes it fun is that nearly everything you do gets you points! When teaching the Play, be sure to peg points. The kids get super excited with each and every point.
Polite Pirates help one another count points. The holes are marked in increments of five, so math can be used even while pegging your points!
The first thing I show students is how to hold their Hand. This is new to some nine-year-olds. They have to hold the cards they’ve kept because we place one down on the table or floor at a time, and you don’t want to get them mixed up.
Something unique to cribbage is that players (teams) will recollect their cards in order to calculate the points their hand is worth when Play is over. For this reason, have students place the cards that they are playing right in front of them; separate from other players/teams.
Next, I explain that, during Play, we add up a running tally of “Pips.” Pips are the symbols on the playing cards. A “Five of Hearts” has five pips or hearts on it. Each face card (Jack, Queen, and King) are worth ten pips in cribbage. An Ace is valued at only one pip in this game. It is very useful; Hang on to those! (Here is a very interesting blog explaining pips and the symbolism of cards.) As students place one of their cards face up on the table or floor, they don’t say the number on the card. They announce the new sum of all of the face up cards. So, if a King had already been played, and that player (team) voiced “Ten,” and then I play a Two, I will say “Twelve” out loud. If the next player (team) places a Three face up, they will say “Fifteen” out loud, keeping a running tab on the growing tally of pips.
The player or team that plays the Fifteen is rewarded Two Points on the cribbage board. You get points during Play whenever you form a combination of Fifteen, a pair, three or four of a kind, and/or a run. These point-producing combinations are similar to what students were looking for when deciding which cards to place in the crib and which to keep. But now, students are forming them with the help of their opponents’ cards.
Let’s say two Queens have been played. The player who placed the second Queen on the table or floor will be rewarded two points. If a third Queen gets played, the person (team) that played it will get six points, because it forms three pairs.
Similarly, when a run of three or more cards in consecutive ascending order are played in a row, the player (team) gets the number of points that represents the number of cards. In other words, if a Ten, then a Jack, and lastly a Queen were played in a row, the person (team) that played the Queen would get three points.
During “Play” the pips can never exceed 31. This is the magic number of cribbage play. As players are placing cards face up and voicing the running sum of pips, they are mindful of what cards they have left to play. The closest to 31, without going over, gets a point. If you can play a card to make the Play value exactly 31 pips, you get two points. As the Play gets close to 31, if a player (team) does not have any card to play that would keep the play under 31, they say “Go.” This is when the other team gets a point. That team must play any cards that they can, keeping the tally under 31. They can collect points from pairs, runs, and even score two points for making exactly 31.
At this point, all of the cards that have been played get turned over (facedown), so that they don’t confuse the players during the next Play. The player (team) who said “Go” during the last play starts off the new play.
Once all of the cards have been played, and a point was awarded to the player (team) who plays the “Last Card,” it is time for each player (team) to gather up all four of their cards and get points for their individual hands. (Here is a website to reference for points.)
This we do one team at a time. The dealer goes last. The crib is counted separately, and that is the very last thing to be tallied. It’s important to count in this order, because whoever reaches the end of the cribbage board first, regardless of how many points are in a hand, wins. In this way, you may not want to be the dealer if a tight game is nearing the end!
I hope this blog is helpful for learning how to teach cribbage to students. One of the many benefits of learning this game is the cross-generational play it opens up. It was one of the first games that I was able to play with the “grownups” during holiday celebrations and vacations. My dad told me about a league he played at his Senior Center in Massachusetts. One thing that he complained about was how fast those games were. It was too much pressure.
That being said, you might want to put timers on for students, in order to keep the game moving. Also, you could have a timer for the whole game; Whoever has the most points when the timer goes off wins! Have fun!