Show Your (Math) Work (Part 2)

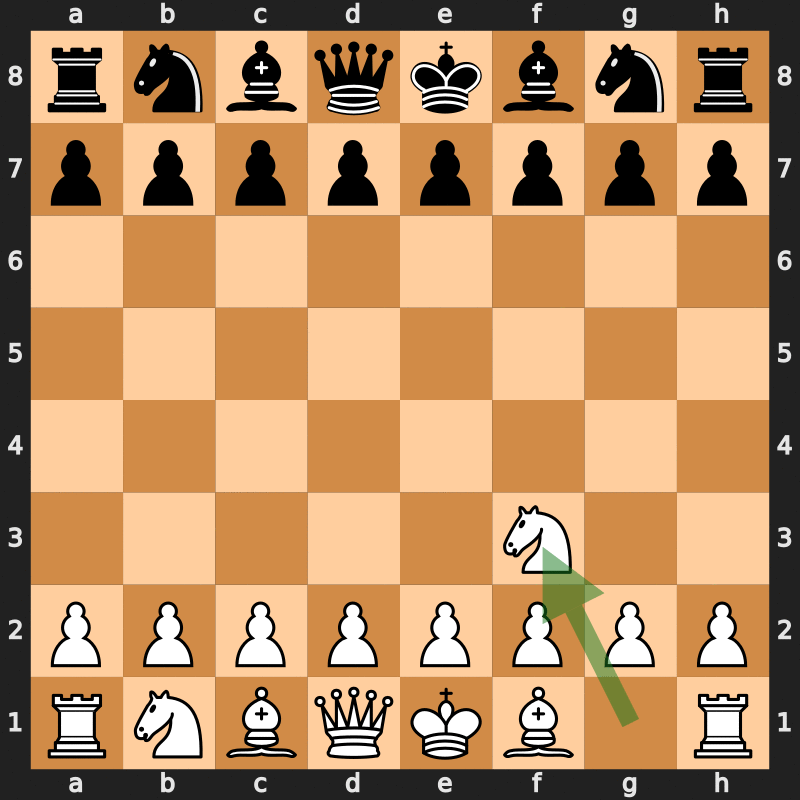
Algebraic notation in chess shows each move that a player makes. Ranks (rows) are notated with numbers, while files (columns) are designated a letter. Thus each of the 64 squares on a chess board has a name, the letter first, followed by the number. For example, the most popular opening in a game of chess is to place a pawn on the square e4. This square is located within the “e” file and on the fourth rank.

Chessgames.com provides the algebraic notation, along with some commentary, for “The Game of the Century.”

In order to show what happened during a chess move players write down not only the square that a piece was moved to, but also what piece was moved and whether something was captured, checked, or checkmated. (There are a couple of other symbols, but these are the major ones.) Abbreviations are used in order to save time. The moves are recorded so that the game can be analyzed and studied afterward. Most chess apps online and on phones will create the notation for you.

The algebraic notation of a chess game looks a lot like code. That’s because it IS! It is a string of commands. If you know how to read it, you could recreate a chess game, move by move. You could plug the code into a computer, as chessgames.com did for “The Game of the Century” between 13 year old Bobby Fischer and International Chess Master Donald Byrne originally played during the Rosenwald Memorial Tournament in New York City, October 17, 1956. 

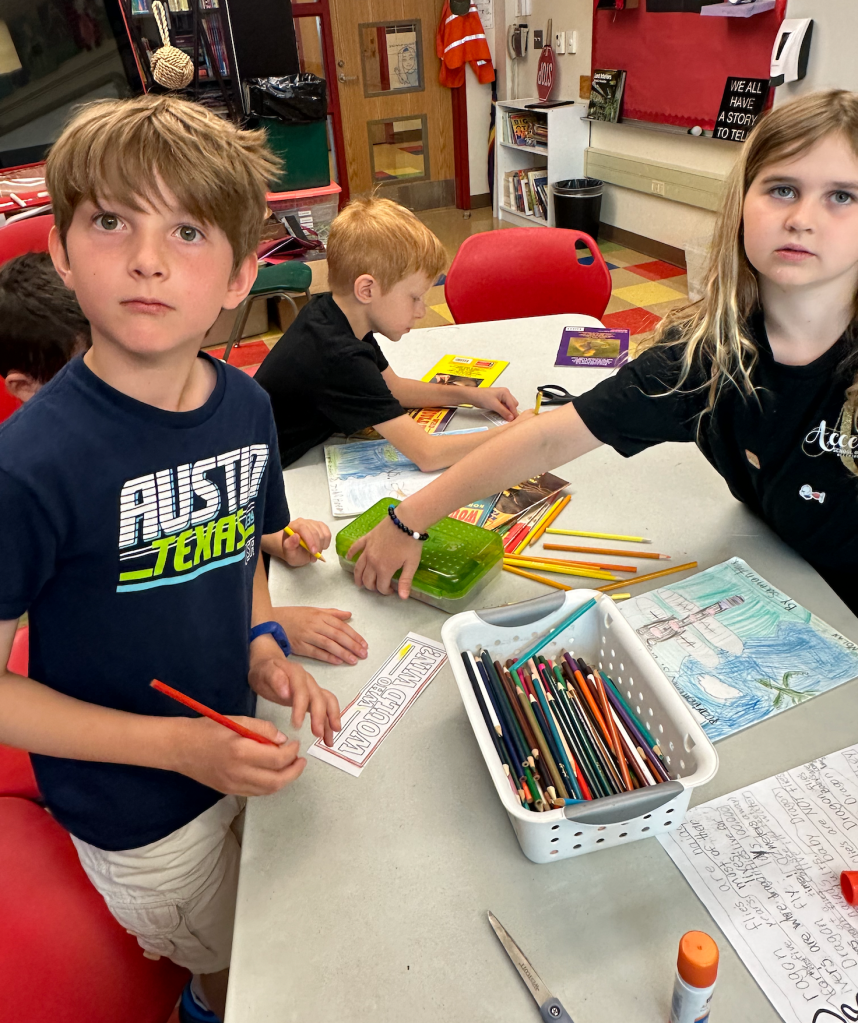
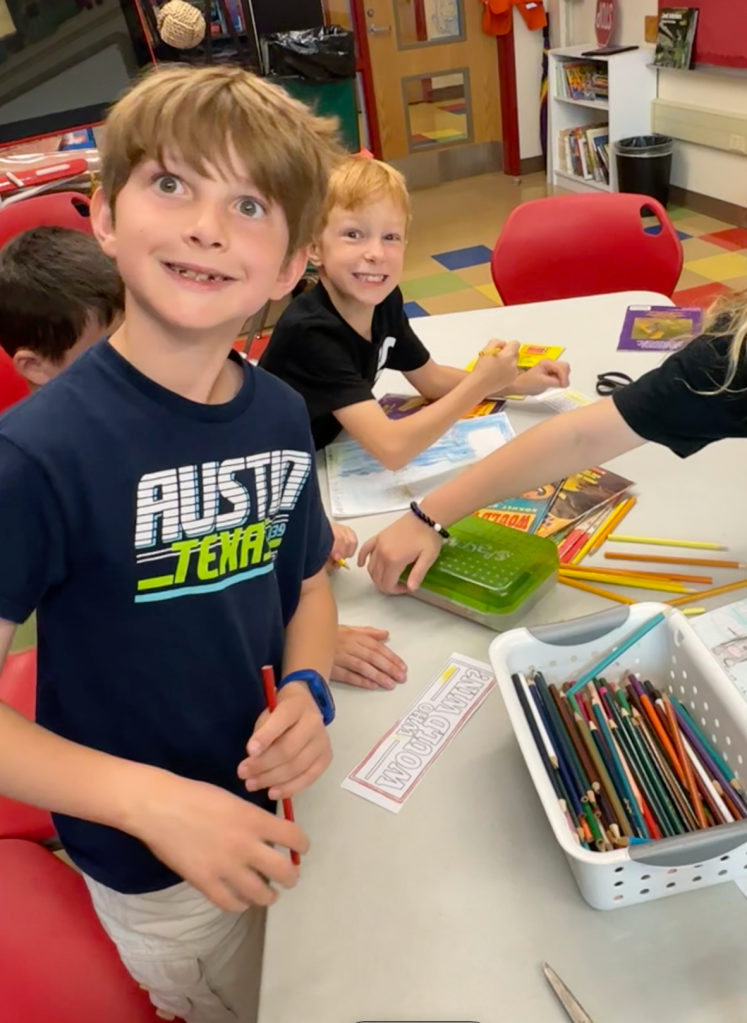
For several years I have been teaching elementary-age kids (7-11) how to play chess. I’ve run a chess club that meets after school. While I always share information about how to read algebraic notation, I don’t require them to use it during play. I want them to learn the game and have fun. 

As students get better and begin playing in tournaments, however, they will need to learn to use notation. During competitive play, they will be required to write down the code for each move on a piece of paper. Next to their move, they will also write down their opponent’s moves. In this way, they will be able to “view” the game after its completion. Serious players do this to evaluate each move. Which ones were better than others? Where did I or my opponent falter? What was the critical move? What could I have done differently? 


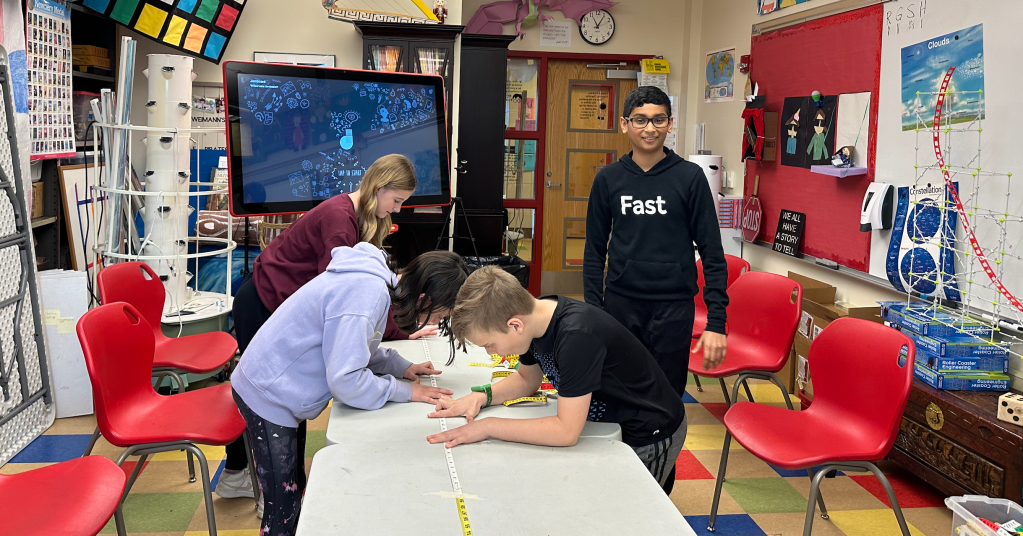
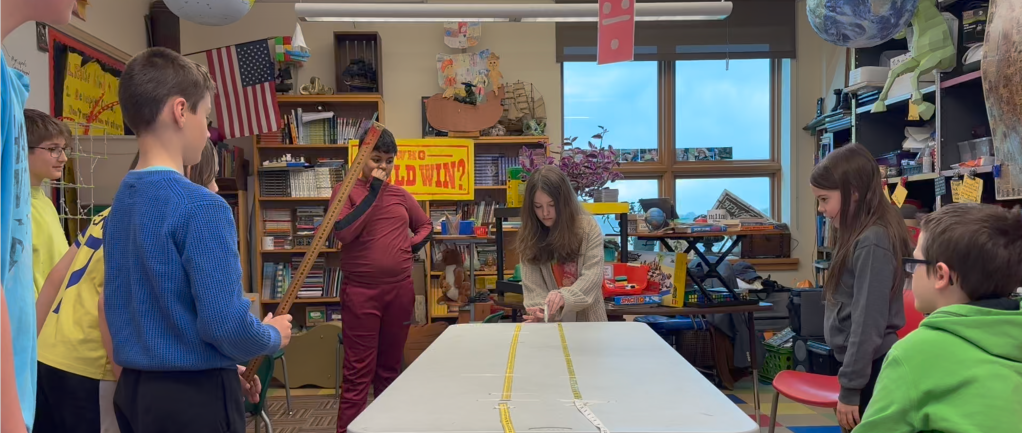
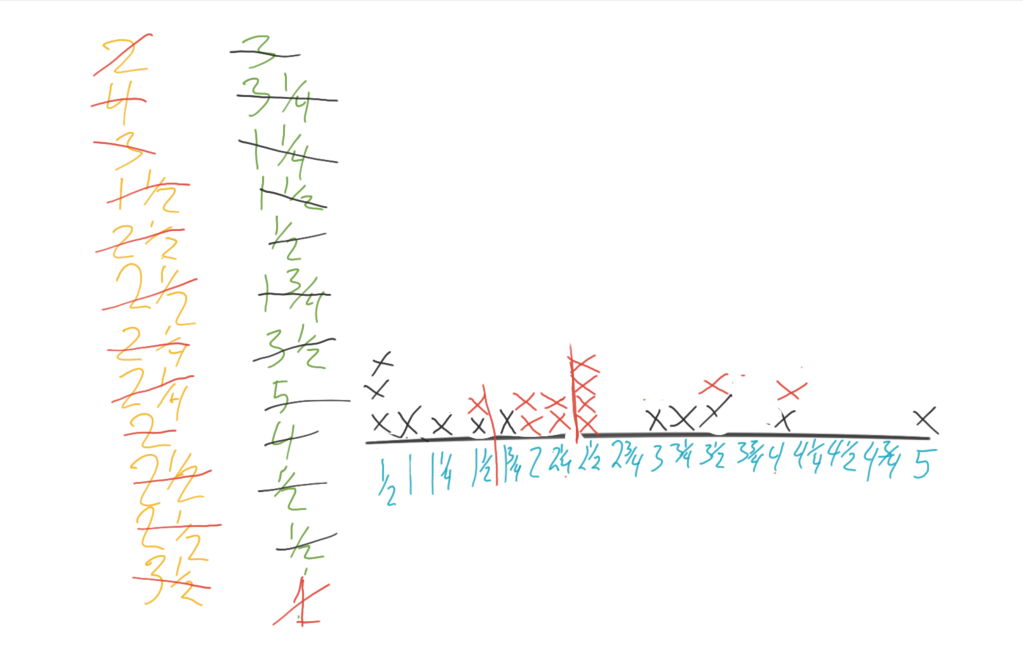
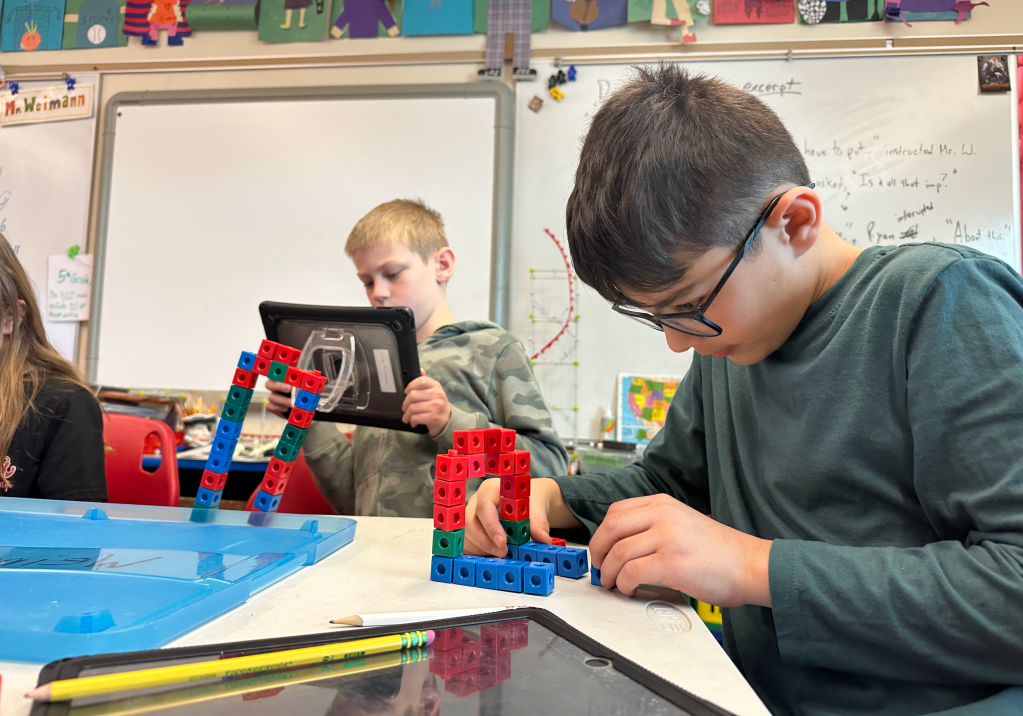
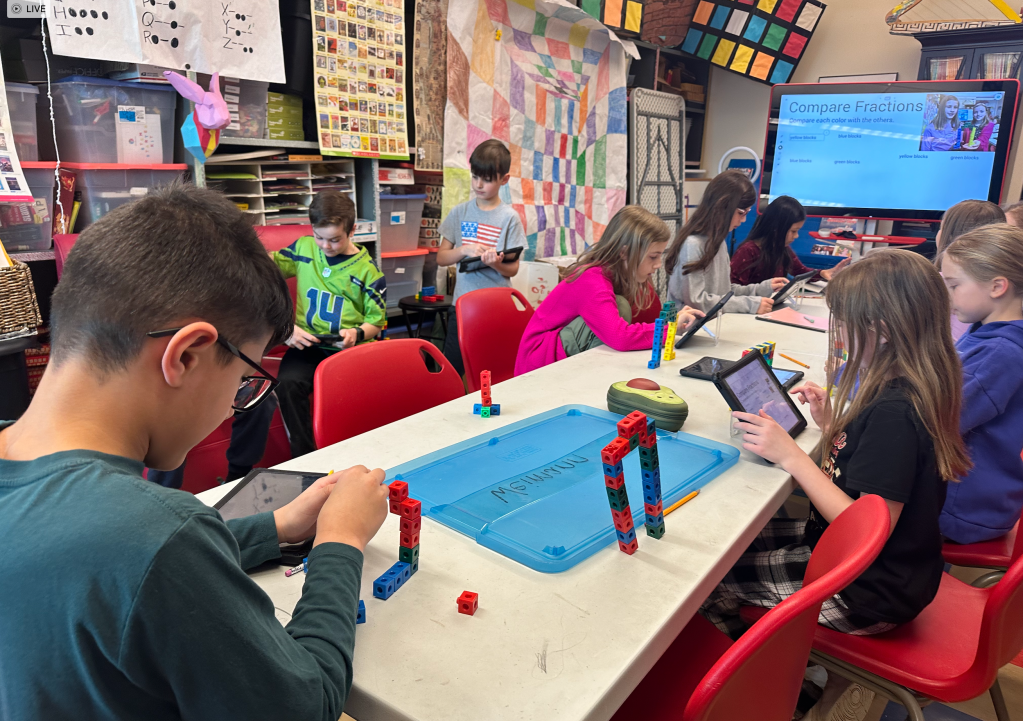
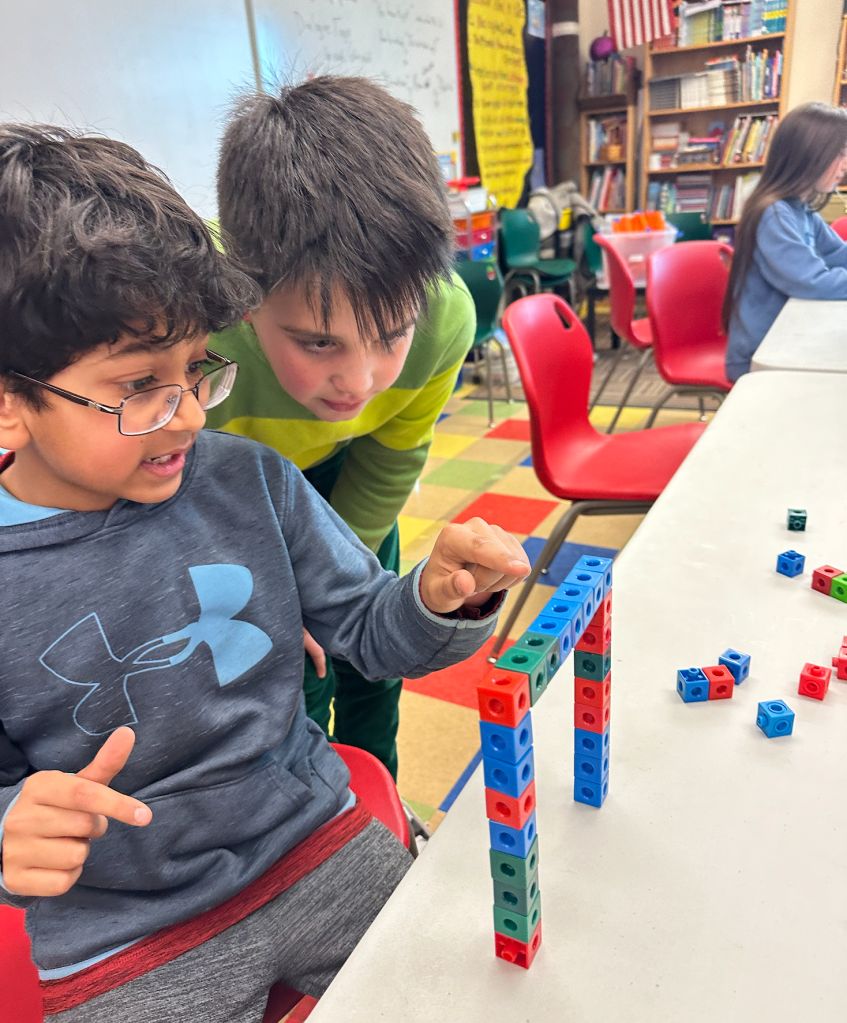
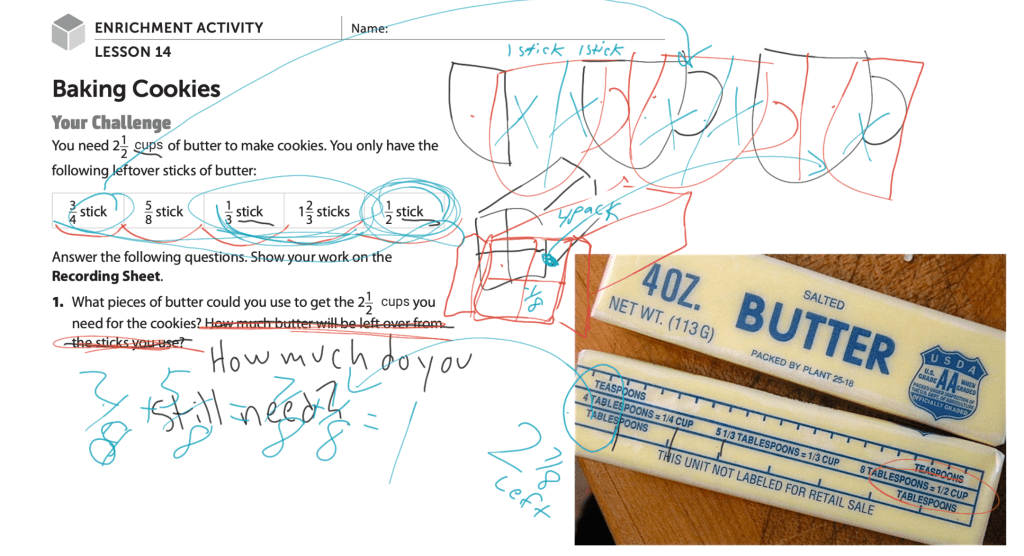
When solving a math problem, it can be valuable to write down some notes. Why? Sometimes you do this to keep short term memory space available. If there are a lot of numbers and a lot of computation is going on, there might be too much to remember in your head. Along the route of figuring out the answer, you write down what you have so far. 

Another reason for taking notes can be showing the steps you took to solve the problem. This might help someone else see a path from beginning to end of the math problem, demonstrating how the answer was achieved. They could “replay” the action of solving the problem by reading the steps taken.

In school, this last “reason” is usually proposed by teachers who want to “see” how you did your work. They say, “Show me your work,” so often that it becomes grating. And, writing down each step of computation can become tedious for a student who just knows the answer. Back in January (2024) I wrote a blog (Part 1) about students communicating their math work creatively. Learning to write down the steps involved in solving a math problem has value, however.

Here are a couple of ideas.

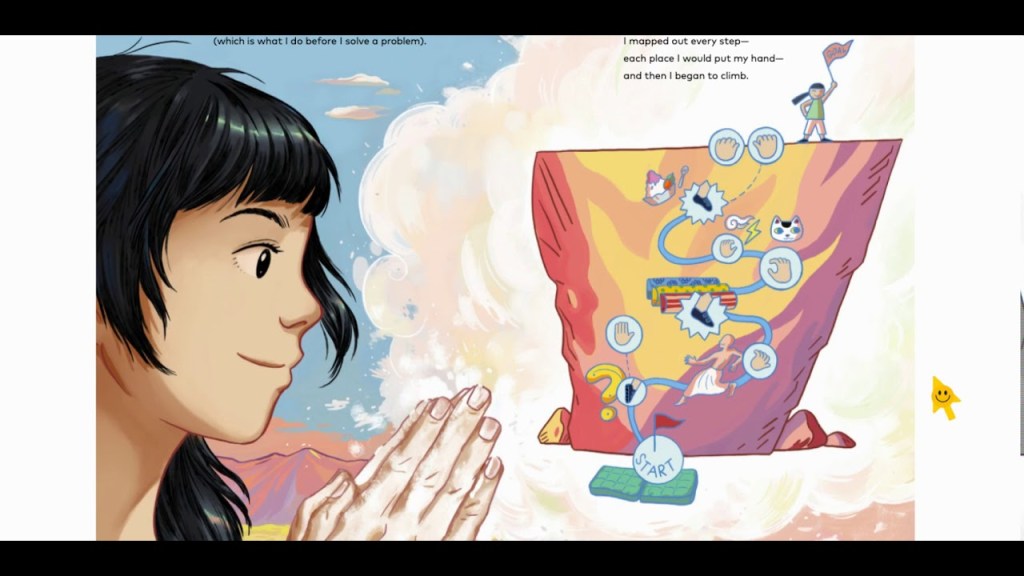
First, instruct students to treat each math problem as though it were a rock-climbing problem. Ashima Shiraishi is a champion of solving problems. She wrote a book about it. “How to Solve a Problem: The Rise (and Falls) of a Rock Climbing Champion” tells the story of 13 year old Ashima figuring out a map that will guide her to the top of Golden Shadow, a V14 boulder in Rocklands, South Africa. The story is an excellent metaphor for not giving up. It also shows how Ashima uses imagery to map out a doable path up the face of a difficult climb. She assigns symbols to the holds and footings that she uses. As she ascends, time after time, for it takes many tries to successfully conquer a difficult problem, she creates a story in her head, using the beneficial symbols (holds), so that she can find her way. The book, illustrated by Yao Xiao, shows (on paper) what Ashima does in her head. 

I often see students erase their math when they have tried a set of steps that did not accurately solve a problem. “Don’t do that,” I tell them. “You could very well make the same mistake again. It’s helpful to see what didn’t work, as well as the correct answer. I (and your math teachers) want to see the journey you took, including the fruitless paths.” 

Second, teachers ought to present problems that are worthy of their students’ struggle. Ashima Shiraishi has an amazing story of being the youngest person to successfully climb very challenging problems. At the age of 14, she was the first woman (and second person ever) in the world to climb a V15 boulder problem. She has crushed youth competitions, winning several years in a row. When she and illustrator Yao Xaio chose a problem to use for the basis of producing a picture book for kids, they decided on one that was very challenging. Ashima fell many times, having to start over at the beginning. The text shares her process of imaging each place that her fingers or toes would hold as something specific. One was the dot at the end of a question mark. Another was the crook of her dad’s elbow. 

What if Ashima used a simple boulder to illustrate her problem-solving skills? One of the most important themes of the short book would be lost; The idea of developing and practicing persistence couldn’t very well be shared if there were no falls. 

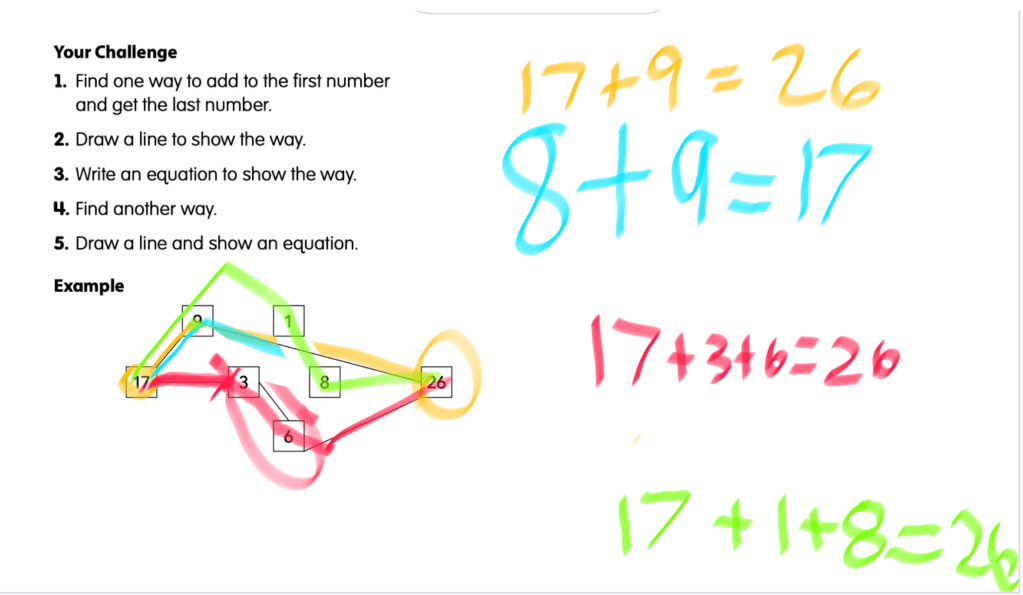
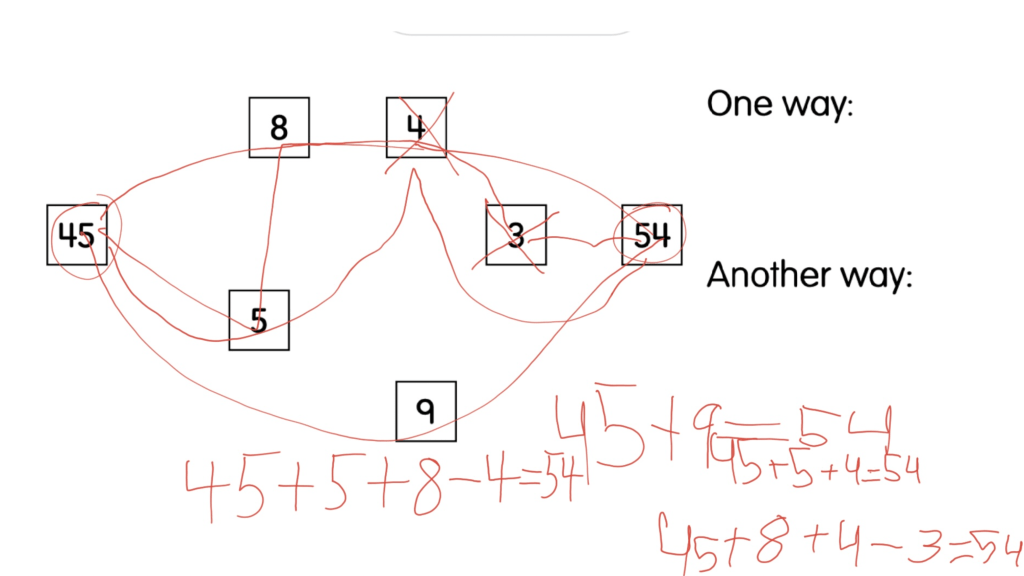
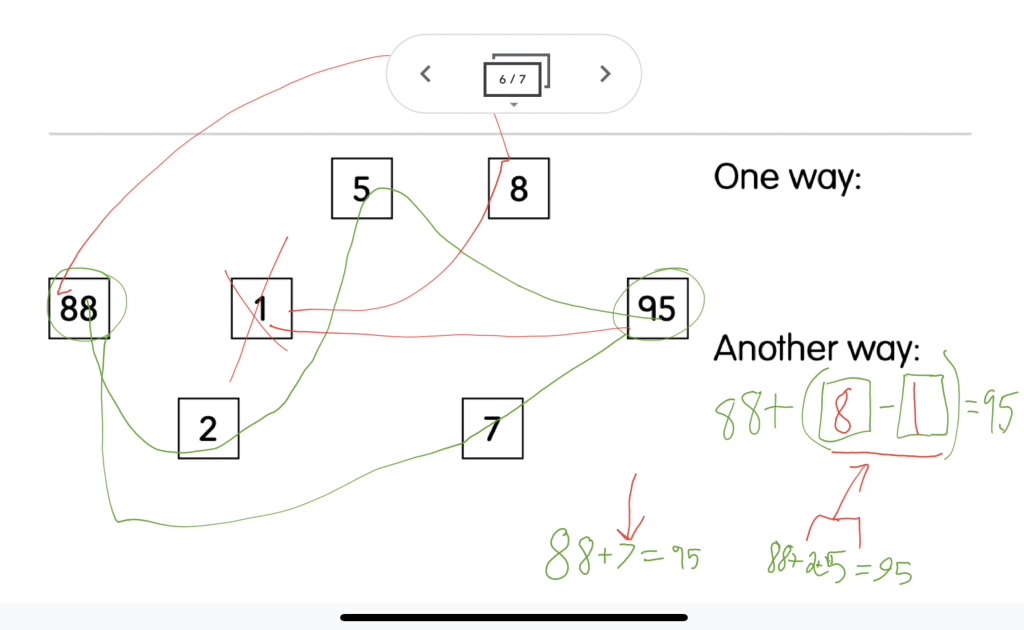
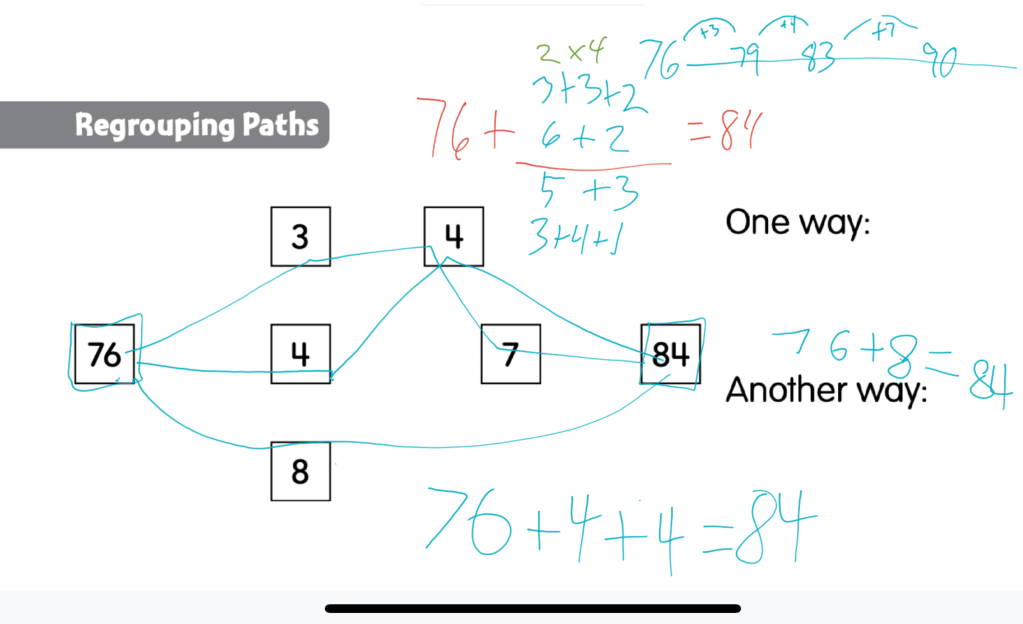
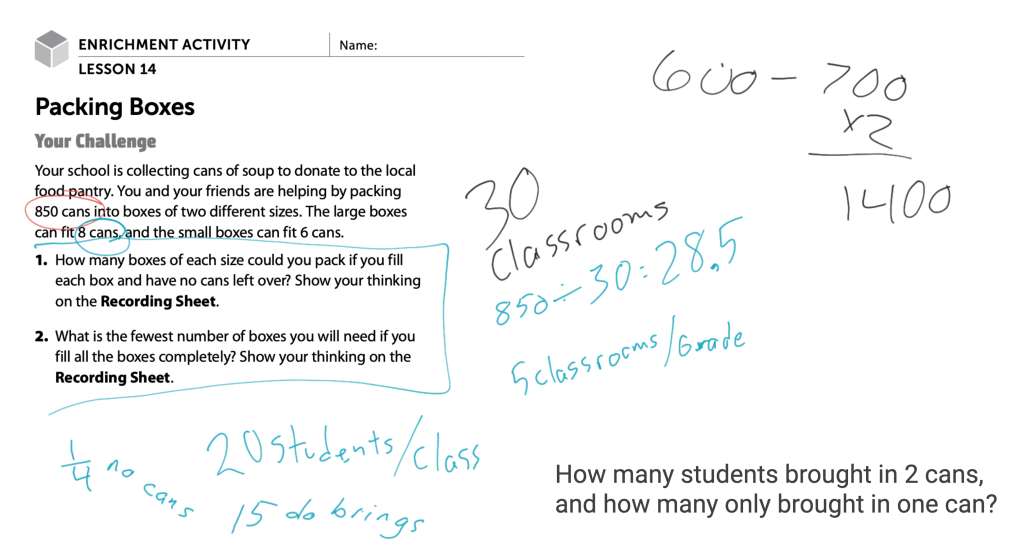
Create fewer math problems that are more challenging. Cause students to have to struggle to conquer each one. If they are required to make memories, it will mean more. If you want your students to “show their work,” give them a problem so complicated that they need to write down notes to get all the way through it. 

The math problem should be a challenging chess opponent in a tournament. Your students should have to show each “move,” as they progress through the solution of the problem. 

There will be practice problems. These are like the rock-climbing walls that Ashima climbs to stay in shape and hone her skills. She will climb the same wall over and over. She will challenge herself to complete the climb faster with each ascent. A story may be imagined for the short climb, and it could be repeated in her head a hundred times, giving the climb life and familiarity. 

This is like memorizing an opening for chess. Increasingly good chess players will learn a variety of initial moves that great players have developed over the years. They will memorize these opening moves through many steps, so that they can anticipate and prepare for potential rebuttals. 

In conclusion, if you want your students to show their work, give them something worthy of writing down the steps it took to complete. Teach them how to make the sharing of their math into a story. In the same way that each move in an important chess game is vital to its end, have students think about what they are doing and share the most important parts of the process. You could even have them try to identify the most crucial part(s) of the problem-solving process. With each boulder of a math problem you give them that challenges their minds and they successfully solve, they should develop a hunger for tackling more and more formidable ones in the future. 

Ratio, Quidditch, and Stimming 

My second grade gifted students are very excited about reading Harry Potter. A couple boys talk about the books often. I’ve had to stop them before they give away any of the plot and spoil the literary experience for those who haven’t read as much. 

Caught being classy; These 2nd graders are finishing up “Who Would Win” books comparing insects.

The other day one of my students was pacing around the room conducting a monologue about quidditch. Everyone was working on wrapping up an end of the year project when this student took a break to stim. 

Over the years I’ve had a few students who stim. It took me a while to understand what this was, and even longer before I was familiar with the term. Stimming is an abbreviation for stimulation. It is when a person uses sound, motion, touch, or other stimulating sensations to soothe the spirit. A person may sing to themselves, wave their hands, repeatedly run their fingers over a piece of fabric, or pace the floor. It usually involves repetition.

The National Autistic Society suggests four reasons a person may stim. They could be using their stim to self-regulate the amount of sensory input they are receiving. By making their own noise, they are blocking out other sounds. Flapping one’s hands or pacing the floor puts the stimming person in charge of what their mind thinks about. It can be a way of dealing with stress and anxiety. Sometimes, a stim can just be enjoyable. Finally, there are times when people who stim do it in order to produce sensory input. Maybe their mind needs something to do, so they stim. 

Stimming can sometimes be distracting for other students in the classroom. It is best for everyone to understand that this is a completely natural and necessary thing for some people. 

I’ve grown accustomed to my 2nd grade stimmer. When he started talking about quidditch to no one in particular, I just let him pace and say his soliloquy. He was going over the rules for the game, and something he said got me thinking. He mentioned the golden snitch, and said that catching it would win you the game. I didn’t mean to be contrary, but I interrupted his stimming to ask, “Do you automatically win if you catch the snitch?” 

He paused his pacing and thought for a moment before explaining, “It is worth 150 points, so whoever catches it will most likely win.” That was a very good answer, but I saw an opportunity for a mini math lesson, that ended up turning into an awesome math lesson!

Another student chimed in, “Catching the snitch ends the match.” 

“But does it guarantee a win?” I challenged. 

The group thought about it for a second. The quidditch expert conceded that, “No. Catching the golden snitch doesn’t mean you win.”

In order to stretch their thinking and prove my point, I suggested they figure out how many scores the other team would have to make in order to win against a team that caught the snitch. Hardly a second passed before the quidditch expert told me the answer; sixteen. 

With each score producing ten points, sixteen would mean that the team without the snitch would have ten more points (160) than the snitch-catching team. “But, it is pretty unlikely that one team would score sixteen goals while the other didn’t earn even one,” I suggested. “What if the team that didn’t catch the snitch was twice as good. For every goal the snitch-catchers earned, the other team scored two. Then, how many goals would have to be scored in order to win without catching the snitch?”

I drew a T chart on the whiteboard. I wrote “Team A” on one side of the T and “Team B” on the other. At the bottom of  Team B’s column I wrote 150 and labeled it, “Golden Snitch.” I then wrote a two directly under Team A and a one under Team B. I explained that Team A scored two goals while Team B only scored one. “How many points does each team have?”

When the second graders told me that Team A had twenty points while Team B had ten, I commended them for multiplying the number of scores by ten, the value of each goal. Only, that was not accurate. I pointed to the “150” at the bottom of Team B’s column. “Team B actually has 160 points,” I told them. 

I wrote another “two” under Team A and an additional “one” under Team B. “Now how many points does each team have?” At this point it was forty to 170. We kept doing this until Team A’s score crept closer and closer to Team B’s. It took a few minutes to calculate, but my students were riveted to the math. Once Team A earned enough points to overcome the snitch catchers, I restated my original query: “How many goals did Team A need to score inorder to beat the team that caught the snitch?” 

They skip-counted to find the answer. I showed them that they could have multiplied the number of twos by two and get the same answer. I also explained to them that the idea of a team being twice as good as another is a ratio. I wrote 2:1 above the T chart. “This means Two to One,” I told them. “For every two goals that this team scored…” I pointed to Team A, “The other earned only one goal.” I left it at that. Our time was up, and they had consumed enough new terms and problem-solving for the morning. 

As you can see, there was a lot of math going on! Among other things, we figured out the difference between the teams to see how far we had to go for Team B to overtake Team A. The challenge was to find out the smallest number of goals necessary to win without getting the snitch.

I was so pleased with the spur of the moment lesson that I decided to reuse it when my fourth graders joined me. I wrote the question, along with some quidditch facts, on a Google Jamboard. A couple of fourth graders engaged in drawing on the picture of Harry and writing some random thoughts. I’ve found that letting students do this allows them the freedom to think creatively. This could very well be a form of stimming. 

I guided their work by asking the question verbally. I retaught the concept of ratio, which I had introduced earlier in the year. The fourth graders were much faster at figuring out the answer. They immediately guessed thirty goals might push Team A over the edge of victory. I wrote “30” under Team A, and asked how many goals Team B would earn with a ratio of two to one. They accurately told me fifteen. We multiplied both numbers by ten and added the snitch to Team B’s score: Tie. 

My students deduced we needed one more score for Team A to have more points than Team B. I told the class that Team B, having a ratio of two to one, could very well score one more goal before catching the snitch. “Just to be safe, we ought to say that Team A should score 32 goals to secure victory over a team that catches the Golden Snitch first when working with a ratio of two to one.” 

At this point one of my fourth graders realized that the answer was staring at them from the whiteboard on the other side of the interactive screen on the wall! “Yup,” I conceded. “I worked out this answer with my second graders earlier in the day. We figured it out a different way.” The fourth graders didn’t feel tricked, but just to be sure, I added, “You guys were really fast. It took my second graders and I a while to figure it out.” 

“Now, let’s have some fun with ratios,” I told them, as I wrote “3:1” on the board. “What if Team A was three times as successful at scoring quaffles than Team B, but Team B catches the snitch? Now, how many goals need to be scored by Team A to win?” 

We started off with thirty goals because it is a nice easy multiple of three and close to our previous answer. If Team A scored thirty goals, Team B would have scored only ten. After multiplying both scores by ten and adding the snitch, we found that Team A didn’t have to score that many goals:

30 * 10 > 10 * 10 + 150 With a difference of fifty (300 – 250 = 50), we figured Team A could have not scored a couple of goals and still have won, even if Team B caught the snitch. We tried again. With 27 goals, Team A would have 270 points and Team B would have scored only 9 goals (using the three to one ratio). Nine goals, at ten points a piece, plus the snitch would mean Team B earned 240 points (9 * 10 + 150). This was closer, but can we do better? Does Team A have to score that many points, or could it be less? Sticking with multiples of three, we gave Team A 24 goals. This would mean Team B would score eight. After calculating the math (24 * 10 = 240 and 8 * 10 + 150 = 230) we saw the difference between the two scores shrink to within one goal.

I took the opportunity to point out the consistency in the scores changing. Team A’s score decreased by thirty with each new calculation, while Team B’s score only went down by ten, but every single time. We explored the idea that 30:10 is the same thing as 3:1. I taught the fourth graders that ratios, like fractions, can be simplified by dividing both sides by the same number. “Ratios explain the relationship between two quantities,” I told them. “The smaller the number the easier to understand how they are related. You don’t say 500 to 100. Five to one is just as accurate and easier to understand.”

Just for fun, I gave my group of fourth graders one more scenario; A more realistic one. I told them that the teams were more evenly matched. I made the ratio three to two (3:2). For every three goals Team A scored, Team B scored two. “Using this new ratio, what is the fewest number of goals Team A would have to score in order to win a match against a team that caught the snitch?”

Because we were still working with thirds, the problem was manageable. It didn’t take my students long to figure out that they could work with numbers that were divisible by three, double the third, and multiply both numbers by ten. We took one of our scenarios from the previous problem, 240 for Team A and 80 for Team B, which represented the three to one ratio, and adjusted Team B’s score to represent the new ratio of three to two. I just erased the 80 and wrote the equivalent of two 80s or 160.  

When we found that this new ratio caused Team B to pull away from Team A, students jumped at Team A earning much larger scores. Someone threw out the number 100. I asked them, “What would a third of 100 be?” When no one answered, I restated the question, “What three numbers could be put together to make 100?” Still nothing. I simply told them that it would be 66. I reminded them that a third of one is 0.33. They all sighed with remembrance. They knew that! “When you add some zeros…” I wrote one, and then followed it up with putting a couple zeros behind it. “You move the decimal over. And, since we are talking about a ratio of three to two…” I wrote 66 on the other side of the T chart. After adding 150 for the Golden Snitch, we noticed that the difference was still pretty large.

I showed my students that it was even easier if they began with scores that were divisible by three. From 100 we tried 90. That was simple, but the difference was still too great. Together, we guessed that 81 would be a multiple of three since it is divisible by nine, but how could we figure out the exact number that could go into 81 three times? A tiny bit of long division algorithm did the trick! We did this a couple of times and noticed a pattern. Each time we lowered the dividend by nine, the quotient dropped by three. A really remarkable recognition happened as we figured out the third difference over on our T chart, too. The differences between the two scores were showing signs of a pattern; Each time we shrunk the number of goals that Team A scored by nine, Team B’s final score would drop by exactly 60 points. It went from 810 to 750 to 690 to 630, consecutively! Wow!

The recognition of patterns within the math brought my mind back to what had started this fantastic exploratory math lesson; Stimming. There is something soothing about knowing what number is next. Being able to rely on the consistency of repetition can be comforting. Tapping, singing, pacing, and even skip-counting are all ways to occupy part of the brain, so that other parts may be freed to think. How much stimming a person needs is different for every individual, just like managing it in the classroom environment will differ, but finding just the right ratio can be magical.

Paper Football Field Goal Line Plot Lesson

Driving question: What is the perfect length of a paper football field? We are talking, one that allows some paper footballs to score goals, but not every “kick.”

Goal: Students will create and use a line plot to categorize data in a way that makes it easy to interpret. They will analyze the data to determine the best measurement for flicking a paper football accurately.

Prep: I folded a paper football out of an ordinary,letter-sized piece of paper (8 ½ by 11 inches). You fold it the same way you fold an American Flag. Have one pre-folded, but this could be part of the lesson, if you have time. (I didn’t have X.) 

I placed two tables end to end, creating a lengthy runway for measuring. Before students arrived, I taped rulers to the table top the entire length of the two tables, about 3 inches away from the center. I put pieces of tape at each foot so that it would be faster and easier to locate the increment. 

Lesson: I told the students the object of the lesson was to determine the “goldilocks length” of a paper football field for this group of students. Another group may be better or worse at flicking the paper football. We are going to collect data that will help us tailor our “field” to our group. 

“We don’t want the field goal too close, or every single flick will score a point. We also don’t want the field goal too far away. Then no one will score! There will be a window where some will score, but some won’t. We will use data to find that sweet spot. And, we will use a line plot to help us read the data.” 

The first thing we did was figure out the width of the field goal, so that we could finish constructing our mock field. I had each student form right angles with their thumbs and index fingers. Then, touching thumb-tips, they placed their finger field goals on the measuring tape (ruler) I had already taped to the tables. As students shared the measurements of their finger field goals, I wrote them on the dry erase board. We had 6, 6, 5, 5 inches. 

I had taught my students how to average numbers earlier in the year. They were bouncing with the information, now. “It’s 5.5,” a girl offered. 

“How do you know?” I queried.

A boy suggested that it was right in the middle of the numbers. I affirmed this by circling the middle four and five. The girl who had provided the original answer shared what she did to get it, and what one should do to find the average of several numbers. “You add all of the numbers, and then divide by the number of numbers.” We discussed dividing 22 by four in order to review fractions and decimals, and to double-check our answer.

Next, we used mini (six inch) rulers to measure five and a half inches distance between the already taped down ruler and a new one. I had the students tape it down. Now, we had a runway that was the average field goal width, running about ten feet long. 

I demonstrated how to flick the paper football. Each student got three tries. If any of them were duds (didn’t fly), we conducted a retry. There were a few very short flicks, but all in all we collected some valuable data. 

This line plot is not great because the line is not accurate. There ought to be measurements that do not have Xs. Every 1/3 foot should be labeled.

About half of the flicks landed between the two rulers; within the field goal range. These measurements were written on the board in one color. The flicks that did not land between the rulers were recorded in a different color. All of the measurements were recorded to the nearest ⅓ of a foot, in order to use mixed numbers on our line plot. 

Once the line plot was finished, it was easy to see the window where the field goal ought to be erected. There was a collection of accurately-flicked colored Xs up to a point. Then the other color, the color of missed flicks began to move in. At a certain point there were no longer any accurate flicks. The brackish space containing both colors contained the available distances. 

Some students wanted to place the field goal at the first measurement that recorded a miss. I explained that, were we to place it there, nearly every flick would score a point. Even the misses that went far could pass between the goal posts before veering off to the side. I drew a picture illustrating what I meant. 

We drew lines at measurements that we thought the field goal would work best. Then we discussed pros and cons referencing the data.

One student wanted the goal posts erected right before the very last successful data point; The last one to land between the two rulers. I told him that “This would guarantee that only one person would get one point for one flick out of… How many did we do? That might be too frustrating, and not very fun.” 

We ended the lesson without deciding on the perfect distance. Basically, the thing to do was to use the data that we collected to try out some reasonable distances, and see which ones were more fun. The beauty of the paper football field goal game is that the field is so malleable. It is all about fun, and that’s what I hoped the line plot lesson would generate. If nothing else, it was memorable. 

Building Strategic Thinking with Dominoes

My 5th grade gifted class revisited the game of Dominoes last week. It took some review, but they enjoyed playing the game. I told them that one of the reasons I had taught them the game was because it is a classic that they could play with grandparents and other elderly people, bridging the gap between generations. The game has been in existence for over 900 years! 

In addition to the game being old, it also presents an opportunity to practice strategic thinking. In an effort to prove this to my 5th graders, I have begun dreaming up scenarios where a player might use analytic skills to make a counter-intuitive move that would benefit them in the long run. 

There are times during a game when you have more than one Bone (Domino) that you can play, but none of the plays will give you points. Sometimes, it does not matter which one you put down, but other times you can plan ahead. Much like you would in chess, you can set up future moves by arranging the Bones to meet your needs. Playing them in a particular order would benefit you more. 

I planned on showing my 5th graders what I meant by setting up scenarios of games and taking pictures. I have done that many times to teach the problem-solving aspect of Dominoes. 

Using photos as teaching tools works great on interactive devices.

Then I thought, Why not have my gifted students make up the puzzles themselves? I will give them the parameters, and they have to try to figure out how to show the need for strategic thinking through constructing an image of a hypothetical game. 

The puzzle would be an image showing Bones (Dominoes) already played, Bones available to a player (standing up so Pips or dots were showing), blank sides of the opponent’s Bones, and maybe a Boneyard (unused Dominoes). 

If you are a novice Dominoes player, some of this vocabulary might be new to you. Bones are the game pieces, named after what they were originally made out of; Ivory or elephant tusks (bones). The Boneyard is made up of the unused Bones lying face down. Face down means that the Pips or dots on the bones are not showing. All you can see is a blank Bone or the uniform design that is printed/carved on every one of the 28 Bones of the set. Bones often have something decorative on the side without Pips, so that players can identify the 0-0 Bone more easily. Every Bone has two numbers on it. There are two ends of the number side of a Bone. No two Bones have the same combination of numbers. Beginning at 0-0, the Bones go up to 6-6. 

The Plan: In order to demonstrate strategies for play, I am going to have my 5th graders come up with puzzles that point to weighted plays. In other words there will be better moves than others. People trying to solve the puzzles will have to analyze the potential moves. Which one is better and why? Puzzle-solvers will be required to explain the move they chose. 

This is from the beginning of the year.

The Work: Arrange Bones as though they had been played in a game. This means matching the ends of Bones; Six is connected to six, three to three, etc. There ought to be four lines of play that a player can connect a Bone to.

Each player has Bones left to play. One set of Bones is standing up, with the number of Pips showing. These are the Bones that the puzzle-solver has to work with. (Normally, when I am teaching Dominoes to students, I have them lay all of the Bones down, so that every student can see all of the Pips. This is so that every single play is a lesson on problem-solving. When one plays a real game, you do not show your Bones to your opponent.)

The Bones that the puzzle-solver has to work with (the ones showing Pips in the image) should have numbers that can be played. They contain the number that is present at the ends of the lines of play. One of the Bones that can be played would cause the sum of all four ends of the lines of play to add up to a multiple of five, which is how one acquires points in Dominoes. This would seem like the best choice to complete the puzzle. 

Because we want this to be a puzzle that causes Domino players to grow in their understanding of the game and not just an illustration modeling how to play, we aren’t going to make the correct answer to our puzzle be an obvious choice. A good head-scratcher will require a player to look beyond the obvious play. 

If four Bones with the same number have already been played, and the puzzle-solver has two of the remaining Bones with that same number, how likely is it that the opponent of the puzzle-solver has any Bones with that number

Here is your task: Make it so that playing the Bone that does NOT create a multiple of five is the better play. 

I’ll have to share this lesson with my 4th graders, as well!

How could this happen? If the opponent of the puzzle-solver is forced to draw a Bone from the Boneyard, rather than playing a Bone, not only will they not earn any points, but they will be growing the number of points that the puzzle-solver will get at the end of the round; The round that the puzzle-solver is now more likely to win because they have fewer Bones left than their opponent. 

At the end of each round the player who uses up all of their Bones first gets points from the Pips that are on their opponent’s remaining Bones. In order for the play that did not make a multiple of five in the first place (at the beginning of the puzzle-solving exercise) to be the better play, the final play must provide more points than the potential multiple of five. 

If the multiple of five would have been fifteen, and there is no way, given the Bones that are left, for the puzzle-solver’s opponent to have a total of Pips greater than fifteen (you always round up, so sixteen would go up to twenty), then not playing the multiple of five during play would not necessarily be a winning strategy. Typically, you would play the multiple of five, get the points, and hope for the best. This exercise is designed to show my 5th graders that if you plan ahead, the delay of point acquisition could very well bring a windfall of greater point tallies. Not only is this a good life lesson, but it can help them play the game better in the future. 

Now, if you want to try to figure out how to create a puzzle that fulfills these requirements on your own, without any help, go for it. You can return to this writing when/if you get stuck and need some guidance. The next section provides some helpful hints. 

If you aren’t sure where to start, or you have hit a mental block, check out these ideas.


Some Helpful Hints: 

Limit the available Bones. You can do this several different ways. One is to only give the puzzle-solver two bones to choose from. 

Another way to limit the potential outcomes is to make the lines of play long. Have most of the Bones from the set showing in the lines of play, so that the potential Bones of the opponent is narrowed to only a few possible numbers. The puzzle-solver can reverse-engineer the game to figure out what Bones are left to be played. It’s like “card-counting,” but legal;)

A very effective strategy for creating a doable puzzle is to limit the numbers in play. Idea: Make the ends of the line of play all the same number, and the puzzle-solver has the remaining Bones that contain that number. For example, there is a one at the end of all four lines of play. There are only seven Bones that have a one in them. If four of these are played, and the puzzle-solver has the remaining three, then the opponent cannot possibly play any of their Bones. 

But, the puzzle has the puzzle-solver making the next play. How can the puzzle-solver cause their opponent to have to draw from the Boneyard? See if you can figure it out.

There are a couple of ways to solve this problem. One answer is to provide the puzzle-solver with a double. A double has the same number on both sides. When this is played at the end of a line of play, it keeps that number going! 

Another solution requires more work, and could therefore be trickier for the puzzle-solver to find. Make it so that all of the Bones that the puzzle-solver possesses have numbers on them that can’t be played. You have to position every bone that has any of the other numbers on them within the lines of play. No need to worry about your puzzle-solver using up their Bones because every one of theirs contains the same number as the ends of the lines of play. 

Stack the Pips. Create lines of play that have low numbers, thus ensuring that the Bones that the opponent possesses are more likely to have higher Pip counts. In this way, even if the puzzle-solver would make a fifteen or twenty with the false-solution-Bone (the one that would make a multiple of five and seems to be the better choice for the puzzle-solver to choose), the total Pips that the opponent would have must be greater than the multiple of five. This number work is truly statistical thinking. Out of all of the Bones still available, how likely is it for the opponent to have a high enough number of Pips for the counterintuitive play to benefit the puzzle-solver more? 

This puzzle would allow for the opponent to make a play or two before the puzzle-solver is out of Bones. My student would have to work through all of the possible outcomes to ensure that the puzzle-solver would come out on top. 

3rd graders learn to play Dominoes

Try it out, and make the puzzle fool-proof. When making the puzzle, turn all of the Bones over so that the Pips are showing. Create a model of lines of play. Give the puzzle-solver the Bones they will work with. Now, look at the Bones that the opponent could have. Adjust the lines of play, so that there is no possible way for the opponent to have a way of winning. You also have to double-check that there are only Bones that would cause the opponent to have more Pips than the false-solution. Then turn over the Bones that form the Boneyard, and stand up a couple that represent the unknown opponent’s Bones. 


Conclusion:

Normally, I will do a lesson like this, and then write a blog about it. This is different. I have used my writing to think through what I want to have my 5th graders do. 

My aim is to have them build their understanding of the game of Dominoes and learn statistical analysis through the process of constructing their own puzzles, rather than just solving mine. Hopefully it will be successful, and I can write a follow up blog about how wonderful it went… or the lessons I learned through its execution, pun intended;) 

If you try this idea or one like it, please share your results. I’d love to learn feedback and improve future teaching. 

Sources:

Marcus, M. (2020). How to Play Dominoes . Cool Math Games. https://www.coolmathgames.com/blog/how-to-play-dominoes

Making Math Connections: 1st Grade Double-Digit Addition

Snargg and Plory, iReady mascots

Yesterday, I had the privilege of attending a one-day conference hosted by Curriculum Associates, the company that produces the lessons that I use to teach my students math. During a whole-group general session between breakouts a few different leaders from the company got on stage to share some ideas. One of them was Kenneth Tan. He was in charge of speaking about some new ways of interpreting the data that diagnostic assessments provide.  

He did a nice job making meaning from graphs and charts. One of the things that Kenneth shared caused me to remember a lesson I’d taught my 1st grade math enrichment class the day before. 

Keynote speaker Glendaliz Almonte shares in Grand Ballroom Hilton Philadelphia at Penn’s Landing.

He had an image appear on the huge screen at the front of the room. It was a grid with around 12 or 16 seemingly random words in boxes. The audience was asked to try to remember as many words as possible. I figured there was a catch, and I took a couple of seconds to glance over the entire grid, getting a feel for the words. Were there any connections that could be helpful?

Just as I realized that the collection of words contained not only nouns and verbs, but adjectives and articles as well as prepositions, the image disappeared! I tried to quickly string together any words I’d remembered, forming a sentence, no matter how silly. 

The speaker probably knew his audience was smart enough to think of this trick and, either to limit their success or to save time, switched slides from the grid of random words to one containing the sentence that I’d tried to piece together. Kenneth Tan remarked that data is only as helpful as it is meaningful. I liked the analogy. 

The idea of connecting words made me remember my first grade math enrichment lesson from Monday. In that lesson, I had students join single-digit numbers to grow a double-digit number from the left side of the image larger and larger, until it eventually equaled the double-digit number shown on the right. This lesson was straight out of the Ready Math Teacher Toolbox (Lesson 20).

With the image imported into a Jamboard, students were able to trace over the provided lines with color. Each color was a different student’s work.

Typing out the process makes the lesson seem more complicated than it was. As you can see from the image, Ready Math had numbers in boxes. Some were double-digit, and some were single-digits. The double-digit numbers flanked the single-digit numbers. Students had to leap frog across the boxes with numbers to get from one double-digit number to the other, and the trip should create a balanced equation. Ready Math had an example that made the task plain as day.

The activity was an instant hit! Among other things, we discussed the relationship between the numbers. The 17 needed a nine to get it to 26. There were several ways to make nine, using the numbers that were available. We talked about combinations of numbers that could not work, and why, as well. One student (the blue line and numbers) wanted to go from 17 to nine, and then visit eight. Either they wanted to try something different, or they had recognized that eight plus nine equals 17. I let them try it, but they realized that the path would not “land them on” 26. They would over shoot their goal.

The Ready Math enrichment assignment had a few diagrams with varying numbers. I had different students come up to the Google Jamboard to draw paths and write equations that demonstrated getting from one double-digit number to the other.

I showed the first graders that every equation for a diagram had some parts that were the same. The first number, the double-digit number, was always the same. And, the sum, the double-digit number on the other side of the equal sign is the same for each. It is the middle addend(s) that change. To illustrate this fact, I drew two boxes in the middle of the equation. These symbolized the boxes from the diagram that held single-digit numbers. When we had finished working through the numbers that were available, we came up with some others that weren’t shown.

Then things got really interesting. The first graders felt bothered when one of the diagrams had numbers that were not being used. The starting number was 88, and we had to get to 95, a difference of seven. One of my students drew a line from the 88 to an eight. That would put the running total up to 96, one past the goal of 95. Rather than tell the student that he was wrong, I asked if there was anything that he could do to “Balance the Equation.”

With a little help from his friends, the first grader decided to change the operation from addition to subtraction between the single-digit numbers. In this way, he was able to incorporate the last unused number, a one. Sure, one had to be “taken away” in order to complete the algorithm accurately, but at least he was valued worthy of a place in our equation!

More than adding and subtracting, this was a lesson in making connections and building relationships between numbers. Finally, finding balance between the two sides of the equal sign is not just algebra. It is a life skill.

Developing Real-World Math Problems: Adding & Subtracting Mixed Numbers

During an interview for a podcast with Curriculum Associates the other day I was asked how I use real world scenarios to enrich math lessons. I had explained to the interviewer that teaching is a second career for me. My experience of entrepreneurship as a residential custom painting contractor helps me introduce loads of business expertise in my math lessons. 

The interviewer was looking to provide practical solutions for teachers to use. I took two seconds to imagine I was sitting in front of my computer (as I am right now;) and tried to remember the steps of making my lessons. 

The first thing I do is find the lesson in the i-Ready toolbox, and look at the “Extend Learning” assignment. I don’t usually use the i-Ready assignment verbatim, just in case the regular education teacher wants to assign it. I use it as a guide for my enrichment lesson. 

i-Ready provides paper lessons that can be assigned virtually or printed out.

For instance, this week my fourth graders were learning about adding and subtracting mixed numbers (Lesson 21). The extended lesson shares a story about a couple of kids filling a fish tank. Some mixed numbers are used, and kids are asked to do calculations that would require them to add and subtract the mixed numbers. 

Here’s a GIF I made showing our classroom 75 gallon fish tank. I made the stand that it is sitting on out of 4 X 4s.

I actually have a 75 gallon fish tank in my classroom, so this story could very well be perfect. However, I just wasn’t feeling the mixed number connection. There is no way that three friends would have three different buckets that all hold different mixed numbers of water with a fraction containing the same denominator. It felt too implausible. 

Regular Ed teachers could still use this paper assignment about students using mixed numbers to fill a fish tank.

I sat at my computer and thought, Where do I encounter mixed numbers? In addition to having run a successful business, I’m also a “Do it yourself-er.” I enjoy building things. Making things with my own hands and tools is satisfying to me. I made the stand that my fish tank sits on. I finished my own basement, complete with bathroom and laundry room. In short, I have come across plenty of mixed numbers! Developing an enrichment math lesson that uses mixed numbers will require me to make the work of adding and subtracting the mixed numbers both doable and easy enough for the fourth graders to understand. That is my challenge.

When I say that I like to use my hands to build things, I don’t mean paper airplanes. Check out this blog about my giant wooden sunken pirate ship classroom decoration.

The morning that I came up with “Fix a Bench” my first thought was to have my students figure out how many boards would fit on a small deck surface. Each board could be a mixed number in width. This would be similar to the fish tank assignment from i-Ready. Kids would just add them up to fill the space.

As I began researching and looking for pictures online to jazz up my presentation, I remembered that lumber is full of mixed numbers. The most common building material, the two by four, is NOT really two inches by four inches. I learned this ages ago when I expected several adjacent two by fours to equal a nice even round number. It was some wacky measurement, and I took a closer look at the dimension of the studs (two by fours) I had purchased. I was incredulous, thinking I’d been ripped off! 

Thinking this might be a fun fact to share with my students, I decided to have them explore having to use various sized pieces of lumber to make something. The fourth graders love mysteries, and I would wait until the very end to explain why two by fours are called that when they actually aren’t those dimensions. 

My lesson was originally “Build a Bench.” When I began planning what my students would actually do, however, I figured out that it would be easier to teach and explain if I had them only choose lumber to place onto an already existing frame of a bench. Thus “Fix a Bench” was born. 

The next part of developing a good real-world lesson is to create a “Sell.” You must come up with a pitch to draw the students in. “Today we’re going to fix a bench” isn’t good enough. Instead, I told my students that “It’s your parents’ anniversary (or birthday for single-parent families), and you want to give them something, but you have no idea  what! They have a special bench that they like to sit on, but the wood is rotting. You get the idea that you will fix this bench for them as a gift. Because you don’t have enough money to buy the wood to do the work, your parents agree to get it for you. Your labor and thoughtfulness is the present. In exchange for your parents footing the bill, you have to tell them exactly how much the lumber will cost.”

This little story makes sense to the students. Even if they don’t have a bench in their backyards or don’t have a backyard at all, they can imagine doing this kind of thing. Also, it gives them some good ideas of how to come up with presents for their parents that won’t cost them anything more than creativity and thoughtfulness. 

“How much does the wood cost?” the students instantly want to know. 

“Before I tell you the costs, I am going to need a helper… This person has to have very good penmanship. I will know that they can write very neatly by how well they listen to the explanation of the project…” I share this with a very stern look in my eye, as I scan the room for anyone not paying close enough attention. Every student straightens their body and widens their eyes. I proceed to share the dimensions of the bench frame.

I got the size of the bench by measuring one of the chairs in my room. The back was approximately 16 inches tall, and the seat was 14 inches deep. Instead of supplying these simple numbers, I turned them into mixed numbers. Sixteen inches turned into 1 ⅓ feet, and 14 inches transformed into 1 ⅙ feet. In order to narrow the focus of calculations, I made the bench exactly eight feet wide. This way, there wouldn’t be any trimming of the ends of the boards. Just choose eight foot long pieces. 

Now, it was time to show the students the materials available to them. I had found a list of lumber online that showed the names of the wood with the actual dimensions next to them. With this image on the screen in front of the class, I showed students how a two by four is actually 1 ½ inches by 3 ½ inches. A two by six, another common board measurement, is really 1 ½ inches by 5 ½ inches. And, a two by eight board is 1 ½” by 7 ¼”! 

The class needed a little guidance to get started with this lesson. I guided them through drawing a diagram of the important parts of their bench. We labeled the back, the seat, “And don’t forget about the single board that goes on top!” I told them. I had them figure out how many inches the mixed numbers would translate to. “Now, we have to fill these spaces (16 and 14 inches, respectively) with lumber,” I told them. “It would be easy if two by fours were actually two inches by four inches, but they aren’t! See if you can figure out how to make sixteen inches of surface using these mixed numbers.” I circled the widths of the “two bys” from the image. I had told them that we would only use those, because they need to be thick enough to hold a human’s weight. 

Using only 3 ½ (the width of a two by four) won’t work for the back of the bench. My students figured out that four of these boards will get you to exactly fourteen inches of wooden surface. That leaves you with a two inch gap, and “We don’t want any spaces. Neither can we saw any boards to resize them. There aren’t any boards that are exactly two inches wide. Can you take away one of the two by fours, and find a different size board that fits nicely?” 

When my students take 3 ½ away from fourteen, they have 10 ½”. “What is the size of the space, now?” I ask this while pointing to a gap that I’ve illustrated on my drawing of the bench we are fixing. They figure out that the empty space is exactly 5 ½ inches wide. “Are there any 5 ½” wide boards that we can purchase?” Yes. The 2 by 6 is that width. 

Are we done? Definitely not! “You were all such hard workers and very good listeners that it is very difficult to decide who could be my writer,” I tell my class of math enrichment fourth graders. 

One of the students actually volunteered another, saying, “Nahum has really good hand-writing. You should have him write on the board.” 

“Are you nominating your friend?” I inquire. He admits it, and several students second the nomination, suggesting that Nahum really does have good handwriting. “Well, okay, then. Come on up here,” I extend the invitation and commend Nahum’s friend for being classy.

As Nahum prepares to write on the board, I open my laptop. I have pricing from a lumber yard ready to go. We now write down the amount of money each board will cost us. I have Nahum give the writing tool to other kids after he writes a couple of prices, so that more students get a chance to write on the board. We only supply the prices of the two-bys, because those are the only ones we are using. 

Students proceed to figure out the cost of 3 two by fours and 1 two by six. When they think that they are done with the project, I point out that we still have to figure out the seat of the bench. They happily begin problem-solving that challenge independently. It took a surprising amount of time for them to figure out that we had already answered the question of what boards could be used. The 4 two by fours that we had added up earlier had totalled exactly fourteen inches, which is the size of the seat! 

When they began adding up four prices of two by fours, I pointed out that we already knew how much three of them cost. “Why not just add the cost of one more to the first number?” I suggest. Grateful for the idea, they do this. 

Preempting the “I’m dones!” that were about to fill the room, I reminded them, “Don’t forget about that top board… The one that goes on the top of the back of the bench.” Happy groans and more pencil scratching ensued. 

Just when my students thought that they were finally done, and Mr. Weimann couldn’t come up with any more surprises, I told them, “It would be very classy if you figured out how much your parents would have to pay in sales tax.” Epic groaning accompanied smiles and students beginning to hunch over their iPads. I told them to use calculators and that our state sales tax was six percent. This was the icing on the cake. 

After a few seconds, I modeled for them, asking Siri, “What is six percent of thirty-eight dollars and fifty-six cents?” When she told me, I wrote it on the board for them. 

Because I had created Google Jamboards with all of the information preloaded on them, I was able to see each individual students’ work. I had waited until Nahum and partners had neatly written the prices into the slide with lumber details before I pushed the Jamboard out in a Google classroom assignment. I had the software “Make a copy for each student.” Students knew that, although they were allowed to work with partners and I helped them solve several parts of the problem on the board, they had to add their own version of the details, showing their work

Before students left my room I explained why two by fours are actually mixed numbers. The lumber is cut at exactly two inches by four inches, but when it dries, it shrinks. Of course the students wanted to know why lumberyards don’t correct for this or call the wood by another name. The young minds cried foul and felt tricked! I told them that it has been this way for a long time, it is easier to say “two by four” than “one and a half by three and a half,” and the price of the wood that you feel like you are being cheated out of goes into having to store it while it dries, before selling it. It isn’t like the mill cuts a two inch by four inch pied of wood for you to bring home, you build with it, and it shrinks on your home. That would be worse. In the same way that creating this lesson required several steps, when one wants to make and use a two by four, you measure the wood, cut the lumber, let it dry, measure it again, and then you can work with it.

Comparing Fractions Through Arch… itecture

Humans love to construct (Lorek, 2018). Is it in our instinct? Sarah Lorek (2018) contrasts the idea that beavers building a dam would be considered “natural” versus humans constructing a dam being “man-made.” The structures look different, and have slightly different purposes, but the reason for construction may not be as disparate as assumed. 

[I searched the web for articles that speak to the (my) hypothesis that constructing things might be a human natural instinct and came up short. This would most likely be a very difficult thing to prove, but I’d love to read about it. If anyone knows of any literature or can point me in the direction of a good source, please share.] 

From my own personal experience, I can say that I have witnessed students come to life when building blocks are made available, and some of my favorite activities involve construction. I have fond memories of sitting in the middle of a mess of Legos, Lincoln Logs, and Robotix when I was a kid. I spent hours building spaceships, cities, and robots. Now, I remodel my house (recent bathroom project), labor on landscaping, and generally enjoy working with my hands (famously failed pirate ship project).

I’ve written about the unique and exciting experience of putting building materials in front of my students. From Building Bridges, using Blocks to teach measurement, Adding Blocks, Purchasing Blocks to use in business plans, constructing Bridges as Object Lessons to teach SEL, and creative Playtime, my students are no strangers to building materials and hands-on lessons. Even during this past lesson, I heard students professing this to be the best Math Enrichment lesson, yet! 

Purpose

Students have been introduced to fractions in their regular math classes. I was planning to enrich a lesson about comparing fractions. Our math curriculum had a nice worksheet that would have students create quilts with limited colored squares, and then compare the fraction of each color. Students can still do that lesson, but independently in the classroom. I created a lesson that was hands-on and interactive.

Students would use colorful connecting blocks to construct an arch. I had a picture of the arch in Washington Square, NYC on the board when they entered the room. We discussed the idea of arches for a few seconds before I shared the parameters of the project. 

Arches are symbolic, letting in light and allowing people to walk through walls. They are old; developed during the second century B.C. They are also timeless, in that they are still used today. They have even been known to hold magical properties! Vampires must receive permission or an invitation before entering someone’s home (through an arch), and the arch makes an appearance in Harry Potter as a passageway between this life and the beyond.

A memory that popped into my head that will definitely date me is that of the movie “Ernest Goes to Camp” (1987). The image on the cover of the movie shows the arch that Ernest is working on at the very beginning of the movie, surrounded by several scenes from the flick.

Parameters

As per a recent lesson that I learned about setting tight parameters, I constructed very strict limits on student creations. Students were allowed exactly 24 cubes. I chose this number because we have been learning and playing Math 24 a lot recently, and because the number 24 is divisible by many numbers. The lesson could include reducing fractions, making common denominators, and more through starting with 24 for a denominator.

The blocks could only be red, green, blue, and/or yellow. At least three different colors were to be used. This ensured that there would be some comparisons between fractions. 

Students could work independently or with a partner, but no groups larger than two. Each student, whether working with a partner or alone, would be responsible for putting information about their project into a Google classroom assignment. 

Activity

Once the assignment was explained, I set them loose. They were busy bees, buzzing around the blocks, loving the building. Creativity bubbled in the classroom. There was a purposefully leaning arch, decorative arches, symmetrical aches, one was made as short as possible while still fulfilling the definition of “arch,” and one even mimicked the pointed style of the Gothic Arch. So impressive! 

I stopped the students when some of the first arches were being completed, so that I could instruct them on what to do next. I had a couple of girls hold up their arch for an example. We took a photo of it, which is what I wanted everyone to do. This way, I could assess the accuracy of the numbers. It demonstrated to students that they must provide evidence.

I model taking a photo of the photo I just took after teaching what to do.

Next, we counted the number of different colored blocks. The girls had made their arch symmetrical and used the same number of colors for each of the three colors. (This is something I fixed the next time I taught the lesson, that afternoon; “None of the colors can be the same number.”) 

I showed the students how to write the fractions next to the color of blocks that I had provided for them in the software that they were manipulating. Then, we wrote an equal sign between the two fractions. The way I got the girls to include “greater than” and “less than” in their project was by combining colors. “The fraction of cool color blocks was greater than the fraction of warm color blocks.” 

Time was allotted for producing fractions and making comparisons on iPads. In order to do even more comparing of fractions, I then had students take pictures of a neighboring team’s arch. They then imported that photo into their Google Jamboard project so that both their arch and their neighbor’s arch were side by side on a slide. Now, they got to compare the fraction of red blocks from their arch with the fraction of the other arch that was constructed with red blocks. This exercise involved talking about the math, sharing out, and self assessing. 

In the end, students enjoyed not only comparing fractions, but constructing them, building knowledge, and cementing learning into a fun and memorable experience. 

Sources

Azzarito, A. (2021, August 19). From Architectural to Artistic, Arches Are Trending. SemiStories. https://semistories.semihandmade.com/design-history-arches/

Lorek, S. (2018). Ancient Architecture and the Human Need to Construct. Trimble Construction. https://constructible.trimble.com/construction-industry/ancient-architecture-and-the-human-need-to-construct  

Sinclair, L. (2014, December 19). The History of Architecture in Eleven Arches. The Architectural Review. https://www.architectural-review.com/essays/the-history-of-architecture-in-eleven-arches

The Top 10 Construction Toys of All Time. Michigan Construction. (2017, December). https://blog.michiganconstruction.com/the-top-10-construction-toys-of-all-time

Pedagogical Aikido

“Where did the 850 cans come from?” I was in the middle of sharing the iReady enrichment lesson (14) with my fourth graders when one of them asked me this question.

Have you ever had a student ask a question in order to postpone learning? If you’re a teacher, then that’s a silly question. Of course! 

This is one of the few things that I remember from my elementary and middle school days. It was a thrilling challenge to try to come up with just the right topic or question that could throw the teacher off track. 

We would hope and pray for a story. Then, we would artfully flatter and ask questions that would lead our pedagogue down the rabbit hole of memories, further and further… away from the lesson at hand. 

Fast forward forty years. Today’s students still play the same tricks on their teachers! This past week I was engaging some fourth graders in math enrichment, when one of them tried steering me off task. Little did they know, that I practice Pedagogical Aikido

Redirecting Energy

Aikido is a form of martial arts that is known for using an opponent’s energy (ki) against them. Masters of this study practice redirection. 

Although I have not formally studied Aikido, I love its principles and attempt to use the philosophy of redirecting thought and energy within the walls of my classroom as much as possible. 

For example, the other day when my student asked about the origin of the 850 cans in our math problem, I allowed the student to think that he had derailed the lesson. I told him that this was an excellent question. “850 cans is a lot of cans. Where would a school get that many cans for a fundraiser?”

The martial art Aikido uses a triangle to teach the redirection of energy. There are three components that work together to use an opponent’s attack against them, saving your energy and neutralizing the situation. It all starts with Balance, known as tachi waza (Aloia, 2020).

“How many students does our school have?” I asked the class. 

I could have squashed the student’s inquiry, telling him something like, “I don’t know where the number of cans came from. It’s hypothetical. Let’s just move on!” Or, “It came from Curriculum Associates, the authors of our math program. Don’t ask silly questions.”

If I had done that, I would have disrespected the student. A dismissive teacher or one who blocks the question head on is too hard, too strong; the lesson too one-sided. By allowing for the question in the first place, and then entertaining it, I had my center of gravity low to the ground. My metaphorical feet were spread wide apart and knees bent. The question didn’t topple my lesson. I was balanced.

In answering my question, the students were surprisingly accurate. Our school has around 700 students. “How many cans would we have if each student brought in one can?” I prompted. That was easy. “But, not every student will bring in a can… And, some will bring in more than one.” The easy back and forth of these simple concepts established a flexible, down to earth ease of thinking. It also revealed the problem. We don’t know where the 850 cans came from.

Next, it was time to Break Balance. This is the second part of the redirecting-energy triangle. “The opposite of balance is imbalance, or kuzushi. To break an opponent’s balance, one must first redirect their energy to one’s own advantage” (Aloia, 2020)

I shouldn’t be surprised, but I was very impressed, nonetheless, at how quickly my students figured out how many classrooms our school had. It was the advanced fourth grade math students receiving enrichment, after all!

I had begun the imbalance kuzushi by getting the class to come up with the total number of classes in the building. After figuring out that our school has five classrooms per grade and our school teaches six grades, if you include kindergarten, we discovered that there are 30 classes represented.

“Let’s say that our school collected 850 cans. How many cans would each class bring in?” The students had no clue where to start.

Antonio Aloia (2020) explains that kuzushi has two arms. The physical off-balancing of an attacker, parrying the opponent’s strike and redirecting the momentum of the assault, coupled with a strike of their own is what one normally thinks of when imagining Aikido. Um, of course there isn’t any literal physical contact with students, let alone “attacks,” but presenting this new problem of dividing up the number of cans by the number of classrooms was a cogitational assault of sorts.

The other arm of kuzushi is a psychological off-balancing. This is where a martial artist would “Distract a would-be opponent by bringing their attention to something else, be it an object on a building or something farther away and behind the opponent” (Aloia, 2020). Pedagogically, this happened when I changed the student’s original question from “where” to “how”: “Where did the cans come from?” turned into “How could a school come up with so many cans?”

While the martial art of Judo involves throws, Aikido keeps your opponent tight and controlled. Perhaps counter-intuitively, it is concerned with the well-being of the attacker. So, rather than toss my students aside to flounder with the problem of dividing 850 by 30 on their own, I guided them through the process of figuring out the answer.

I asked them how many cans there would be if every class brought in 10 each; 300. “Okay, maybe that was the first week of the fundraiser. If each class brought in another ten cans during the second week, how many cans would the school have collected?” We were up to 600 cans. They were starting to catch on. 

One of the students used Google to divide 850 by 30. Rather than scold him, I asked him if it were possible for any of the classrooms to bring in .333333 of cans. This was a silly question. “What happens with the remainder from the division answer?” I asked. They didn’t know. “For our purposes, we will assume that the students from every classroom brought in 28 cans. The teachers brought in the rest.” My students were okay with this explanation. 

The third side of Aikido’s redirecting energy triangle permeates everything. It is ki or energy. Don’t think of it as power or force, though. Ki is more like momentum.

“How big are our classrooms? How many students are there in a classroom?” I got several answers on this. We decided to use the number 20. “Let’s say that a quarter of the students don’t bring in any cans. If the rest are responsible for bringing in 28 cans, how many brought in two and how many brought in one?” My students just looked at me. I told them to try and figure it out on their own, and then I’d show them. 

One student crushed it, and I had her show the class what she did. Then I modeled drawing a picture to solve the problem. 

After all of this, I told my students, “Now that we have collected all of these cans, we need to put them in something to bring them to the food pantry that we are donating them to.”

“If Dylan went out and bought a bunch of boxes… Thank you Dylan! (Dylan is all smiles at this point; He may or may not have been the person to ask the question that started all of this;) And, if Dylan’s boxes are all the same size, holding six cans each, how many boxes would Dylan have to get?” I let them wrestle with that a little while. 

When I was prepared to let them demonstrate their math on the board, I turned to the slide that had the original question on it. They reread the word problem as I decided on who would come forward to share their work first. A few students groaned and some others called out. “That’s the problem we just did!” 

“Yeah?” I feigned ignorance. 

I used someone else’s name when I told the story about getting bigger boxes; Ones that held 8, instead of 6 cans. “How many of those boxes were purchased?” 

As it turns out, we never got to fully explore the last question, but a couple of students tried solving it in their heads. I had completely Aikido-ed them! Lol.

Redirecting energy can be an even more effective motivator than a cool lesson. Take their energy, spin it around, and use it against them. Students will feel like they’re in charge of their own learning, and in a way, they are!

Source

Aloia, A. (2020, June 19). Reflecting on Jujitsu Pioneer George Kirby’s Advanced Techniques for Redirecting an Opponent’s Energy. Martial Arts of Yesterday, Today and Tomorrow. https://maytt.home.blog/2020/06/19/reflection-on-jujitsu-pioneer-george-kirbys-advanced-techniques-for-redirecting-an-opponents-energy/comment-page-1/?unapproved=2695&moderation-hash=f6966939a4ca212a2123a94cabda8d13#respond

Buttery Batch of Math Cookies

This is the introduction that I used on my fifth graders.

In preparation for teaching a math enrichment lesson to my fifth graders, I looked at the iReady “Extension” activities in the Ready Math “Teacher Toolbox,” and I found a problem that I liked a lot. (iReady and Ready Math are products of Curriculum Associates. My district has been using it for several years, and I like it a lot.) This lesson (14) is all about using fractions to solve word problems.

Here’s an image of the worksheet that a teacher could photocopy or share via Google classroom. Because I have the luxury of actually teaching enrichment lessons, I decided to do some explaining before handing over the problem. Also, I opted to make a few tweaks, too. In my experience recipes usually call for specific measurements of butter, not a number of “sticks.” Therefore, I covered up the word sticks in the problem and wrote in “cups.”

This changed the outcome of the answer quite a lot. Now, students would not have enough butter to complete the recipe. They could access new sticks of butter, but if they did that, then solving the problem wouldn’t require wrestling with all of the fractions presented in the partial sticks. That’s when I imagined the real-life experience of baking cookies after having worked all day at making a big meal, like Thanksgiving.

Needing soft butter for recipes is a real thing. Also, who doesn’t love consolidating? We can clean up all of those partial sticks of butter and make cookies at the same time!

I shared what a typical day of cooking in preparation for a large Thanksgiving meal looks like at my home with my fifth grade students, setting the stage for having several fractions of sticks hanging around. With the instruction to use up the warm butter first, and then dip into the cold butter from the new package, I set my students loose to calculate how much butter would be left.

Many students jumped on adding up all of the fractions. They began figuring out compatible denominators, so that they could combine every partial stick and find out what they had in all. “But, do you have to do that?” I asked them. No one wanted to venture a guess.

“What are you asked to find?” I pressed.

“Two and half cups of butter,” someone accurately answered. Without saying anything, I drew two of the worst cups ever drawn on an interactive board, followed by half of a third. I made fun of my drawings, which everyone helped with, pitching in their own digs. Once that settled down, I pointed out the lines I’d drawn through the middle of each measuring cup.

“Why’d I do that?” Earlier, we had discussed that fact that one entire stick of butter was the equivalent of half a cup. The students understood better than they could put it into words, so I articulated the concept for them, “Each half of a cup was one stick of butter.”

Then, we looked back at the fractions. It was easy to see that 1 2/3 + 1/3 would be able to fill one whole measuring cup. That leaves us with three fractions with differing denominators. “Before working out a common denominator to add up all three, think about what you are trying to do,” I instructed. “What is your aim?”

I showed the students that 1/2 a stick of butter + two of the 3/4 would equal one whole. “That would take care of half of a measuring cup,” I told them. Also, I should mention that I crossed out halves of measuring cups, as we discovered combinations of partial sticks of butter that would fill them.

“If we used up two of the quarters to combine with the 1/2 a stick and create a whole stick, how many quarters are left?” One quarter. “And then, we have 5/8 of different stick left.”

They instantly got it. We were 1/8 short of a whole stick of butter. In the end we needed one whole cold stick of butter, plus 1/8 of an additional stick to add to all of our warm butter fragmented sticks to fill our two and a half measuring cups.

The Ready Math extension lesson (14) has a second question that I left as is. The catch is that my students used our additional left over cold butter (2 7/8 sticks) from my adapted first problem to solve it. I let them struggle with this one for a few minutes before I showed them the short cut of drawing pictures.

“You might think it childish to draw pictures,” I began. Fifth grade is the oldest grade in my school, so these were the seniors of the place. “…But, I find it easier to manage some problems when I sketch what is happening.” I had been watching them crunching numbers, making common denominators again, and subtracting fractions. Now, within a handful of seconds, I showed them how many quarters could be made from two sticks of butter! I pointed out the idea of labeling the quarters in order to keep track of my thinking. I wrote a B above each “batch” of cookies. Sure, I could just count the quarters, but when it came to the last stick, it will be important to identify what portions of butter will complete a batch.

As I divided the last rectangle into eighths, I asked, “What am I doing to this last stick of butter?”

Rather than answering my question, they were chomping at the bit to be the first to spew the solution to the problem. “Eleven and 1/8!” more than one fifth grader shouted at the same time.

“No, that’s incorrect,” I casually, but cautiously counseled. Rewording what they had yelled in order to make plain the problem with their answer, I said, “You cannot make 11 AND 1/8 batches.” The emphasis on the word “and” did the trick.

“You can make eleven batches, and you’ll have 1/8 of a stick left over,” a student corrected.

“Perfect,” I affirmed. “Drawing pictures might seem silly, but look at how simple it is to see the answer. We didn’t do any denominator work past doubling up the number of sections in the last stick. I hardly did any math, beyond simply counting!

“When you are taking standardized tests, you get scrap paper. Use it. Draw pictures. Illustrate word problems. Take the time to label parts of your illustrations. Make sure that you understand what you are being asked. What is your goal? What are you supposed to find? It’s not just a number. It is the solution to a problem. In real life, it is a key that will unlock a problem. Be a problem-solver; Not a human-calculator,” I told them.

Photo by Elliot Fais on Pexels.com

In conclusion, my aim is to turn these advanced math performers into problem-solvers. With this goal in mind, I try to make lessons that force students to use what they have learned in their regular math class in a way that is not only compatible with what they would find in the “real world,” but forces them to understand how to use the skills. I often allow my students to use calculators because the problems I prepare for them require more knowing what to do with the numbers than practicing running through algorithms. AI can learn how to crunch numbers, but will it be able to successfully manage a kitchen full of amateur chefs laughing, telling stories, and making meaningful memories, all the while measuring butter for cookies after already cooking and eating a Thanksgiving dinner?

To combat the threat of AI, don’t try to make humans better than machines. That just makes them more like machines. I say, grow the human-ness of students. This is getting pretty deep, so I’m going to go eat a buttery cookie while I chew on these ideas for a future blog;)

Wallpaper Based Learning: Math Enrichment

Who wants to see a picture of Mr. Weimann with hair?

EVERYONE, apparently. I used this hook to get students to pay attention to my pitch of wallpaper hanging. They hung on my every word. 

This was a math enrichment lesson, in which I presented a real world problem that my fourth grade advanced math students would struggle through, using many math concepts that they already know. Knowing what to do with the numbers is sometimes more than half of the problem.

When I was in college (the first time;), I began painting to pay my way. Back then, it was just the outside of homes (exterior painting). Upon graduating, I conducted an informal internship with a wallpaper hanger. He taught me all about interior painting; which is VERY different from slapping paint on siding; and he trained me to hang wallpaper. 

This pic is from 20 years ago.

I was 22 years old, had long, curly, brown hair, and according to my students who did end up earning the privilege of viewing my old photos, quite tan (nearly all of them commented on this fact;). I worked with the professional wallpaper hanger for a little less than a year, hanging all kinds of paper in all kinds of homes. 

About half of his work came from a restoration company that did insurance projects. These homes had suffered water, smoke, or fire damage.

Unlike a company that specializes in a niche of upper-middle class single family repaints, this work brought us into a wide range of residences. I worked in downtown Philadelphia and on the Main Line, a very wealthy area–This place has both Ferrari and Lamborghini dealerships, among others!

This was one of the stranger bathrooms I papered. I had to paper inside that skylight.

We rehung thick, tough paper on basement ceilings; and metallic, mirror-backed papers in tiny bathrooms. It wasn’t unheard of for me to have to remove several layers of paper in older homes, in order to get to a clean plaster surface. 

It was fun to see so many different types of homes, meet a variety of peoples, and travel all over the area. I learned a lot about problem-solving because every job was completely different, and you didn’t get paid until it was done, and done well. 

Eventually, I struck out on my own. I got married in 2000, and my wife Sonia and I started our own painting company called “Excellent Painting.”

We used feathers to produce the veins on this marbleized pillar.

We ordered lawn signs and door hangers, spread the word, and pioneered a full-service painting/wallpaper business that did it all! We even dabbled in faux finishes, popular at the time. Faux finish is when you use tricks and artistic techniques to make pillars and walls look like marble, stone, or wood.

Because we were the only company that could do all three, we got a lot of business, especially in the new developments that were popping up in suburban areas near where we lived. The market was ripe, and we were busy. 

This is a photo of one of our neighborhoods. We would literally move our equipment from one house to the next, working our way around the loop. Having the interior of your home decorated by Matt and Sonia Weimann was a must.

There are many components to running a successful business. You have to market the company, spreading the word, so that people know to call you. Then you need to return phone calls and perform estimates. Those estimates need to be cheap enough that people will hire you, but expensive enough to cover the costs of supplies and provide a livable income.

Eventually, you have to deliver on your promises. You have to be able to successfully perform the work that you estimated. Be prepared to follow up on complaints, questions, and problems. If you don’t, an infection of bad publicity will spread around the neighborhood, and you can write that group of homes off! Do things well, and reap the rewards of moving from house to house, cutting down on marketing costs and time. 

This is an advertisement from a small local paper that was mailed to many homes in our area. It was an awesome investment!

Many of the skills and lessons that I learned through entrepreneurship are tapped in my teaching. Some days the professional world mixes with pedagogical practice more than others. My favorite place to bring my background to life is in math lessons

The other day, I treated my fourth grade math enrichment class to a treat of problem-solving that had them working hard, thinking hard, and learning hard. The challenge was to help me come up with a price for wallpapering a couple of bathrooms.

I shared a photo of a bathroom that I papered several years ago. Many opinions about the bathroom were unsolicitedly shared by my students. In order to get them motivated, I asked, “Who wants to see a picture of Mr. Weimann (that’s me;) with hair?”

Instant quiet. Hands involuntarily went to mouths to clamp lips shut.

“Listen up.” I proceeded to explain that you don’t just glue wallpaper to walls. You have to perform all kinds of preparatory work. 

There’s taking down old paper, because many times the rooms that you are going to hang wallpaper in were rooms that were already wallpapered. This is a lot of work. You may not know this, but wallpaper is two layers. There is the thin vinyl layer that sometimes peels off in large flexible sheets, but other times has to be slowly, painstakingly, curse-your-existence-ly chiseled off of the walls in tiny, bitesize pieces; As, you can probably tell, I have had too many experiences like this! Then there is the backing, which more closely resembles actual paper. This, you wet and scrape off rather nicely. There are all kinds of tricks to removing wallpaper more efficiently, but suffice to say, you better estimate plenty of time for this part of your project!

You aren’t done preparing the walls for wallpaper when all of the old paper is removed, however. Before you move on, you have to clean off all of the old glue! If you don’t, your new paper may not adhere properly. You do not want your new wallpaper to fall off the walls or bubble up. This process is not only messy. It can be deceiving. The glue is transparent, so that it does not discolor the wallpaper. Cleaning it off of the walls requires diligent and frequent assessments. Run your fingers over a cleaned wall. If you feel anything slippery or slimy, it is probably glue that still needs to be scrubbed off.

People don’t hang wallpaper the way they used to. My students will probably never practice this skill. But, I shared all of this information with them, so that they could see that there is much more to crafts like this than what meets the eye.

Once my students had been prepped with the horrors of wallpaper work, I brought out some numbers. I kept it simple with easy fractions to work with.

We would charge one whole dollar per square foot for actually hanging up the wallpaper, ½ a dollar for taking down the old wallpaper (Once in a while rooms don’t have wallpaper to remove. Plus, you want to make this a separate price so that customers appreciate all of your hard work, and it doesn’t seem overpriced.), and ¼ of a dollar per square foot for prep work. (This would include cleaning the walls, caulking cracks, and spackling holes and other imperfections that the paper won’t hide.) These prices are from when I was first starting out. I actually did this kind of thing, regularly.

Next, I shared a simple floor plan with my students. Some of them recognized the blueprint for what it was. I showed them the illustration of doors and asked them what the rectangle representing a closet was. We discussed what was happening in the picture for a minute. And then, I told them that our customer wants to wallpaper the two bathrooms. 

The image was presented on an interactive Google Jamboard, so I could write on the board. I used a bright blue to rewrite the dimensions of the bathrooms in question. I told them that the ceilings were 8 feet high. When I turned around, I was met with incredulous faces. They had no idea what to do!

This was perfect, because it provided me an opportunity to teach. I told them that a good strategy when dealing with a difficult problem is to draw pictures. I drew four rectangles beside the image of the floor plan on the Jamboard. With a little prompting I got my fourth graders to figure out that we would need to find the square footage of the wall space that would be covered with wallpaper in order to create prices. “What are these four rectangles?” I asked. 

I’ll confess that the first time I did this lesson (I have an AM and a PM 4th grade math enrichment class) I tried drawing a three-dimensional image of the bathroom on the side of the floor plan, and this ended up being too difficult to understand. I ended up pulling each wall from my drawing out and making individual rectangle representations.

In my second attempt, I cut straight to the 4 walls. This was less confusing.

Either way, it required some spacial thinking to understand what to do with the numbers.
This was my first (AM) lesson.

Once it was established that my picture of 4 rectangles were in fact the walls, we labeled the dimensions: Each one was eight feet high, and two were one length, while the other two were a different length. 

In order to figure out the square footage of all of the walls, you solve the area of each, and add them together. This reads simple enough, but my students had never had to do anything like this before! 

It took a little convincing to show them why we needed the square footage at all. I used the dimensions of our classroom and kept it to only one surface; the floor.

“How big do you think our room is?” I prompted. After a couple of guesses, I told them that I thought it was about 30 by 15. I then paced out the floor and found it to be 11 paces by 6 paces. “If we calculate each pace to be worth 3 linear feet, what are the actual dimensions of the room?” Wait for it. My students knew to multiply 3 times 11 and 6, respectively.

“Are 30 and 15 easier to work with?” 

We used the dimensions of our classroom floor to practice. (The -100 was subtracting the cost of supplies.)

“They are compatible numbers,” Evie answered. I beamed with pride. We’ve been talking about using helpful numbers to do mental math a lot.

“That’s right; Much easier to work with. And, what is 30 times 15?” Blank stares. “What is three times 15?” Now we were thinking! When we figured out the answer to that, I wrote “15 X 3 X 10” on the Jamboard. “Thirty feels big, but pull it apart. It’s just 3 tens.” 

“So we know that the floor of the classroom is about 450 square feet. How much would it cost to wallpaper the floor… Of course no one would do this, but what would it cost?” Everyone quickly understood that it would cost $450, since each square foot would cost one dollar. 

“Now, let’s say that some maniac had already wallpapered the floor before we were asked to. What?! Crazy, I know, but what if… We would have to remove that old paper before we can apply any new paper. How much will that cost? It’s fifty cents per square foot,” I remind them. It doesn’t take long to figure out half of 450. 

“And, finally, there will be some prep work before actually wallpapering. That costs twenty-five cents per square foot.”

In order to illustrate this concept, I drew a square on a new, fresh Jamboard slide. I labeled it $1. Then I drew another square, the same size as the first, and drew a line down the middle. I labeled each half $.50. Before going any farther, my math enrichment students knew to halve the half

While a couple of kids knew what to do with the twenty five from $225, some didn’t. I told them to break apart the number. “Don’t think of it as 225. What is half of two hundred?” I wrote 100 on the board when they said it aloud. “What’s half of 25? How do you know that it’s 12 and a ½?” 

Evie-to-the-rescue-again explained that 24 divided by 2 is 12. The one extra that it takes to make it 25 can be split in half. “Nice,” I encouraged.

“So, how much would it cost to do the whole project on the floor of the classroom, provided some nut wanted to wallpaper a floor?” Staring students looked stunned. “You have the price for applying the wallpaper,” I said, circling the $450. “You have the price for removing the old wallpaper.” At that point, I circled the $225. “And, we just figured out that it would cost 112 and ½ of a dollar to prep the surface.” 

“Do we add it all up?” a hesitant student asked. 

“That’s right,” I said, trying to sound proud and hoping to steer my students toward feeling like they can do this. “Now, time to figure out what this bathroom would cost!”

I let them struggle a little before helping. They needed a bit of guidance. But, we figured out the square footage of all four walls. They did pretty good finding out what it would cost. And, the second bathroom was a little easier. 

A funny experience happened at the very end of the afternoon lesson. This PM group of fourth graders originally entered the room with the announcement that they already knew the answer to the problem.

A couple of them had walked in on me finishing up my morning math enrichment lesson. They confessed that they already knew the final answer to be $952, “or something.” 

I told them that I was going to change all of the numbers, so it will be different. They thought that sounded reasonable;)

I had intended to make the ceilings 9 feet tall for the PM class, but the concepts were difficult enough to understand that I didn’t feel like it was all that necessary. But, by the very end of the afternoon lesson, after I told the students to take the prices of the two bathrooms and add them together so that we can tell the customer how much it will cost… 

“Wait,” they exclaimed. “You didn’t change the numbers!” Huge smiles stretched across their faces. They loved being tricked.

“Look at that. You ended up needing to do all of the work, anyway.” We all laughed as they exited the room.