Developing Real-World Math Problems: Adding & Subtracting Mixed Numbers

During an interview for a podcast with Curriculum Associates the other day I was asked how I use real world scenarios to enrich math lessons. I had explained to the interviewer that teaching is a second career for me. My experience of entrepreneurship as a residential custom painting contractor helps me introduce loads of business expertise in my math lessons. 

The interviewer was looking to provide practical solutions for teachers to use. I took two seconds to imagine I was sitting in front of my computer (as I am right now;) and tried to remember the steps of making my lessons. 

The first thing I do is find the lesson in the i-Ready toolbox, and look at the “Extend Learning” assignment. I don’t usually use the i-Ready assignment verbatim, just in case the regular education teacher wants to assign it. I use it as a guide for my enrichment lesson. 

i-Ready provides paper lessons that can be assigned virtually or printed out.

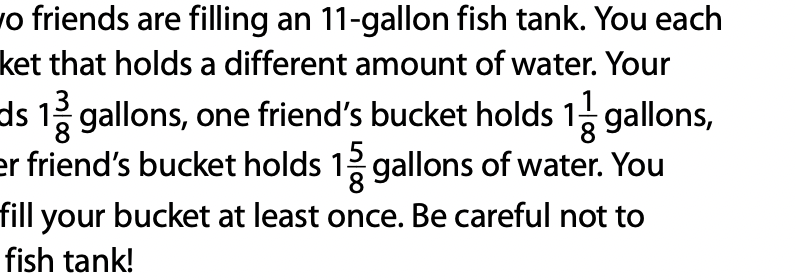
For instance, this week my fourth graders were learning about adding and subtracting mixed numbers (Lesson 21). The extended lesson shares a story about a couple of kids filling a fish tank. Some mixed numbers are used, and kids are asked to do calculations that would require them to add and subtract the mixed numbers. 

Here’s a GIF I made showing our classroom 75 gallon fish tank. I made the stand that it is sitting on out of 4 X 4s.

I actually have a 75 gallon fish tank in my classroom, so this story could very well be perfect. However, I just wasn’t feeling the mixed number connection. There is no way that three friends would have three different buckets that all hold different mixed numbers of water with a fraction containing the same denominator. It felt too implausible. 

Regular Ed teachers could still use this paper assignment about students using mixed numbers to fill a fish tank.

I sat at my computer and thought, Where do I encounter mixed numbers? In addition to having run a successful business, I’m also a “Do it yourself-er.” I enjoy building things. Making things with my own hands and tools is satisfying to me. I made the stand that my fish tank sits on. I finished my own basement, complete with bathroom and laundry room. In short, I have come across plenty of mixed numbers! Developing an enrichment math lesson that uses mixed numbers will require me to make the work of adding and subtracting the mixed numbers both doable and easy enough for the fourth graders to understand. That is my challenge.

When I say that I like to use my hands to build things, I don’t mean paper airplanes. Check out this blog about my giant wooden sunken pirate ship classroom decoration.

The morning that I came up with “Fix a Bench” my first thought was to have my students figure out how many boards would fit on a small deck surface. Each board could be a mixed number in width. This would be similar to the fish tank assignment from i-Ready. Kids would just add them up to fill the space.

As I began researching and looking for pictures online to jazz up my presentation, I remembered that lumber is full of mixed numbers. The most common building material, the two by four, is NOT really two inches by four inches. I learned this ages ago when I expected several adjacent two by fours to equal a nice even round number. It was some wacky measurement, and I took a closer look at the dimension of the studs (two by fours) I had purchased. I was incredulous, thinking I’d been ripped off! 

Thinking this might be a fun fact to share with my students, I decided to have them explore having to use various sized pieces of lumber to make something. The fourth graders love mysteries, and I would wait until the very end to explain why two by fours are called that when they actually aren’t those dimensions. 

My lesson was originally “Build a Bench.” When I began planning what my students would actually do, however, I figured out that it would be easier to teach and explain if I had them only choose lumber to place onto an already existing frame of a bench. Thus “Fix a Bench” was born. 

The next part of developing a good real-world lesson is to create a “Sell.” You must come up with a pitch to draw the students in. “Today we’re going to fix a bench” isn’t good enough. Instead, I told my students that “It’s your parents’ anniversary (or birthday for single-parent families), and you want to give them something, but you have no idea  what! They have a special bench that they like to sit on, but the wood is rotting. You get the idea that you will fix this bench for them as a gift. Because you don’t have enough money to buy the wood to do the work, your parents agree to get it for you. Your labor and thoughtfulness is the present. In exchange for your parents footing the bill, you have to tell them exactly how much the lumber will cost.”

This little story makes sense to the students. Even if they don’t have a bench in their backyards or don’t have a backyard at all, they can imagine doing this kind of thing. Also, it gives them some good ideas of how to come up with presents for their parents that won’t cost them anything more than creativity and thoughtfulness. 

“How much does the wood cost?” the students instantly want to know. 

“Before I tell you the costs, I am going to need a helper… This person has to have very good penmanship. I will know that they can write very neatly by how well they listen to the explanation of the project…” I share this with a very stern look in my eye, as I scan the room for anyone not paying close enough attention. Every student straightens their body and widens their eyes. I proceed to share the dimensions of the bench frame.

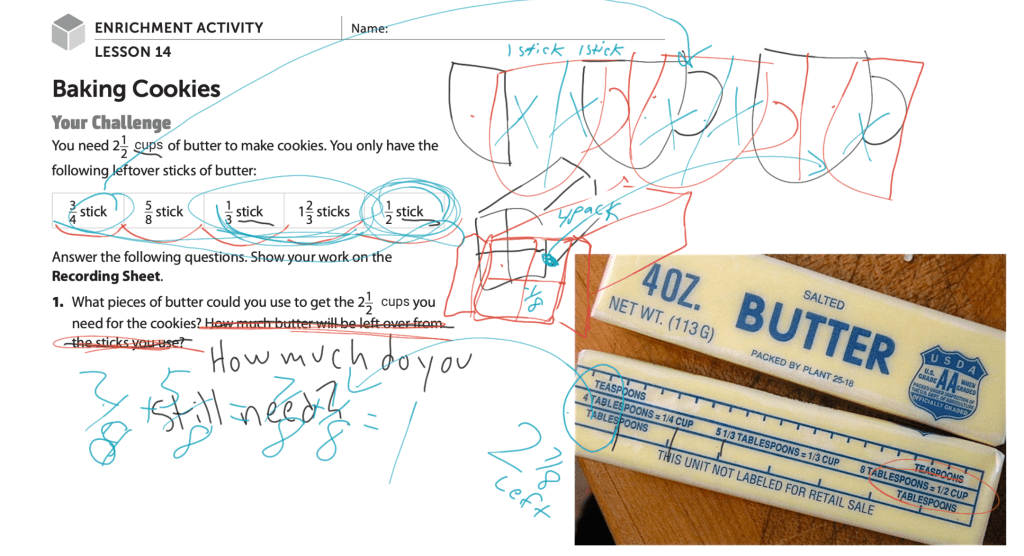
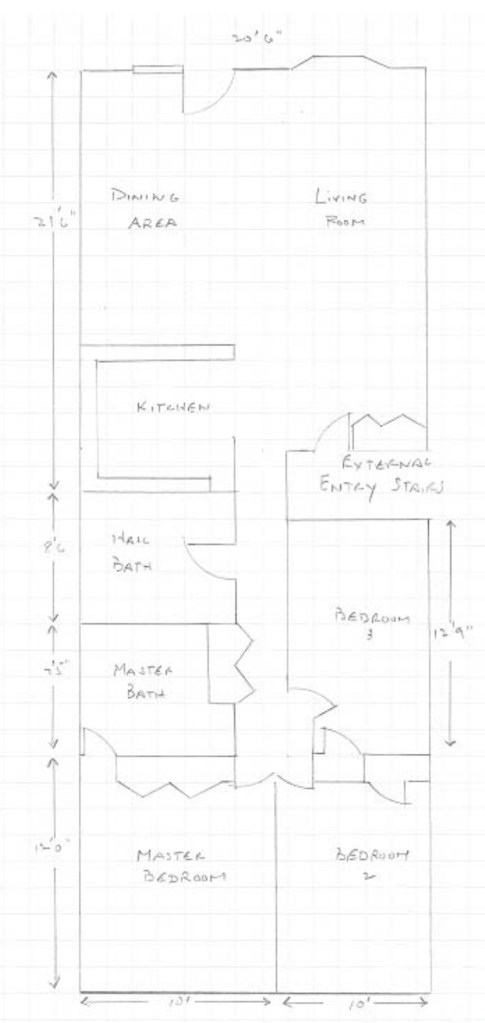
I got the size of the bench by measuring one of the chairs in my room. The back was approximately 16 inches tall, and the seat was 14 inches deep. Instead of supplying these simple numbers, I turned them into mixed numbers. Sixteen inches turned into 1 ⅓ feet, and 14 inches transformed into 1 ⅙ feet. In order to narrow the focus of calculations, I made the bench exactly eight feet wide. This way, there wouldn’t be any trimming of the ends of the boards. Just choose eight foot long pieces. 

Now, it was time to show the students the materials available to them. I had found a list of lumber online that showed the names of the wood with the actual dimensions next to them. With this image on the screen in front of the class, I showed students how a two by four is actually 1 ½ inches by 3 ½ inches. A two by six, another common board measurement, is really 1 ½ inches by 5 ½ inches. And, a two by eight board is 1 ½” by 7 ¼”! 

The class needed a little guidance to get started with this lesson. I guided them through drawing a diagram of the important parts of their bench. We labeled the back, the seat, “And don’t forget about the single board that goes on top!” I told them. I had them figure out how many inches the mixed numbers would translate to. “Now, we have to fill these spaces (16 and 14 inches, respectively) with lumber,” I told them. “It would be easy if two by fours were actually two inches by four inches, but they aren’t! See if you can figure out how to make sixteen inches of surface using these mixed numbers.” I circled the widths of the “two bys” from the image. I had told them that we would only use those, because they need to be thick enough to hold a human’s weight. 

Using only 3 ½ (the width of a two by four) won’t work for the back of the bench. My students figured out that four of these boards will get you to exactly fourteen inches of wooden surface. That leaves you with a two inch gap, and “We don’t want any spaces. Neither can we saw any boards to resize them. There aren’t any boards that are exactly two inches wide. Can you take away one of the two by fours, and find a different size board that fits nicely?” 

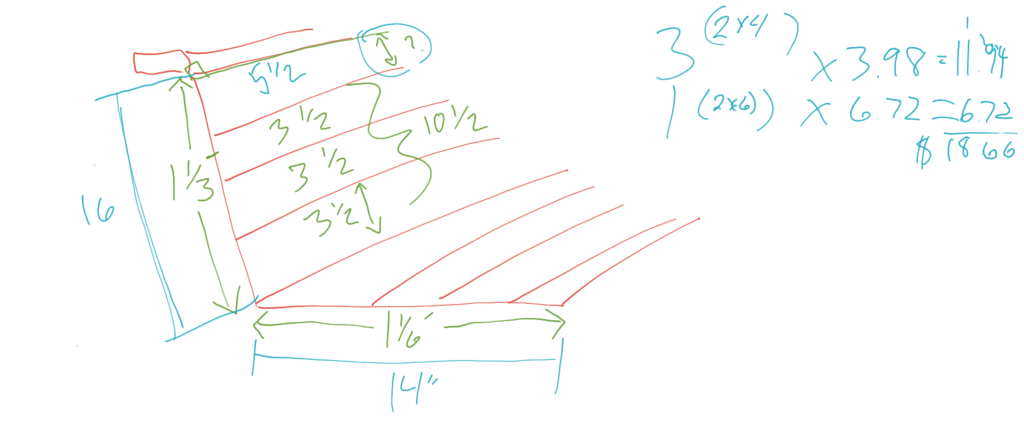
When my students take 3 ½ away from fourteen, they have 10 ½”. “What is the size of the space, now?” I ask this while pointing to a gap that I’ve illustrated on my drawing of the bench we are fixing. They figure out that the empty space is exactly 5 ½ inches wide. “Are there any 5 ½” wide boards that we can purchase?” Yes. The 2 by 6 is that width. 

Are we done? Definitely not! “You were all such hard workers and very good listeners that it is very difficult to decide who could be my writer,” I tell my class of math enrichment fourth graders. 

One of the students actually volunteered another, saying, “Nahum has really good hand-writing. You should have him write on the board.” 

“Are you nominating your friend?” I inquire. He admits it, and several students second the nomination, suggesting that Nahum really does have good handwriting. “Well, okay, then. Come on up here,” I extend the invitation and commend Nahum’s friend for being classy.

As Nahum prepares to write on the board, I open my laptop. I have pricing from a lumber yard ready to go. We now write down the amount of money each board will cost us. I have Nahum give the writing tool to other kids after he writes a couple of prices, so that more students get a chance to write on the board. We only supply the prices of the two-bys, because those are the only ones we are using. 

Students proceed to figure out the cost of 3 two by fours and 1 two by six. When they think that they are done with the project, I point out that we still have to figure out the seat of the bench. They happily begin problem-solving that challenge independently. It took a surprising amount of time for them to figure out that we had already answered the question of what boards could be used. The 4 two by fours that we had added up earlier had totalled exactly fourteen inches, which is the size of the seat! 

When they began adding up four prices of two by fours, I pointed out that we already knew how much three of them cost. “Why not just add the cost of one more to the first number?” I suggest. Grateful for the idea, they do this. 

Preempting the “I’m dones!” that were about to fill the room, I reminded them, “Don’t forget about that top board… The one that goes on the top of the back of the bench.” Happy groans and more pencil scratching ensued. 

Just when my students thought that they were finally done, and Mr. Weimann couldn’t come up with any more surprises, I told them, “It would be very classy if you figured out how much your parents would have to pay in sales tax.” Epic groaning accompanied smiles and students beginning to hunch over their iPads. I told them to use calculators and that our state sales tax was six percent. This was the icing on the cake. 

After a few seconds, I modeled for them, asking Siri, “What is six percent of thirty-eight dollars and fifty-six cents?” When she told me, I wrote it on the board for them. 

Because I had created Google Jamboards with all of the information preloaded on them, I was able to see each individual students’ work. I had waited until Nahum and partners had neatly written the prices into the slide with lumber details before I pushed the Jamboard out in a Google classroom assignment. I had the software “Make a copy for each student.” Students knew that, although they were allowed to work with partners and I helped them solve several parts of the problem on the board, they had to add their own version of the details, showing their work

Before students left my room I explained why two by fours are actually mixed numbers. The lumber is cut at exactly two inches by four inches, but when it dries, it shrinks. Of course the students wanted to know why lumberyards don’t correct for this or call the wood by another name. The young minds cried foul and felt tricked! I told them that it has been this way for a long time, it is easier to say “two by four” than “one and a half by three and a half,” and the price of the wood that you feel like you are being cheated out of goes into having to store it while it dries, before selling it. It isn’t like the mill cuts a two inch by four inch pied of wood for you to bring home, you build with it, and it shrinks on your home. That would be worse. In the same way that creating this lesson required several steps, when one wants to make and use a two by four, you measure the wood, cut the lumber, let it dry, measure it again, and then you can work with it.

Buttery Batch of Math Cookies

This is the introduction that I used on my fifth graders.

In preparation for teaching a math enrichment lesson to my fifth graders, I looked at the iReady “Extension” activities in the Ready Math “Teacher Toolbox,” and I found a problem that I liked a lot. (iReady and Ready Math are products of Curriculum Associates. My district has been using it for several years, and I like it a lot.) This lesson (14) is all about using fractions to solve word problems.

Here’s an image of the worksheet that a teacher could photocopy or share via Google classroom. Because I have the luxury of actually teaching enrichment lessons, I decided to do some explaining before handing over the problem. Also, I opted to make a few tweaks, too. In my experience recipes usually call for specific measurements of butter, not a number of “sticks.” Therefore, I covered up the word sticks in the problem and wrote in “cups.”

This changed the outcome of the answer quite a lot. Now, students would not have enough butter to complete the recipe. They could access new sticks of butter, but if they did that, then solving the problem wouldn’t require wrestling with all of the fractions presented in the partial sticks. That’s when I imagined the real-life experience of baking cookies after having worked all day at making a big meal, like Thanksgiving.

Needing soft butter for recipes is a real thing. Also, who doesn’t love consolidating? We can clean up all of those partial sticks of butter and make cookies at the same time!

I shared what a typical day of cooking in preparation for a large Thanksgiving meal looks like at my home with my fifth grade students, setting the stage for having several fractions of sticks hanging around. With the instruction to use up the warm butter first, and then dip into the cold butter from the new package, I set my students loose to calculate how much butter would be left.

Many students jumped on adding up all of the fractions. They began figuring out compatible denominators, so that they could combine every partial stick and find out what they had in all. “But, do you have to do that?” I asked them. No one wanted to venture a guess.

“What are you asked to find?” I pressed.

“Two and half cups of butter,” someone accurately answered. Without saying anything, I drew two of the worst cups ever drawn on an interactive board, followed by half of a third. I made fun of my drawings, which everyone helped with, pitching in their own digs. Once that settled down, I pointed out the lines I’d drawn through the middle of each measuring cup.

“Why’d I do that?” Earlier, we had discussed that fact that one entire stick of butter was the equivalent of half a cup. The students understood better than they could put it into words, so I articulated the concept for them, “Each half of a cup was one stick of butter.”

Then, we looked back at the fractions. It was easy to see that 1 2/3 + 1/3 would be able to fill one whole measuring cup. That leaves us with three fractions with differing denominators. “Before working out a common denominator to add up all three, think about what you are trying to do,” I instructed. “What is your aim?”

I showed the students that 1/2 a stick of butter + two of the 3/4 would equal one whole. “That would take care of half of a measuring cup,” I told them. Also, I should mention that I crossed out halves of measuring cups, as we discovered combinations of partial sticks of butter that would fill them.

“If we used up two of the quarters to combine with the 1/2 a stick and create a whole stick, how many quarters are left?” One quarter. “And then, we have 5/8 of different stick left.”

They instantly got it. We were 1/8 short of a whole stick of butter. In the end we needed one whole cold stick of butter, plus 1/8 of an additional stick to add to all of our warm butter fragmented sticks to fill our two and a half measuring cups.

The Ready Math extension lesson (14) has a second question that I left as is. The catch is that my students used our additional left over cold butter (2 7/8 sticks) from my adapted first problem to solve it. I let them struggle with this one for a few minutes before I showed them the short cut of drawing pictures.

“You might think it childish to draw pictures,” I began. Fifth grade is the oldest grade in my school, so these were the seniors of the place. “…But, I find it easier to manage some problems when I sketch what is happening.” I had been watching them crunching numbers, making common denominators again, and subtracting fractions. Now, within a handful of seconds, I showed them how many quarters could be made from two sticks of butter! I pointed out the idea of labeling the quarters in order to keep track of my thinking. I wrote a B above each “batch” of cookies. Sure, I could just count the quarters, but when it came to the last stick, it will be important to identify what portions of butter will complete a batch.

As I divided the last rectangle into eighths, I asked, “What am I doing to this last stick of butter?”

Rather than answering my question, they were chomping at the bit to be the first to spew the solution to the problem. “Eleven and 1/8!” more than one fifth grader shouted at the same time.

“No, that’s incorrect,” I casually, but cautiously counseled. Rewording what they had yelled in order to make plain the problem with their answer, I said, “You cannot make 11 AND 1/8 batches.” The emphasis on the word “and” did the trick.

“You can make eleven batches, and you’ll have 1/8 of a stick left over,” a student corrected.

“Perfect,” I affirmed. “Drawing pictures might seem silly, but look at how simple it is to see the answer. We didn’t do any denominator work past doubling up the number of sections in the last stick. I hardly did any math, beyond simply counting!

“When you are taking standardized tests, you get scrap paper. Use it. Draw pictures. Illustrate word problems. Take the time to label parts of your illustrations. Make sure that you understand what you are being asked. What is your goal? What are you supposed to find? It’s not just a number. It is the solution to a problem. In real life, it is a key that will unlock a problem. Be a problem-solver; Not a human-calculator,” I told them.

Photo by Elliot Fais on Pexels.com

In conclusion, my aim is to turn these advanced math performers into problem-solvers. With this goal in mind, I try to make lessons that force students to use what they have learned in their regular math class in a way that is not only compatible with what they would find in the “real world,” but forces them to understand how to use the skills. I often allow my students to use calculators because the problems I prepare for them require more knowing what to do with the numbers than practicing running through algorithms. AI can learn how to crunch numbers, but will it be able to successfully manage a kitchen full of amateur chefs laughing, telling stories, and making meaningful memories, all the while measuring butter for cookies after already cooking and eating a Thanksgiving dinner?

To combat the threat of AI, don’t try to make humans better than machines. That just makes them more like machines. I say, grow the human-ness of students. This is getting pretty deep, so I’m going to go eat a buttery cookie while I chew on these ideas for a future blog;)

Wallpaper Based Learning: Math Enrichment

Who wants to see a picture of Mr. Weimann with hair?

EVERYONE, apparently. I used this hook to get students to pay attention to my pitch of wallpaper hanging. They hung on my every word. 

This was a math enrichment lesson, in which I presented a real world problem that my fourth grade advanced math students would struggle through, using many math concepts that they already know. Knowing what to do with the numbers is sometimes more than half of the problem.

When I was in college (the first time;), I began painting to pay my way. Back then, it was just the outside of homes (exterior painting). Upon graduating, I conducted an informal internship with a wallpaper hanger. He taught me all about interior painting; which is VERY different from slapping paint on siding; and he trained me to hang wallpaper. 

This pic is from 20 years ago.

I was 22 years old, had long, curly, brown hair, and according to my students who did end up earning the privilege of viewing my old photos, quite tan (nearly all of them commented on this fact;). I worked with the professional wallpaper hanger for a little less than a year, hanging all kinds of paper in all kinds of homes. 

About half of his work came from a restoration company that did insurance projects. These homes had suffered water, smoke, or fire damage.

Unlike a company that specializes in a niche of upper-middle class single family repaints, this work brought us into a wide range of residences. I worked in downtown Philadelphia and on the Main Line, a very wealthy area–This place has both Ferrari and Lamborghini dealerships, among others!

This was one of the stranger bathrooms I papered. I had to paper inside that skylight.

We rehung thick, tough paper on basement ceilings; and metallic, mirror-backed papers in tiny bathrooms. It wasn’t unheard of for me to have to remove several layers of paper in older homes, in order to get to a clean plaster surface. 

It was fun to see so many different types of homes, meet a variety of peoples, and travel all over the area. I learned a lot about problem-solving because every job was completely different, and you didn’t get paid until it was done, and done well. 

Eventually, I struck out on my own. I got married in 2000, and my wife Sonia and I started our own painting company called “Excellent Painting.”

We used feathers to produce the veins on this marbleized pillar.

We ordered lawn signs and door hangers, spread the word, and pioneered a full-service painting/wallpaper business that did it all! We even dabbled in faux finishes, popular at the time. Faux finish is when you use tricks and artistic techniques to make pillars and walls look like marble, stone, or wood.

Because we were the only company that could do all three, we got a lot of business, especially in the new developments that were popping up in suburban areas near where we lived. The market was ripe, and we were busy. 

This is a photo of one of our neighborhoods. We would literally move our equipment from one house to the next, working our way around the loop. Having the interior of your home decorated by Matt and Sonia Weimann was a must.

There are many components to running a successful business. You have to market the company, spreading the word, so that people know to call you. Then you need to return phone calls and perform estimates. Those estimates need to be cheap enough that people will hire you, but expensive enough to cover the costs of supplies and provide a livable income.

Eventually, you have to deliver on your promises. You have to be able to successfully perform the work that you estimated. Be prepared to follow up on complaints, questions, and problems. If you don’t, an infection of bad publicity will spread around the neighborhood, and you can write that group of homes off! Do things well, and reap the rewards of moving from house to house, cutting down on marketing costs and time. 

This is an advertisement from a small local paper that was mailed to many homes in our area. It was an awesome investment!

Many of the skills and lessons that I learned through entrepreneurship are tapped in my teaching. Some days the professional world mixes with pedagogical practice more than others. My favorite place to bring my background to life is in math lessons

The other day, I treated my fourth grade math enrichment class to a treat of problem-solving that had them working hard, thinking hard, and learning hard. The challenge was to help me come up with a price for wallpapering a couple of bathrooms.

I shared a photo of a bathroom that I papered several years ago. Many opinions about the bathroom were unsolicitedly shared by my students. In order to get them motivated, I asked, “Who wants to see a picture of Mr. Weimann (that’s me;) with hair?”

Instant quiet. Hands involuntarily went to mouths to clamp lips shut.

“Listen up.” I proceeded to explain that you don’t just glue wallpaper to walls. You have to perform all kinds of preparatory work. 

There’s taking down old paper, because many times the rooms that you are going to hang wallpaper in were rooms that were already wallpapered. This is a lot of work. You may not know this, but wallpaper is two layers. There is the thin vinyl layer that sometimes peels off in large flexible sheets, but other times has to be slowly, painstakingly, curse-your-existence-ly chiseled off of the walls in tiny, bitesize pieces; As, you can probably tell, I have had too many experiences like this! Then there is the backing, which more closely resembles actual paper. This, you wet and scrape off rather nicely. There are all kinds of tricks to removing wallpaper more efficiently, but suffice to say, you better estimate plenty of time for this part of your project!

You aren’t done preparing the walls for wallpaper when all of the old paper is removed, however. Before you move on, you have to clean off all of the old glue! If you don’t, your new paper may not adhere properly. You do not want your new wallpaper to fall off the walls or bubble up. This process is not only messy. It can be deceiving. The glue is transparent, so that it does not discolor the wallpaper. Cleaning it off of the walls requires diligent and frequent assessments. Run your fingers over a cleaned wall. If you feel anything slippery or slimy, it is probably glue that still needs to be scrubbed off.

People don’t hang wallpaper the way they used to. My students will probably never practice this skill. But, I shared all of this information with them, so that they could see that there is much more to crafts like this than what meets the eye.

Once my students had been prepped with the horrors of wallpaper work, I brought out some numbers. I kept it simple with easy fractions to work with.

We would charge one whole dollar per square foot for actually hanging up the wallpaper, ½ a dollar for taking down the old wallpaper (Once in a while rooms don’t have wallpaper to remove. Plus, you want to make this a separate price so that customers appreciate all of your hard work, and it doesn’t seem overpriced.), and ¼ of a dollar per square foot for prep work. (This would include cleaning the walls, caulking cracks, and spackling holes and other imperfections that the paper won’t hide.) These prices are from when I was first starting out. I actually did this kind of thing, regularly.

Next, I shared a simple floor plan with my students. Some of them recognized the blueprint for what it was. I showed them the illustration of doors and asked them what the rectangle representing a closet was. We discussed what was happening in the picture for a minute. And then, I told them that our customer wants to wallpaper the two bathrooms. 

The image was presented on an interactive Google Jamboard, so I could write on the board. I used a bright blue to rewrite the dimensions of the bathrooms in question. I told them that the ceilings were 8 feet high. When I turned around, I was met with incredulous faces. They had no idea what to do!

This was perfect, because it provided me an opportunity to teach. I told them that a good strategy when dealing with a difficult problem is to draw pictures. I drew four rectangles beside the image of the floor plan on the Jamboard. With a little prompting I got my fourth graders to figure out that we would need to find the square footage of the wall space that would be covered with wallpaper in order to create prices. “What are these four rectangles?” I asked. 

I’ll confess that the first time I did this lesson (I have an AM and a PM 4th grade math enrichment class) I tried drawing a three-dimensional image of the bathroom on the side of the floor plan, and this ended up being too difficult to understand. I ended up pulling each wall from my drawing out and making individual rectangle representations.

In my second attempt, I cut straight to the 4 walls. This was less confusing.

Either way, it required some spacial thinking to understand what to do with the numbers.
This was my first (AM) lesson.

Once it was established that my picture of 4 rectangles were in fact the walls, we labeled the dimensions: Each one was eight feet high, and two were one length, while the other two were a different length. 

In order to figure out the square footage of all of the walls, you solve the area of each, and add them together. This reads simple enough, but my students had never had to do anything like this before! 

It took a little convincing to show them why we needed the square footage at all. I used the dimensions of our classroom and kept it to only one surface; the floor.

“How big do you think our room is?” I prompted. After a couple of guesses, I told them that I thought it was about 30 by 15. I then paced out the floor and found it to be 11 paces by 6 paces. “If we calculate each pace to be worth 3 linear feet, what are the actual dimensions of the room?” Wait for it. My students knew to multiply 3 times 11 and 6, respectively.

“Are 30 and 15 easier to work with?” 

We used the dimensions of our classroom floor to practice. (The -100 was subtracting the cost of supplies.)

“They are compatible numbers,” Evie answered. I beamed with pride. We’ve been talking about using helpful numbers to do mental math a lot.

“That’s right; Much easier to work with. And, what is 30 times 15?” Blank stares. “What is three times 15?” Now we were thinking! When we figured out the answer to that, I wrote “15 X 3 X 10” on the Jamboard. “Thirty feels big, but pull it apart. It’s just 3 tens.” 

“So we know that the floor of the classroom is about 450 square feet. How much would it cost to wallpaper the floor… Of course no one would do this, but what would it cost?” Everyone quickly understood that it would cost $450, since each square foot would cost one dollar. 

“Now, let’s say that some maniac had already wallpapered the floor before we were asked to. What?! Crazy, I know, but what if… We would have to remove that old paper before we can apply any new paper. How much will that cost? It’s fifty cents per square foot,” I remind them. It doesn’t take long to figure out half of 450. 

“And, finally, there will be some prep work before actually wallpapering. That costs twenty-five cents per square foot.”

In order to illustrate this concept, I drew a square on a new, fresh Jamboard slide. I labeled it $1. Then I drew another square, the same size as the first, and drew a line down the middle. I labeled each half $.50. Before going any farther, my math enrichment students knew to halve the half

While a couple of kids knew what to do with the twenty five from $225, some didn’t. I told them to break apart the number. “Don’t think of it as 225. What is half of two hundred?” I wrote 100 on the board when they said it aloud. “What’s half of 25? How do you know that it’s 12 and a ½?” 

Evie-to-the-rescue-again explained that 24 divided by 2 is 12. The one extra that it takes to make it 25 can be split in half. “Nice,” I encouraged.

“So, how much would it cost to do the whole project on the floor of the classroom, provided some nut wanted to wallpaper a floor?” Staring students looked stunned. “You have the price for applying the wallpaper,” I said, circling the $450. “You have the price for removing the old wallpaper.” At that point, I circled the $225. “And, we just figured out that it would cost 112 and ½ of a dollar to prep the surface.” 

“Do we add it all up?” a hesitant student asked. 

“That’s right,” I said, trying to sound proud and hoping to steer my students toward feeling like they can do this. “Now, time to figure out what this bathroom would cost!”

I let them struggle a little before helping. They needed a bit of guidance. But, we figured out the square footage of all four walls. They did pretty good finding out what it would cost. And, the second bathroom was a little easier. 

A funny experience happened at the very end of the afternoon lesson. This PM group of fourth graders originally entered the room with the announcement that they already knew the answer to the problem.

A couple of them had walked in on me finishing up my morning math enrichment lesson. They confessed that they already knew the final answer to be $952, “or something.” 

I told them that I was going to change all of the numbers, so it will be different. They thought that sounded reasonable;)

I had intended to make the ceilings 9 feet tall for the PM class, but the concepts were difficult enough to understand that I didn’t feel like it was all that necessary. But, by the very end of the afternoon lesson, after I told the students to take the prices of the two bathrooms and add them together so that we can tell the customer how much it will cost… 

“Wait,” they exclaimed. “You didn’t change the numbers!” Huge smiles stretched across their faces. They loved being tricked.

“Look at that. You ended up needing to do all of the work, anyway.” We all laughed as they exited the room. 

Give Your Teaching Life by Using Real-Life Situations to Teach

It’s math enrichment time again. The pacing guide has the fifth graders learning to add and subtract fractions. Our curriculum has an enrichment lesson that students can work on independently. It’s a grid that has empty spaces that need to be filled in order to help every row and column add up to the same sum. I like these types of exercises because they are puzzles and make the practice feel like a game

This is the enrichment activity provided by iReady. It’s a good tool for independent practice, but I wanted to provide a “Math Experience.”

I view my job as a math enrichment educator as deepening the understanding of already mastered math skills. Puzzles and games are a great way to make the skills easier to access, faster to use, and more accurate. They are excellent tools for regular ed teachers to provide for those students who have demonstrated competency in a math concept. This style of enrichment activity is good for keeping the advanced students busy while the teacher catches everyone else up to speed. For my part, I aim at helping students see the math from a different perspective, though. 

I cut all of the tiles for the ceiling before attaching them.

It makes a grid of mixed numbers!

Diamonds are beautiful, rare, and expensive gems used to make jewelry, but did you know that they are also the hardest substance on Earth? In fact, the fragments that are cut away from a diamond when it is shaped for a piece of jewelry were used to make saws and drill-bits that can cut through rock (2023). I’ve had the experience recently of using a diamond-studded saw blade to cut through ceramic tile and marble to make a new shower in my house. Just like adding and subtracting fractions can be used to complete a pretty grid, they are also very useful in everyday life. I hoped to make my students’ understanding of fractions more rich (enriched) by having them use their skills to help me measure tile precisely. 

This was one of the most difficult home remodeling projects I’ve tackled. I should use it to teach my students, I thought to myself. So I did.

Welcome to math-enrichment, real-world experience-mode. This project was full of fractions–really! I was excited to share it with my students. 

The first thing I did was think about the different ways I had to work with fractions in order to make the ceramic tiles fit my shower walls. I came up with a math problem that involved quite a lot of fraction work. This will be good, I thought, but perhaps there’s a simpler one to begin with. Even though it’s not the first part of tiling, I decided to have my students measure the window sill, a piece of white marble that had to be exact because the sides of the frame were already tiled. 

I put a photo of my window, minus the sill, into a Google jamboard. The photo shows my tape measure. “I took this picture, so that I would remember the exact measurement when I was at the granite store ordering my marble. I don’t want the gap to be too big on either side of the marble, or it will look weird,” I tell my students. “What I want is for the gap to be the same size as all of the other gaps between tile in the shower, ⅛ of an inch.” After explaining the parameters of the problem, my students have a goal: Make the marble look nice. It will look nice if the measurement is just right. “The space we have to fill is exactly 28 ½ inches wide,” I informed my students. “What width will the marble be cut in order to leave ⅛ of an inch on either side? Go!”

Anyone with experience measuring with rulers and tape measures for cutting materials will understand that you can simply back up your finger or the material on the tool to find the answer. Fifth graders have not had this experience, yet. Also, we were sitting in a classroom, instead of holding a tape measure up to the empty window frame.

After letting my students wrestle with the fractions for a few minutes with a couple of them finding success, I showed the class how to look at the problem, by holding up a yardstick. I placed my finger at the 28 ½ inch mark. I slid my finger over a fraction (⅛) of an inch and asked them how much I just “cut” off of the marble. They saw that it shrank by ⅛ of an inch. “Now, we need to take ⅛ of an inch off of the other side, but do we move our finger ⅛ of an inch from the beginning of the yardstick?” I paused to let them imagine what would happen if we did that. “No, we include the subtraction of that ⅛ of an inch right here,” and I slid my finger over another fraction (⅛) of an inch. “Now, how wide is our marble?” 

Some of my students had written 28 and 2/8 on their papers. When we looked at the yardstick together, we discussed that it is better to say 28 and ¼ of an inch… “Not just because you are supposed to reduce your fractions! But, because one is easier and faster to count than two; plain and simple.” This set us up for our next problem, the one I had come up with originally, but put off until after having practiced some measuring, first. 

Time for some tiling!

“Now, we need to cut some ceramic tile to fit my shower wall,” I pitched. “Remember, we want to keep gaps of ⅛ of an inch between everything; between the tile, between the corner of the wall and the tile, between the tile and the metal edging; everything.” (This isn’t just easy for students to forget. It is easy for someone measuring for actually tiling a shower to forget. I should know! I can’t tell you how many times I had to re-measure or recalculate because I forgot to account for the grout!) 

“Okay, so our wall is exactly 30 and ¾ inches wide, from the corner of the shower to the metal edging. I’ve already tiled the window wall,” I explained. “This 30 and ¾ inches is the space that we need to fill with tile and grout.” I showed them a tile and told them that it is two feet by one foot, rectangular. There was a photo of my shower wall in the Jamboard, too. I wanted them to visualize the final product. While I had written the entire problem into a Google jamboard, I shared the problem with them orally, also. It was easy for me to communicate, because I just did this! It was fresh on my brain. 

“We will be alternating the tile,” I told them. “We begin at the bottom of the shower wall and work our way up. The first row will begin with a whole piece of tile placed in the corner. The next row will begin with half of a tile starting at the corner, and so on.”

“Guess what,” I exclaimed. “I have a treat for you: The tile that you thought (I thought;) was two feet wide isn’t! Like everything else in life, it is a little short; a quarter of an inch short to be precise. It’s your job to figure out exactly how wide to cut the tile that will fill the gap that is left within the 30 ¾ inches space. Don’t forget about the ⅛ inch grout between everything! Go.” 

Student mouths hung slack-jawed. I used the Jamboard to demonstrate the math. I drew lines that represented the sides of the shower wall. “This is the corner,” I told them, pointing to the line on the right. “And, this is the metal edging that is the end of our tiling.” I pointed at the line on the left when I said this. “Now, how wide is the space between the two lines?” I prompted. 

It took some waiting, but finally one of the students ventured, “Thirty inches?” 

“Thirty and what?” I reminded them.

“Three quarters of an inch,” they completed. I told my students that this was the width of my tub (30 ¾ inches).

“Okay,” and I wrote the complete distance in the space between the two lines. “Now, let’s begin by allocating ⅛ of an inch over here.” I drew a little circle next to the line that represented the corner. “What comes after the ⅛ inch of grout?” Pause. Wait. Patiently persist in waiting. “Look back at the problem.”

“A tile,” someone says out loud.

“Yes,” I affirm the correct answer. “We put a whole tile on the wall. How much distance does that take up?” I went ahead and wrote on the Jamboard while they were thinking: 24” – ¼ of an inch.

“23 and ¾ of an inch,” a student answered before I was done writing. Pleased, I put the length into the designated space in our row of tile. 

“Now what?” I asked.

“We figure out how wide the remaining space is,” a student said in a half statement/half question.

“Yes, but…” I wanted to provide positivity, but needed to help them toward accuracy. “Don’t forget about the ⅛ of an inch on either side of the remaining tile. You have to leave space (⅛”) between the two pieces of tile and also a space (⅛”) over here.” I drew tiny circles and labeled them on the Jamboard. “Use all of these measurements to figure out where I will cut my tile to place on the wall,” I told them. “Be careful!” I warned. “I don’t want to waste any tile. I have just enough.”

There were a few ways to figure out the answer. You could add up all of the fractions. And then, subtract the mixed number from 30 ¾ inches. You could also subtract each individual “space” away from 30 ¾ inches to see what is left. This method is like sliding your finger down the yardstick. After letting the students try the math on their own, we discussed. 

If you thought that the previous problems were difficult, buckle up. “Now, I have a real treat for you,” I told my students. “That first whole tile; The almost two feet wide tile; We have to cut a hole in it. The spout for my tub has to go through it.” Groans. “That’s right! I want the pipe, which is exactly one inch in diameter, to be in the center of my wall. What does that mean?”

“Halfway,” someone says. 

“Yes.” I let that sink in. “How far from the corner is the pipe?”

One of my fraction experts quickly tells me that it ought to be placed 15 ⅜ inches from the corner. I was pretty impressed, and had the student explain how he had converted ¾ into 6/8 in order to divide the fraction in half. 

“That’s right, but that is the center of the pipe,” I tell them. After explaining the term diameter, I point out that half of an inch will be on one side of 15 and ⅜ and half an inch on the other. “Where do we cut the hole for the pipe? …Don’t mess up! We don’t want to waste a great big whole tile!!”

After they fight with fractions for a minute, I remind them of the ⅛ inch of grout that precedes the beginning of the whole tile. Many groans follow this reminder. 

The whole lesson ends with me warning the students that, “After all of that measuring and math, you better be sure to cut the tile on the correct side of the line you draw, because your diamond blade will shave 1/16 of an inch off of whatever you’re cutting. In other words, you could figure out that the hole for your pipe has to be cut 14 ⅞ from the edge. Mark that measurement on your tile. And then, when you go to make the cut, slice the tile on the wrong side of the mark, which would make the distance from the hole to the edge of the tile 1/16 of an inch short. What would that be?” I posed the question, but didn’t actually expect them to figure it out. They knew I was messing with them, and they all gathered their things to leave. 

“Wait! What about our next row of tile?” I laughed as they left shaking their heads. 

Tony Wagner, the author of “Creating Innovators: The making of young people who will change the world” (2012), describes the practices of some highly effective schools. One of them is Olin College, a small engineering school that is pioneering hands-on learning.

“In classes at Olin, the primary goal is not the acquisition of knowledge. The goal is to develop a set of skills–or, in Jon Stolk’s terms, competencies–by solving a problem, creating a product, or generating a new understanding. Knowledge is important, but it is acquired on an “as needed” basis. It is a means to an end. Traditional academics often criticize this approach for being too utilitarian and lacking an appreciation of learning for its own sake, but the evidence is that Olin students are very well prepared for graduate school and better prepared for work, with managers who have been surveyed by the college reporting that Olin students who’ve just graduated act as if they’ve had three to five years of experience. Learning research shows that students understand and retain much more of what they learn when they have studied and used the knowledge in an applied context.” (Wagner, p. 175)

“When will we ever use this in real life?” is a question many math students will utter when trudging through seemingly pointless pedagogy. Infuse life into your teaching by showing how the lessons are used in real-life.  

Sources:

Development History of the Notched Rim Lapidary Diamond Blade. Barranca Diamond. (2023). https://www.barrancadiamond.com/home/history.html#:~:text=Richard%20Felker%2C%20a%20pharmacist%20develops,natural%20and%20manmade%20stone%20products.  

Wagner T. & Compton R. A. (2012). Creating innovators : the making of young people who will change the world (1st Scribner hardcover). Scribner. 

Deep Teaching with Story Telling

“All of that, just to teach this little lesson?”

How deep does your teaching go? One way to help students understand a concept and remember the lesson is to share a story. On Thursday I was teaching an idea about fractions that was difficult to grasp. We had been working on understanding this concept all week. I had drawn models on the board and number lines on students’ papers. A few simply were not getting it. I was at a loss. 

The lesson had to do with the fact that whenever the numerator is the same as the denominator, a fraction is equal to one whole. It doesn’t matter if it is 365 over 365 or 5/5, they both equal one whole. How? While I could stop at providing the rule, I like to explain the “why” of math. The following story ensued. 


This is my dad, well past his book-binding days.

When I was in high school, I had the worst job! (This got everyone’s attention.) At least it was my least favorite job. I worked in a factory. What we did was kind of cool. This factory bound books. It was a book bindery. My dad worked there. He was a manager, so he was in charge of a team of people who operated different machines. He got the jobs, planned out how to complete them, gave people orders, made sure things ran smoothly, fixed machines, and was responsible for shipping out completed jobs to happy customers. 

The book bindery had two parts. My dad’s part worked on orders of new books. The other part of the business would repair or re-bind old books. This part would get a shipment of books from university and school libraries in the summer. Workers would use a huge cutting machine to slice the spine of a book away. Then the front and back cover would be removed. A new cover would be made and glued onto the old pages that had been either glued or sometimes sewn together. The new cover would get stamped with the name of the book, author, and publisher. There was a different gigantic machine for each part of this process. This is where I worked for a summer right after graduating from high school. 

846-06111912 © ClassicStock / Masterfile Model Release: Yes Property Release: No 1930s ELDERLY FACTORY WORKER IN OVERALLS SMOKING PIPE PUNCHING TIME CARD

What was so bad about it? Sounds kind of neat, right? There was NO freedom. You had to “clock in” at 8 AM, sharp. It was best to do it a couple of minutes before eight. If you were late, you’d get a “talking to.” A manager would come by and tell you that you had clocked in late too many times. One more and you were gone; You’d be fired. The manager might allow you to explain yourself, but there was no empathy. The clock was unforgiving, and you need to be on time. “Clocking in” meant getting your stiff paper card from a metal sleeve holding many cards, pushing it through a slot on the top of a metal machine displaying the time on the front. You’d push your card down until a cha-gump was heard. At the same time the sound happened, you would feel something grab your card. When you pulled it out, a time would be stamped on it. 

One more thing. It wasn’t a good idea to stamp your card more than a couple of minutes early, unless you had permission. The owners of the bindery did not want to pay anyone more than they had to, and if your card had any extra time on it, they would be responsible to give you money for that time. 

A book with the cover removed, you can see the stitching.

After clocking in, I would get to my workstation to pick up where I left off the day before. I was lucky. Whether it was because my dad worked in the other part of the bindery or I was good at it, I don’t know, but I got to operate “The Blade.” This was the gigantic cutting machine that sliced the spines off of old books. I also used it to trim the edges of pages, so that they were clean and straight for rebinding.

In order to work the machine, you would place the book onto a metal surface and push it against the back wall with the spine facing you. I would adjust the depth of the cut by turning a knob to move the book closer or farther away. When I had it just right, I would press a petal down with my foot. This lowered a metal wall that clamped the book down and held it in place. At this point I could see whether I had lined up the book just right or not. I might need to fine-tune the settings before making my cut. [I had to be careful, because if I cut off too much, the book will not have enough space on the inside of the pages for anyone to read it. If that happened, I’d just wasted an old book. You would get into big trouble if that were to happen. There are no do overs! If you didn’t cut enough off, then you could do it again, but you are wasting valuable time.] With the book held tight by the big clamp, I would push two buttons on either side of the front of the machine with the thumb of each hand, and a giant guillotine of a blade would swoosh down right in front of the clamp, slicing the spine away from the book.

Why the TWO thumb buttons? Let’s say you wanted to push a book against the back with one hand while slicing the binding away. You could accidentally cut every finger off of your hand with one fatal swish of that blade! Forcing you to use both hands at the same time ensures zero accidents. 

Unfortunately, other machines had work-arounds; ways to bypass the safety procedures; and even the cutting machine could be fooled. You could tape a piece of cardboard over one button, tricking the machine into thinking that one of your thumbs was pushing it in. Basically, there were opportunities to become seriously injured on the job. While management might give someone a hard time for doing something dangerous, they would also heap tons of pressure on everyone to achieve inhuman amounts of productivity. You constantly felt like you weren’t getting enough done fast enough. If only there was a way to quicken what you were doing. What if you eliminated one of the timely safety precautions…?

At 10AM a bell would ring, and we could take a fifteen-minute break. The workers would pile into a break room in the middle of the factory where picnic (ironic name) tables were set up. We did this even if it was a gorgeous summer day. It was probably better to NOT know how beautiful it was outside! At the tables we ate snacks, drank coffee, and chatted. There wasn’t any talking on the factory floor; chatting would slow down production, so this was a time for finding out what coworkers had done the night before. We read newspapers to find out what was happening in the world outside of the book bindery. 

10:15AM did not find us exiting the break room. We had better already be out of there and at our stations when the next bell rang. Anyone found lingering would get a talking to

Another bell would ring at noon. [While I was sharing all of this information with my students, I was drawing a timeline of my prison-like day on the dry-erase board.] You would go back to the break room. You better have a packed lunch, because there’s no running to McD’s, even though it was only 2 miles away. I tried it once and the stress of making it back to work on time equaled more indigestion than it was worth!

The factory floor was cement, which caused your feet to hurt. I piled up cardboard boxes to stand on, and I wore sneakers with thick soles, but once your feet hurt, there was no fixing them. Additionally, even though there wasn’t much of a dress code, we did have to wear pants. It was summer time when I worked at the book bindery. Even though the place had air conditioning, the owners were constantly adjusting the temperature to use as little power as possible. It always seemed a little too hot. 

It was difficult to avoid counting the hours between breaks and leading up to quitting time. When would the final bell ring?


Now, we get to the math of the story. I look to my students for an answer. Who can help me get out of here? What time did the final bell ring? I began my eight-hour day at 8AM. One student guessed, “6PM.”

“Was that a guess, or did you work that out?” I query. “Come on. Think. Eight to Noon would be how many hours?”

Another student half-guessed, “5PM.”

“You’re getting closer,” I hint.

You can probably imagine that someone figured out that eight hours would take me from 8AM to 4PM, but we have to account for the half hour of lunch. The owners aren’t going to pay me to eat. That was my time. The 15 minute coffee break in the morning was included in my work day. (Probably, this was meant to fuel productivity with a caffeine jolt, not to mention relieve the tension of not being able to talk all morning.)


Let’s say a guy has a medical condition that requires him to drink some medicine on the hour, every hour. If he takes a drink each hour of an eight-hour work day, his day is split into 8 parts; 8 hours = 8 parts. He doesn’t miss a dose, so he has had 8/8 drinks per day. The 8/8 is one day. 

I didn’t need to stop and take a drink. I only stopped during the allocated break times. With only two breaks, my day was split up into three parts. I work all three parts, so I work three out of my three parts. My 3/3 day is only one day, also. My friend and I both work a full eight-hour day, but mine is simply divided up differently. 

8/8 = 1

3/3 = 1

8/8 = 3/3

I’ve drawn timelines (number lines) on the board. It is easy to see that the same amount of time is broken up differently. 

If my friend keeps his medicinal drink in a 32 ounce water bottle, and his dosage is one ounce per hour, how many days will he be able to use the bottle before he has to refill it? 

How many doses will one day be? With each day broken up into eight equal parts (hours), the denominator will be 8. The total number of ounces (32) will be the numerator. The improper fraction will look like this: 32/8. Is there enough medicine for more than one day? A lot more. How much more?

How many eights go into 32? Or, how many eight-hour days can the 32 ounces be stretched over? You could do repeated subtraction. The water bottle will last four days. 


This Polite Pirate would be celebrating her birthday over the weekend. She got all dressed up on Friday to celebrate. I told her that she looked like a “boss.”

Before leaving this story and transitioning to a different lesson, my students had to know why on earth ANYONE would work at such a horrible place. I told them that there are pros and cons to nearly everything. First of all, this could very well be the only job that some of the workers could get. The book bindery employed many people who did not speak English. Once they were trained on how to operate a machine, they could do their job efficiently, and it didn’t matter that they could not communicate via the same language as the owners. Occupations that require more communicating might require people to know English. 

But, I knew English, so why did I work there? It was a summer job, and although the hourly wage was not very high, it was the only place that offered a full 40-hour work week to a temporary employee. Other businesses weren’t interested in investing training in a worker who would only be there for a few weeks. Also, if I worked over 40 hours, which the boss wasn’t too keen about, I’d get “time and a half.” Ooooh, I feel more math coming on… Groans. 

Many businesses only offer benefits, which include health insurance, to “full-time” employees. This title belongs to people who contract or agree to work a 40-hour week. Sometimes it is worth working a less attractive job, so that you can keep your family safe by having health insurance. This is the American way. 


I’ve told the Polite Pirates (my students) all about running my own painting business before becoming a teacher; There’s lots of math in those conversations! At this point in my explanation I point out that while running your own business means you are the boss, and you have freedom, it is a lot of work! Had the stress of making sure that I had future painting projects to do, because if my work dried up… Then what? There’s no money coming in! So, I had to do a lot of marketing, and that costs money. Then I had the pressure of finishing projects on time. Sometimes I had to work more than 40 hours in a week. Because I set prices with customers before beginning the projects, I didn’t make any extra money if I worked longer hours! And, what if I priced it badly? What if I thought that a job would be lucrative if I charged 300 dollars, only to find out that the product needed to complete the job would cost me $250? Don’t even get me started on spilled paint…! How much of that profit would be left if I had to buy a customer a new carpet? 

Working at a factory is, believe it or not, liberating from the stress of all of that responsibility. You punch in your time clock, put in your hours, punch out, and leave all of the thoughts of work at work. What you didn’t complete will be waiting for you to finish tomorrow. Let the manager stress out about how a job is going to get done. 

Finally, although this all sounds kind of awful, I am glad that I had the experience of working in the book bindery. I learned all about how books are put together, which was interesting. But, more importantly, I got to see first-hand a type of life that I may not have known had I not worked there. 

As I rose from my chair to erase my notes from the board, my students understood that all of that was to teach a simple lesson on fractions. “All of that, just to teach us about whole numbers…?” a few students said in surprise. Yup.