
It’s math enrichment time again. The pacing guide has the fifth graders learning to add and subtract fractions. Our curriculum has an enrichment lesson that students can work on independently. It’s a grid that has empty spaces that need to be filled in order to help every row and column add up to the same sum. I like these types of exercises because they are puzzles and make the practice feel like a game.

I view my job as a math enrichment educator as deepening the understanding of already mastered math skills. Puzzles and games are a great way to make the skills easier to access, faster to use, and more accurate. They are excellent tools for regular ed teachers to provide for those students who have demonstrated competency in a math concept. This style of enrichment activity is good for keeping the advanced students busy while the teacher catches everyone else up to speed. For my part, I aim at helping students see the math from a different perspective, though.

I cut all of the tiles for the ceiling before attaching them.
It makes a grid of mixed numbers!

Diamonds are beautiful, rare, and expensive gems used to make jewelry, but did you know that they are also the hardest substance on Earth? In fact, the fragments that are cut away from a diamond when it is shaped for a piece of jewelry were used to make saws and drill-bits that can cut through rock (2023). I’ve had the experience recently of using a diamond-studded saw blade to cut through ceramic tile and marble to make a new shower in my house. Just like adding and subtracting fractions can be used to complete a pretty grid, they are also very useful in everyday life. I hoped to make my students’ understanding of fractions more rich (enriched) by having them use their skills to help me measure tile precisely.

Welcome to math-enrichment, real-world experience-mode. This project was full of fractions–really! I was excited to share it with my students.
The first thing I did was think about the different ways I had to work with fractions in order to make the ceramic tiles fit my shower walls. I came up with a math problem that involved quite a lot of fraction work. This will be good, I thought, but perhaps there’s a simpler one to begin with. Even though it’s not the first part of tiling, I decided to have my students measure the window sill, a piece of white marble that had to be exact because the sides of the frame were already tiled.
I put a photo of my window, minus the sill, into a Google jamboard. The photo shows my tape measure. “I took this picture, so that I would remember the exact measurement when I was at the granite store ordering my marble. I don’t want the gap to be too big on either side of the marble, or it will look weird,” I tell my students. “What I want is for the gap to be the same size as all of the other gaps between tile in the shower, ⅛ of an inch.” After explaining the parameters of the problem, my students have a goal: Make the marble look nice. It will look nice if the measurement is just right. “The space we have to fill is exactly 28 ½ inches wide,” I informed my students. “What width will the marble be cut in order to leave ⅛ of an inch on either side? Go!”


Anyone with experience measuring with rulers and tape measures for cutting materials will understand that you can simply back up your finger or the material on the tool to find the answer. Fifth graders have not had this experience, yet. Also, we were sitting in a classroom, instead of holding a tape measure up to the empty window frame.
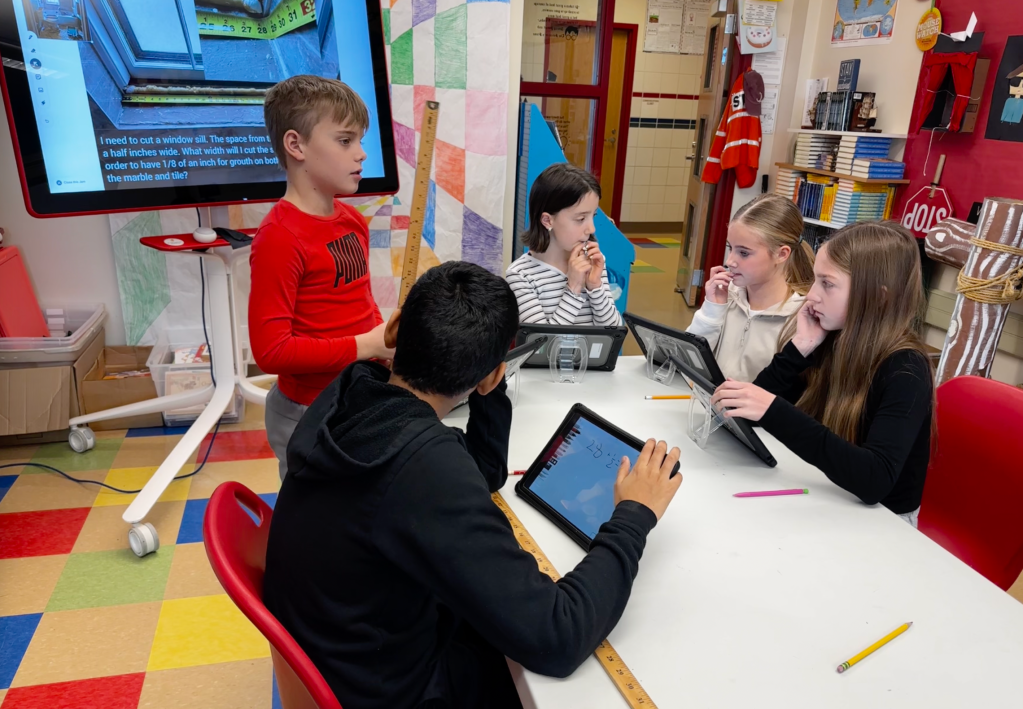
After letting my students wrestle with the fractions for a few minutes with a couple of them finding success, I showed the class how to look at the problem, by holding up a yardstick. I placed my finger at the 28 ½ inch mark. I slid my finger over a fraction (⅛) of an inch and asked them how much I just “cut” off of the marble. They saw that it shrank by ⅛ of an inch. “Now, we need to take ⅛ of an inch off of the other side, but do we move our finger ⅛ of an inch from the beginning of the yardstick?” I paused to let them imagine what would happen if we did that. “No, we include the subtraction of that ⅛ of an inch right here,” and I slid my finger over another fraction (⅛) of an inch. “Now, how wide is our marble?”
Some of my students had written 28 and 2/8 on their papers. When we looked at the yardstick together, we discussed that it is better to say 28 and ¼ of an inch… “Not just because you are supposed to reduce your fractions! But, because one is easier and faster to count than two; plain and simple.” This set us up for our next problem, the one I had come up with originally, but put off until after having practiced some measuring, first.

“Now, we need to cut some ceramic tile to fit my shower wall,” I pitched. “Remember, we want to keep gaps of ⅛ of an inch between everything; between the tile, between the corner of the wall and the tile, between the tile and the metal edging; everything.” (This isn’t just easy for students to forget. It is easy for someone measuring for actually tiling a shower to forget. I should know! I can’t tell you how many times I had to re-measure or recalculate because I forgot to account for the grout!)
“Okay, so our wall is exactly 30 and ¾ inches wide, from the corner of the shower to the metal edging. I’ve already tiled the window wall,” I explained. “This 30 and ¾ inches is the space that we need to fill with tile and grout.” I showed them a tile and told them that it is two feet by one foot, rectangular. There was a photo of my shower wall in the Jamboard, too. I wanted them to visualize the final product. While I had written the entire problem into a Google jamboard, I shared the problem with them orally, also. It was easy for me to communicate, because I just did this! It was fresh on my brain.
“We will be alternating the tile,” I told them. “We begin at the bottom of the shower wall and work our way up. The first row will begin with a whole piece of tile placed in the corner. The next row will begin with half of a tile starting at the corner, and so on.”


“Guess what,” I exclaimed. “I have a treat for you: The tile that you thought (I thought;) was two feet wide isn’t! Like everything else in life, it is a little short; a quarter of an inch short to be precise. It’s your job to figure out exactly how wide to cut the tile that will fill the gap that is left within the 30 ¾ inches space. Don’t forget about the ⅛ inch grout between everything! Go.”
Student mouths hung slack-jawed. I used the Jamboard to demonstrate the math. I drew lines that represented the sides of the shower wall. “This is the corner,” I told them, pointing to the line on the right. “And, this is the metal edging that is the end of our tiling.” I pointed at the line on the left when I said this. “Now, how wide is the space between the two lines?” I prompted.

It took some waiting, but finally one of the students ventured, “Thirty inches?”
“Thirty and what?” I reminded them.
“Three quarters of an inch,” they completed. I told my students that this was the width of my tub (30 ¾ inches).
“Okay,” and I wrote the complete distance in the space between the two lines. “Now, let’s begin by allocating ⅛ of an inch over here.” I drew a little circle next to the line that represented the corner. “What comes after the ⅛ inch of grout?” Pause. Wait. Patiently persist in waiting. “Look back at the problem.”
“A tile,” someone says out loud.
“Yes,” I affirm the correct answer. “We put a whole tile on the wall. How much distance does that take up?” I went ahead and wrote on the Jamboard while they were thinking: 24” – ¼ of an inch.
“23 and ¾ of an inch,” a student answered before I was done writing. Pleased, I put the length into the designated space in our row of tile.
“Now what?” I asked.
“We figure out how wide the remaining space is,” a student said in a half statement/half question.
“Yes, but…” I wanted to provide positivity, but needed to help them toward accuracy. “Don’t forget about the ⅛ of an inch on either side of the remaining tile. You have to leave space (⅛”) between the two pieces of tile and also a space (⅛”) over here.” I drew tiny circles and labeled them on the Jamboard. “Use all of these measurements to figure out where I will cut my tile to place on the wall,” I told them. “Be careful!” I warned. “I don’t want to waste any tile. I have just enough.”
There were a few ways to figure out the answer. You could add up all of the fractions. And then, subtract the mixed number from 30 ¾ inches. You could also subtract each individual “space” away from 30 ¾ inches to see what is left. This method is like sliding your finger down the yardstick. After letting the students try the math on their own, we discussed.
If you thought that the previous problems were difficult, buckle up. “Now, I have a real treat for you,” I told my students. “That first whole tile; The almost two feet wide tile; We have to cut a hole in it. The spout for my tub has to go through it.” Groans. “That’s right! I want the pipe, which is exactly one inch in diameter, to be in the center of my wall. What does that mean?”
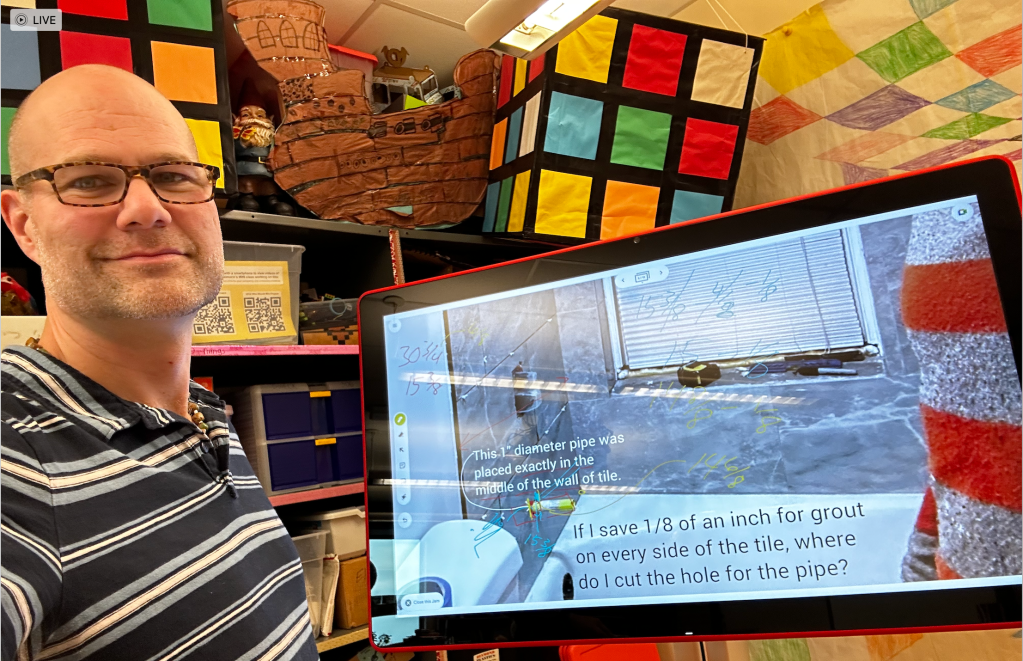
“Halfway,” someone says.
“Yes.” I let that sink in. “How far from the corner is the pipe?”
One of my fraction experts quickly tells me that it ought to be placed 15 ⅜ inches from the corner. I was pretty impressed, and had the student explain how he had converted ¾ into 6/8 in order to divide the fraction in half.
“That’s right, but that is the center of the pipe,” I tell them. After explaining the term diameter, I point out that half of an inch will be on one side of 15 and ⅜ and half an inch on the other. “Where do we cut the hole for the pipe? …Don’t mess up! We don’t want to waste a great big whole tile!!”
After they fight with fractions for a minute, I remind them of the ⅛ inch of grout that precedes the beginning of the whole tile. Many groans follow this reminder.
The whole lesson ends with me warning the students that, “After all of that measuring and math, you better be sure to cut the tile on the correct side of the line you draw, because your diamond blade will shave 1/16 of an inch off of whatever you’re cutting. In other words, you could figure out that the hole for your pipe has to be cut 14 ⅞ from the edge. Mark that measurement on your tile. And then, when you go to make the cut, slice the tile on the wrong side of the mark, which would make the distance from the hole to the edge of the tile 1/16 of an inch short. What would that be?” I posed the question, but didn’t actually expect them to figure it out. They knew I was messing with them, and they all gathered their things to leave.
“Wait! What about our next row of tile?” I laughed as they left shaking their heads.
Tony Wagner, the author of “Creating Innovators: The making of young people who will change the world” (2012), describes the practices of some highly effective schools. One of them is Olin College, a small engineering school that is pioneering hands-on learning.
“In classes at Olin, the primary goal is not the acquisition of knowledge. The goal is to develop a set of skills–or, in Jon Stolk’s terms, competencies–by solving a problem, creating a product, or generating a new understanding. Knowledge is important, but it is acquired on an “as needed” basis. It is a means to an end. Traditional academics often criticize this approach for being too utilitarian and lacking an appreciation of learning for its own sake, but the evidence is that Olin students are very well prepared for graduate school and better prepared for work, with managers who have been surveyed by the college reporting that Olin students who’ve just graduated act as if they’ve had three to five years of experience. Learning research shows that students understand and retain much more of what they learn when they have studied and used the knowledge in an applied context.” (Wagner, p. 175)
“When will we ever use this in real life?” is a question many math students will utter when trudging through seemingly pointless pedagogy. Infuse life into your teaching by showing how the lessons are used in real-life.
Sources:
Development History of the Notched Rim Lapidary Diamond Blade. Barranca Diamond. (2023). https://www.barrancadiamond.com/home/history.html#:~:text=Richard%20Felker%2C%20a%20pharmacist%20develops,natural%20and%20manmade%20stone%20products.
Wagner T. & Compton R. A. (2012). Creating innovators : the making of young people who will change the world (1st Scribner hardcover). Scribner.

2 thoughts on “Give Your Teaching Life by Using Real-Life Situations to Teach”